
A common requirement in Oracle APEX forms: when the user picks one option, another field must be locked. For example, an order form with a Delivery Method radio group, where the Delivery Address must not be changed when the method is Pickup.
The obvious solution is a dynamic action with the Disable action. It looks right on the screen, but when the user saves the form, the value of the disabled field is lost, or APEX shows an error such as "Delivery Address must have some value". This article shows why that happens and how to make the field read only instead, so the value is kept and still looks clear to the user.
The Problem with Disable
The demo form below has a dynamic action on the Delivery Method radio group: when the value is Pickup, it disables the Delivery Address item. Mary Johnson's order is a pickup, so the address is disabled and shown in a faded gray:
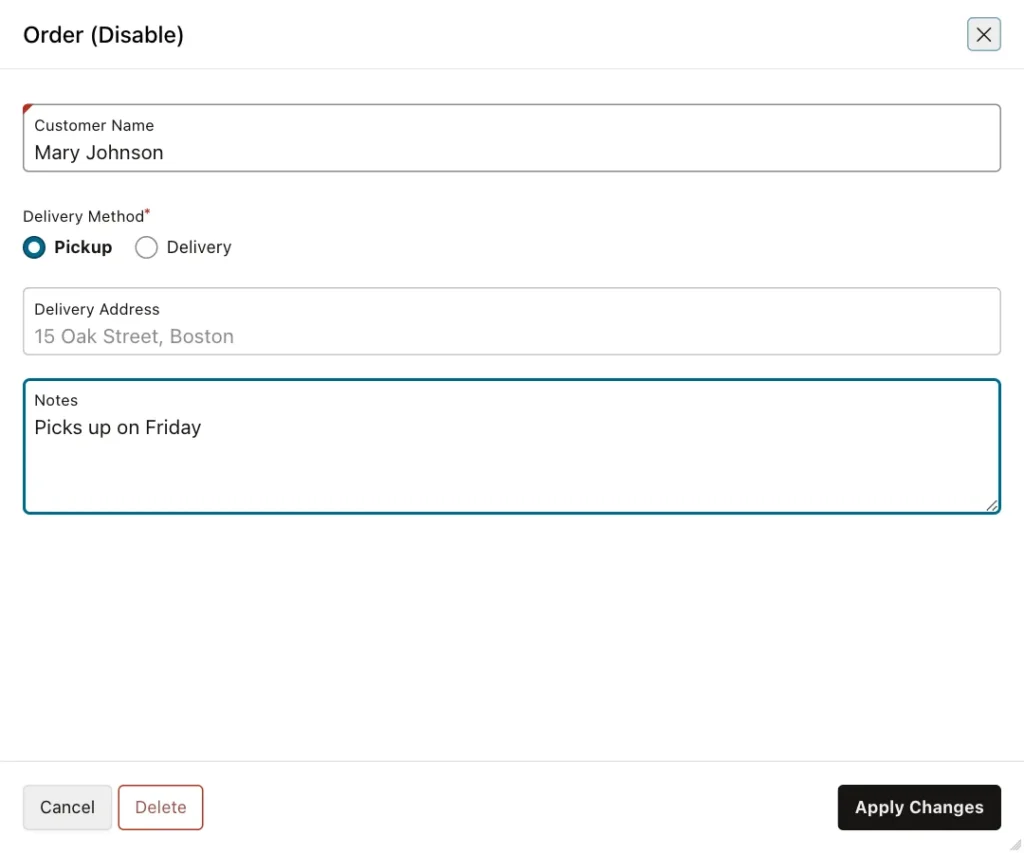
The user changes only the notes and clicks Apply Changes. The save succeeds, but the address is gone:

If the Delivery Address item is required, the save fails instead, although the address is visible on the screen:
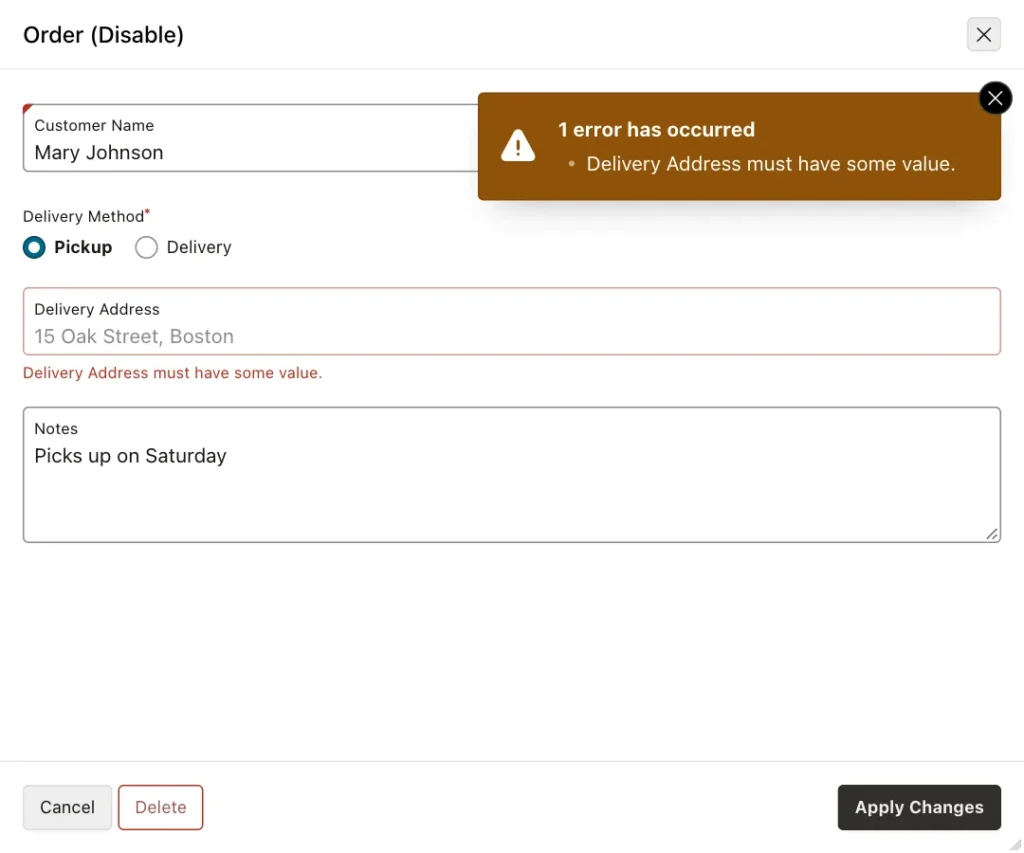
The reason is in HTML itself: the browser never sends a disabled field with the form. APEX receives no value for the item, so it treats the item as empty. The form process then writes NULL to the column, or a required check fails. The same happens when you disable an item in JavaScript with apex.item("P5_DELIVERY_ADDRESS").disable().
The Fix: Read Only Instead of Disabled
A read-only field also cannot be changed by the user, but the browser still sends its value with the form. So the form saves the value that was already there. APEX has no dynamic action for read only, but one line of JavaScript does it, and a few lines of CSS give the field a clear, readable look instead of the faded gray of a disabled item.
The steps below use the page "Order (Read Only)", page 5 of the demo application, with the items P5_DELIVERY_METHOD (a radio group with the values PICKUP and DELIVERY) and P5_DELIVERY_ADDRESS (a text field).
Step 1: Add the JavaScript Function and CSS to the Page
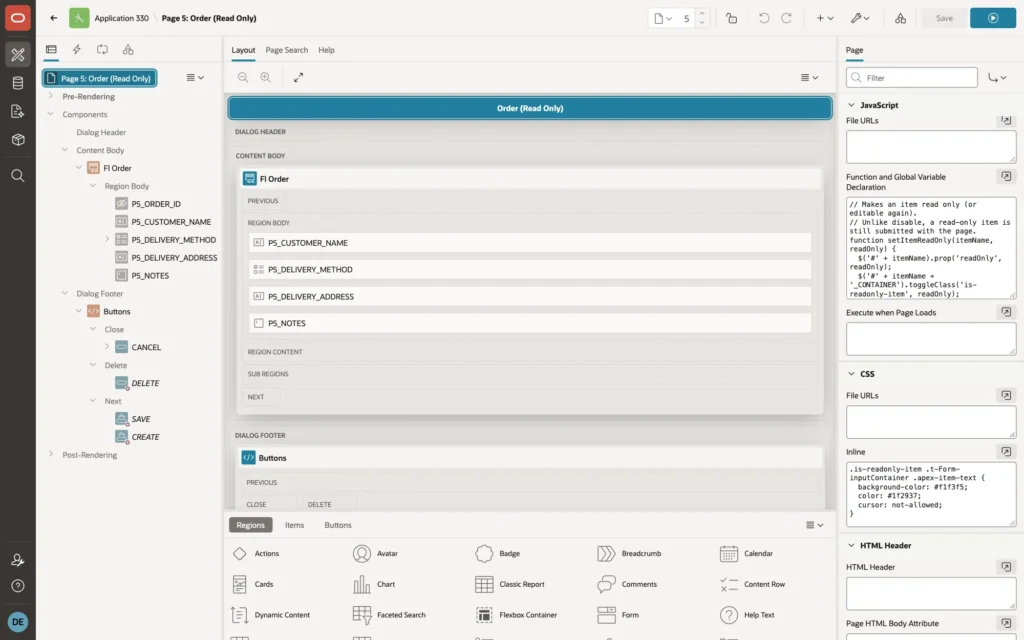
In Page Designer, click the page name at the top of the Rendering tree to show the page properties. In JavaScript, Function and Global Variable Declaration, enter:
// Makes an item read only (or editable again).
// Unlike disable, a read-only item is still submitted with the page.
function setItemReadOnly(itemName, readOnly) {
  $('#' + itemName).prop('readOnly', readOnly);
  $('#' + itemName + '_CONTAINER').toggleClass('is-readonly-item', readOnly);
}
The function setItemReadOnly takes two parameters:
- itemName: the name of the page item, for example 'P5_DELIVERY_ADDRESS'.
- readOnly: true to make the item read only, false to make it editable again.
With true, it sets the readOnly property of the item, so the user cannot type into it, and adds the class is-readonly-item to the item's container for the styling in the CSS below. With false, it removes both, and the item works as a normal field again. In both cases the item stays enabled, so its value is always submitted with the page. You can call it for any text field on the page, for example setItemReadOnly('P5_CUSTOMER_NAME', true).
Then, in CSS, Inline, enter:
.is-readonly-item .t-Form-inputContainer .apex-item-text {
  background-color: #f1f3f5;
  color: #1f2937;
  cursor: not-allowed;
}
This gives a read-only text field a light gray background with dark text, so it is clearly locked but still easy to read.
Step 2: Create the Dynamic Action
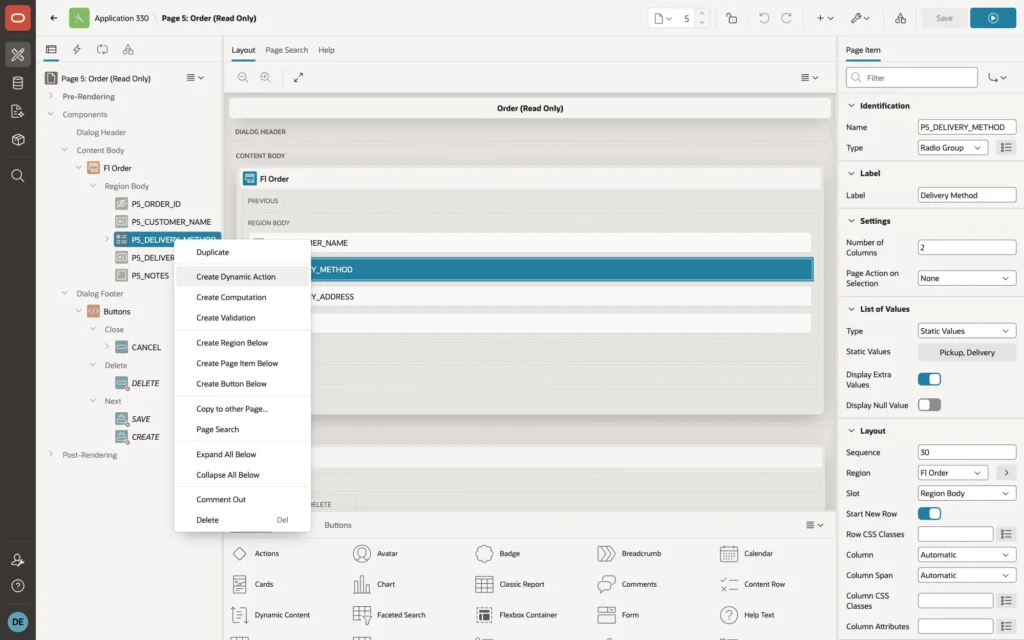
In the Rendering tree, right-click the radio group P5_DELIVERY_METHOD and choose Create Dynamic Action:
Select the new dynamic action and set:
- Identification, Name: Address only for delivery
- When, Event: Change
- When, Selection Type: Item(s), Item(s): P5_DELIVERY_METHOD
- Client-side Condition, Type: Item = Value
- Client-side Condition, Item: P5_DELIVERY_METHOD, Value: PICKUP
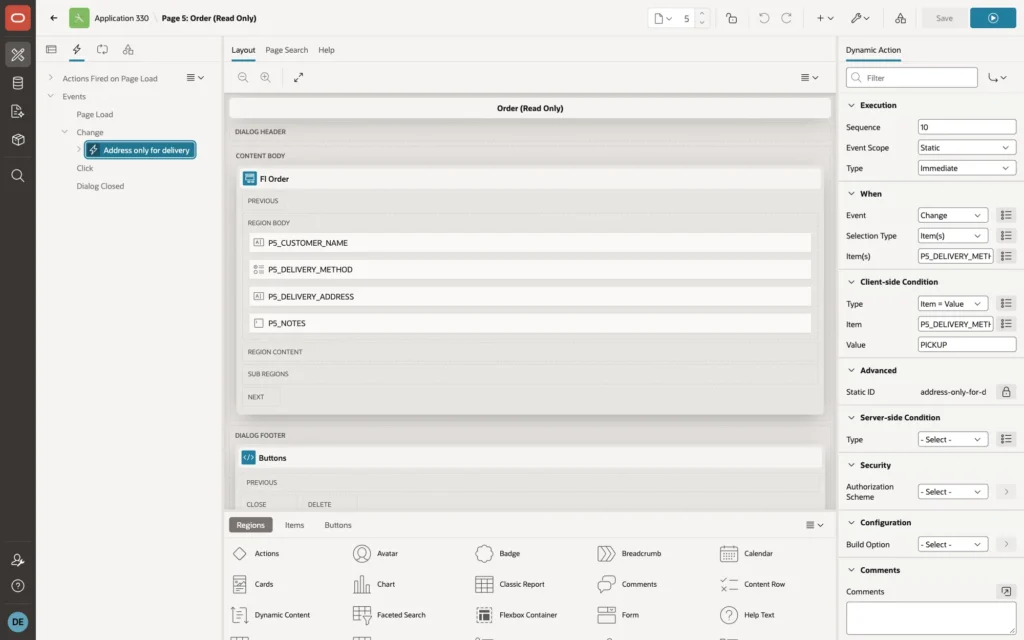
With a client-side condition, the dynamic action has two branches: True actions run when the method is Pickup, False actions run for any other value.
Step 3: Add the True Action
Select the action under True and set:
- Identification, Action: Execute JavaScript Code
- Settings, Code: setItemReadOnly('P5_DELIVERY_ADDRESS', true);
- Execution, Fire on Initialization: On
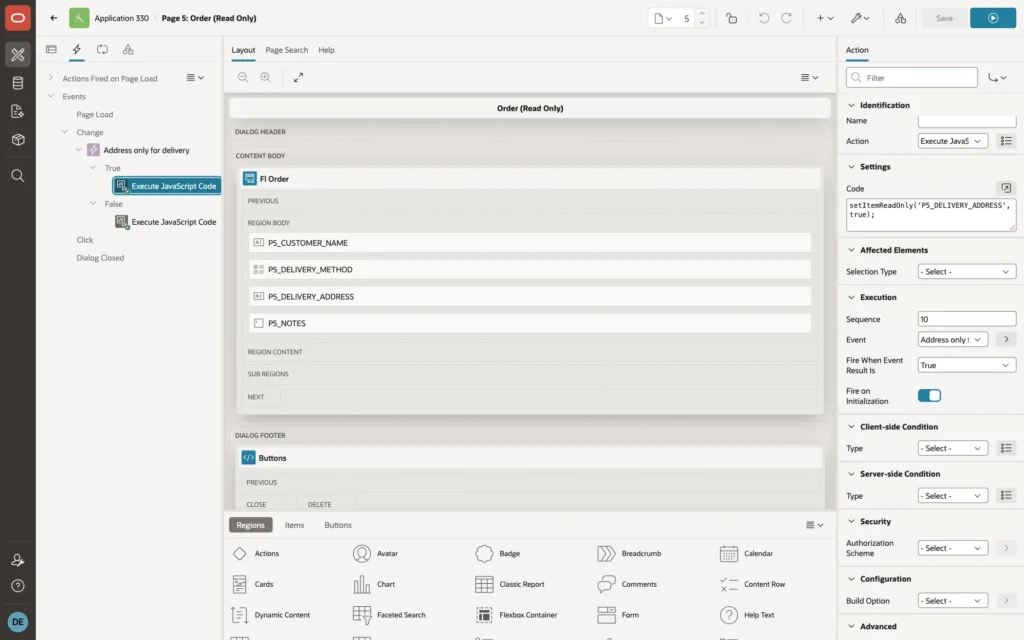
Fire on Initialization runs the action when the page opens, so an order that is already a pickup opens with the address locked.
Step 4: Add the False Action
Right-click the True action and choose Create Opposite Action, or right-click False and create an action. Set:
- Identification, Action: Execute JavaScript Code
- Settings, Code: setItemReadOnly('P5_DELIVERY_ADDRESS', false);
- Execution, Fire on Initialization: On
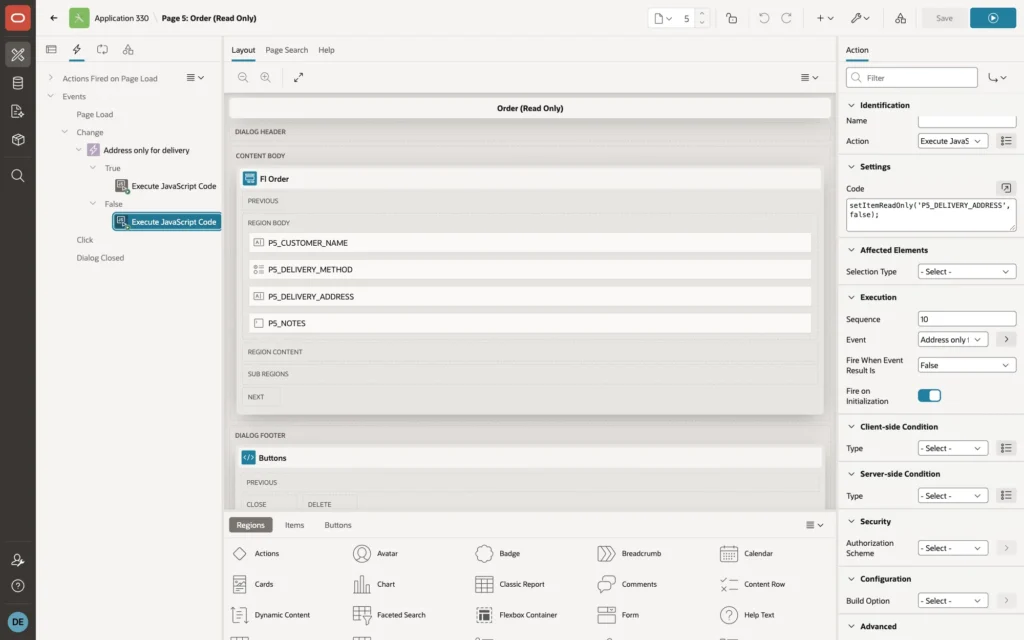
Click Save.
The Result
Open Mary Johnson's order again. The address is locked, with dark, readable text on a light gray background:
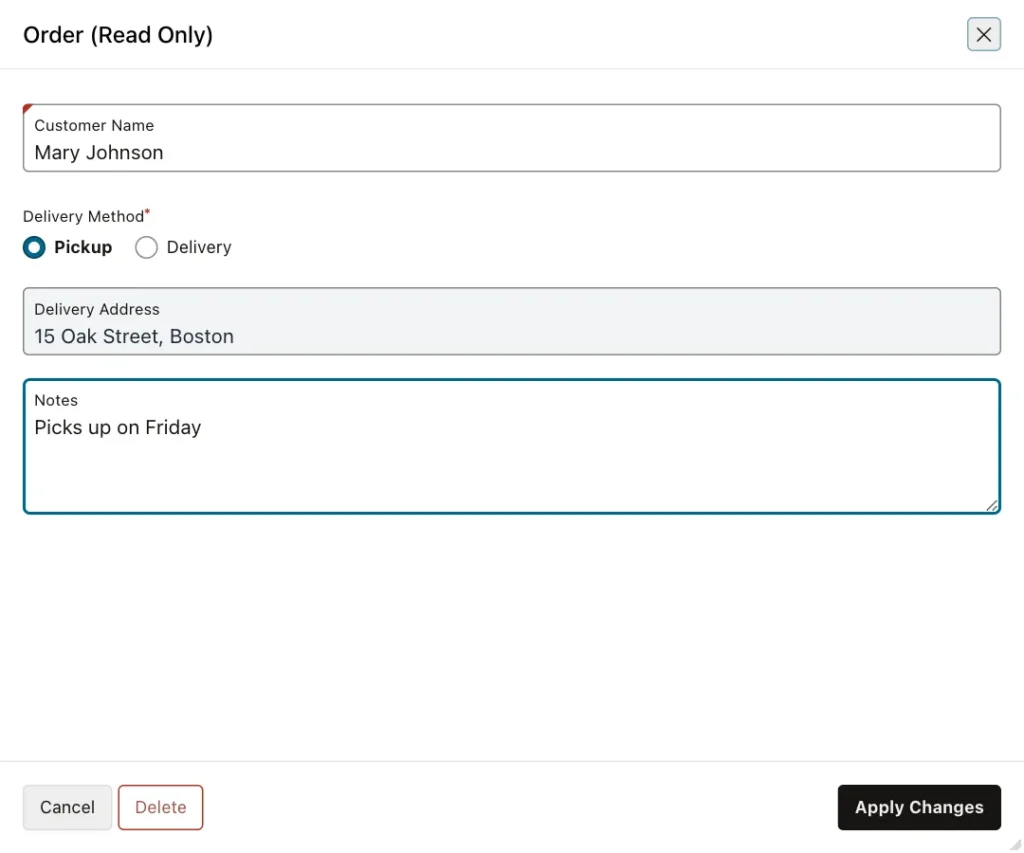
Typing into the address does nothing. Switching to Delivery makes it editable again, and switching back to Pickup locks it. Change the notes and click Apply Changes: this time the address is saved unchanged.

Good to Know
- The readOnly property works for text fields, number fields, and textareas. For a textarea, add its class to the CSS selector: .is-readonly-item .t-Form-inputContainer .apex-item-textarea. Select lists, radio groups, checkboxes, and switches ignore readOnly, so they need a different approach.
- Read only, like disabled, only works in the browser. A user who knows the browser's developer tools can still change the value. If the value must not change on the server either, add a validation or a process that checks it.
- To use setItemReadOnly on several pages, move the function and the CSS from the page into application files, in Shared Components, Static Application Files, and reference them in the User Interface attributes of the application.
- If you only need to show a value that the user never edits on this page, set the item's Read Only condition to Always in Page Designer instead. The form then keeps the value on save. That setting is decided when the page is rendered, so it cannot react to the user's clicks the way the dynamic action does.
Summary
Disabling a form item with a dynamic action or apex.item().disable() stops the browser from sending its value, so APEX saves NULL or reports a required-item error. Make the item read only instead: a small setItemReadOnly function, a few lines of CSS, and a dynamic action with an Execute JavaScript Code action for the True and False branches. The user cannot change the field, it stays readable, and the form saves its value correctly.
See my articles more often when you search Google.
