
Almost every piece of JavaScript you write in an Oracle APEX application touches a page item. You read what the user typed, fill in a value from somewhere else, hide a field that no longer applies, or check whether anything changed before the user leaves.
The apex.item API handles all of that through one consistent interface. A text field, a select list, a shuttle, a date picker, and a rich text editor all answer to the same methods, so you never need to know how each item type stores its value in the page. This guide covers every method of that interface, with a working example and its real output for each, plus three recipes you can drop into your own forms.
Quick Reference
| Method or property | What it does |
|---|---|
| getValue, setValue, value | Read and write the item's value |
| addValue, removeValue | Add or remove one value in a multi-value item |
| displayValueFor | Turn a stored value into the text the user sees |
| getMultiValueStorage, getSeparator | Find out how a multi-value item stores its values |
| isEmpty, hasDisplayValue, isChanged | Check whether the item has a value, shows something, or was edited |
| disable, enable, isDisabled | Lock and unlock the item for editing |
| hide, show | Hide or show the item together with its label |
| setFocus, setStyle | Move the cursor into the item, or set one CSS property |
| getValidity, getValidationMessage | Run client-side validation and get its message |
| refresh, isReady, whenReady | Reload the item from the server, and wait for it to finish loading |
| getNativeValue | Number fields only: the value as a real JavaScript number |
| apex.item.isItem, create, addAttachHandler | Test whether an ID is an item, and build item plug-ins |
How to Run These Examples
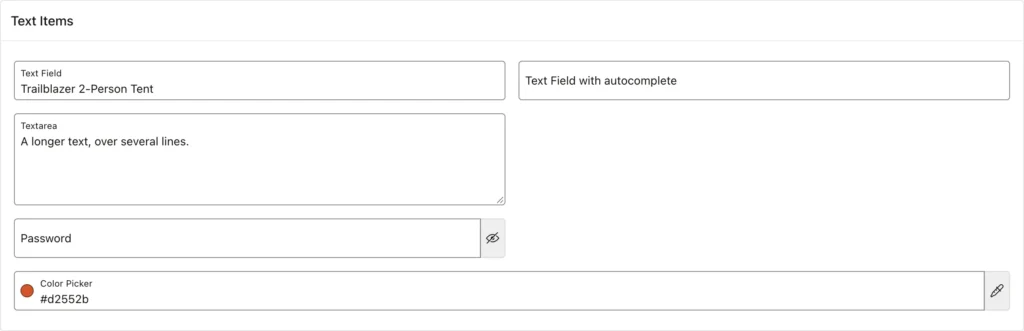
Every example below was run in Oracle APEX 26.1 on a test page that holds one item of every type, with names such as P20_TEXT, P20_NUMBER, and P20_SELECT_MANY. The output shown under each example is exactly what the browser console printed, not a reconstruction.
To try one yourself, open a page in your application, press F12 to open the developer tools, paste the code into the Console tab, and change the item names to ones on your page. For code you want to keep, put the same lines in a dynamic action with the Execute JavaScript Code action, or in the page's Execute when Page Loads attribute. If you are new to that side of APEX, the guide to JavaScript and CSS in Oracle APEX covers where code belongs.
The Item Interface and Its Properties
Calling apex.item with an item name returns that item's interface. It carries five properties, which are handy when you need to reach the underlying HTML or check what kind of item you are dealing with.
| Property | Type | Description |
|---|---|---|
| id | string or false | The ID of the item's main element, which for a page item is its name. False when the item is not on the page. |
| node | Element or false | The element that best represents the value. False when the item is not on the page. |
| element | jQuery | The item's element as a jQuery object, or an empty one when the item is not on the page. |
| item_type | string | The type of item, such as NUMBER or DATE_PICKER. |
| value | string or Array | A shortcut for getValue and setValue. |
const date = apex.item("P20_DATE");
console.log("id:", date.id);
console.log("item_type:", date.item_type);
console.log("node:", date.node.tagName, date.node.id);
console.log("element:", date.element.length, "element(s)");
Output:
id: P20_DATE
item_type: DATE_PICKER
node: A-DATE-PICKER P20_DATE
element: 1 element(s)
Look at what the node of a date picker turns out to be: an a-date-picker element, not an input. That is exactly why you should read values through getValue rather than reaching into node.value yourself, because the markup behind an item type can change between releases while the interface stays the same.
value
Reading the value property calls getValue, and assigning to it calls setValue. It keeps simple code short, but reach for setValue when you need its extra parameters.
item.value → string | Array
item.value = pValue
const text = apex.item("P20_TEXT");
console.log(text.value);
text.value = "Glacier Trekking Poles";   // the same as setValue
console.log($v("P20_TEXT"));
Output:
Trailblazer 2-Person Tent
Glacier Trekking Poles
Reading and Setting Values
getValue
Returns the item's current value: a string, or an array of strings for items that hold several values, such as a shuttle, a checkbox group, or a select list with multiple selection.
item.getValue() → string | string[]
console.log(apex.item("P20_TEXT").getValue());
console.log(apex.item("P20_NUMBER").getValue(), typeof apex.item("P20_NUMBER").getValue());
console.log(apex.item("P20_SELECT_MANY").getValue());
Output:
Trailblazer 2-Person Tent
1,250.00 string
[]
Two results in that output catch people out. The number field returns formatted text, "1,250.00", rather than a number, and an empty multi-value item returns an empty array rather than an empty string. Both are covered further down.
Keep in mind where the value lives. The initial value comes from session state when the page renders, but anything the user or your code changes afterwards exists only in the browser until the page is submitted or the item is sent to the server in an Ajax call. The guide to session state in Oracle APEX explains why that distinction causes so many "my value didn't save" bugs.
setValue
Sets the item's value and fires its change event, so dynamic actions and any other listeners react exactly as if the user had changed it.
item.setValue(pValue, [pDisplayValue], [pSuppressChangeEvent])
| Parameter | Type | Description |
|---|---|---|
| pValue | string or string[] | The value, or an array of values for multi-value items. |
| pDisplayValue | string | The text to show, for items that cannot look it up themselves, such as a popup LOV that has not loaded its list. |
| pSuppressChangeEvent | boolean | Pass true to set the value without firing the change event. Defaults to false. |
apex.item("P20_TEXT").element.on("change", () => console.log("change event, new value:", $v("P20_TEXT")));

apex.item("P20_TEXT").setValue("Summit Down Sleeping Bag");
apex.item("P20_TEXT").setValue("Trail Runner Pack", null, true);   // no change event
console.log("value now:", $v("P20_TEXT"));

apex.item("P20_SELECT_MANY").setValue(["1", "3"]);                  // several values
console.log("select many:", apex.item("P20_SELECT_MANY").getValue());
Output:
change event, new value: Summit Down Sleeping Bag
value now: Trail Runner Pack
select many: ["1", "3"]
The handler printed a line for the first setValue call but not the second, because the second passed true as its third argument. Suppressing the event matters most when you set a value from inside a change handler, where letting it fire would trigger the handler again and start an endless loop.
The declarative equivalent is the Set Value dynamic action, and the Set Value dynamic action examples show when that is the simpler choice.
addValue
Adds one value to an item that holds several, such as a select many or a multi-value combobox. Item types that do not support multiple values simply ignore the call.
item.addValue(pValue, [pDisplayValue])
const many = apex.item("P20_SELECT_MANY");
many.setValue([]);
many.addValue("2");
many.addValue("4");
console.log(many.getValue());
Output:
["2", "4"]
removeValue
Removes one value from a multi-value item, leaving the rest in place.
item.removeValue([pValue])
const many = apex.item("P20_SELECT_MANY");
many.setValue(["1", "2", "4"]);
many.removeValue("2");
console.log(many.getValue());
Output:
["1", "4"]
displayValueFor
Returns the text the user would see for a given value: the label of a select list option, the text of a radio button, or the formatted version of a number. Pass an array to a multi-value item and you get the display values joined with commas.
item.displayValueFor(pValue, [pState]) → string
const department = apex.item("P20_DEPARTMENT");
const first = department.element.find("option[value!='']").first().val();
console.log(first, "is", department.displayValueFor(first));

const shuttle = apex.item("P20_SHUTTLE");
const values = shuttle.element.find("option").slice(0, 2).map((i, o) => o.value).get();
console.log(values, "are", shuttle.displayValueFor(values));

// Select Many loads its options when the user opens it: until then it has no display values
console.log(apex.item("P20_SELECT_MANY").displayValueFor(["1", "3"]));
Output:
1 is Camping
["11", "16"] are Backpacks, Base Layers
["1", "3"]
The last line is the one to understand. An item can only translate values it already knows, and a select many loads its options only when the user opens it, so before that it hands back the raw values unchanged. The optional pState parameter is for interactive grid column items, whose display can depend on whether the cell is read only.
getMultiValueStorage
Tells you how a multi-value item packs its values when the page is submitted: either separated by a character, or as a JSON array. This reflects the item's Multiple Values setting, and it returns null for single-value items.
item.getMultiValueStorage() → Object | null
console.log("select many:", apex.item("P20_SELECT_MANY").getMultiValueStorage());
console.log("shuttle:", apex.item("P20_SHUTTLE").getMultiValueStorage());
console.log("text field:", apex.item("P20_TEXT").getMultiValueStorage());
Output:
select many: {"type":"separated", "separator":":"}
shuttle: {"type":"separated", "separator":":"}
text field: null
getSeparator
Returns just the separator character of a multi-value item. It returns null for single-value items, and also for items that store their values as a JSON array.
item.getSeparator() → string | null
console.log("select many:", JSON.stringify(apex.item("P20_SELECT_MANY").getSeparator()));
console.log("checkbox group:", JSON.stringify(apex.item("P20_CHECKBOX_GROUP").getSeparator()));
console.log("text field:", apex.item("P20_TEXT").getSeparator());
Output:
select many: ":"
checkbox group: ":"
text field: null
This is the value to use when you split a submitted multi-value item on the server, rather than hard-coding a colon and hoping nobody changes the item's settings.
Checking the Item's State
isEmpty
Returns true when the item has no value. It is more forgiving than comparing against an empty string: a value made only of spaces, tabs, or line breaks counts as empty, and so does the null value of an item with a list of values.
item.isEmpty() → boolean
console.log(apex.item("P20_TEXT").isEmpty());
apex.item("P20_TEXT").setValue("   ");
console.log(apex.item("P20_TEXT").isEmpty());         // only spaces count as empty
console.log(apex.item("P20_PASSWORD").isEmpty());
Output:
false
true
true
hasDisplayValue
Returns true when the item shows anything at all, whether a value or a placeholder. It answers a question about the display rather than the data, which is what you need when deciding, for example, whether a floating label should move out of the way.
item.hasDisplayValue() → boolean
const text = apex.item("P20_TEXT");
console.log("text shows a value:", text.hasDisplayValue());
text.setValue("");
console.log("after clearing:", text.hasDisplayValue(), "- empty:", text.isEmpty());
Output:
text shows a value: true
after clearing: false - empty: true
isChanged
Returns true when the value differs from what it was when the page loaded. APEX relies on this to warn users about unsaved changes, and apex.page.isChanged asks the same question of every item on the page at once.
item.isChanged() → boolean
const text = apex.item("P20_TEXT");
console.log(text.isChanged());
text.setValue("Trail Runner Pack");
console.log(text.isChanged());
console.log("page changed:", apex.page.isChanged());
Output:
false
true
page changed: true
For a different angle on the same problem, see how to check whether an item value changed using a dynamic action.
Showing, Hiding, and Locking Items
disable and enable
Disable makes an item unavailable for editing, and enable makes it editable again.
item.disable()
item.enable()
const text = apex.item("P20_TEXT");
text.disable();
console.log("disabled:", text.isDisabled());
text.enable();
console.log("disabled:", text.isDisabled());
Output:
disabled: true
disabled: false
const radio = apex.item("P20_RADIO");
radio.disable();
radio.enable();
console.log("P20_RADIO disabled:", radio.isDisabled());
Output:
P20_RADIO disabled: false
There is one consequence to plan for. A disabled item is not submitted with the page, so if its value still needs saving, make the item read only on the server instead of disabling it in the browser.
isDisabled
Returns true when the item is currently disabled.
item.isDisabled() → boolean
console.log(apex.item("P20_DISPLAY_ONLY").isDisabled());
apex.item("P20_NUMBER").disable();
console.log(apex.item("P20_NUMBER").isDisabled());
Output:
false
true
Note the first line: a Display Only item reports false. It is not disabled, it is simply not editable, which is a different thing and matters when your code tests one to infer the other.
hide and show
Hide and show the item along with its label, whatever the page layout. The Show and Hide dynamic actions call these same two methods.
item.hide()
item.show()
apex.item("P20_NUMBER").hide();
apex.item("P20_DATE").hide();
console.log("number visible:", apex.jQuery("#P20_NUMBER_CONTAINER").is(":visible"));
Output:
number visible: false
const number = apex.item("P20_NUMBER");
number.hide();
number.show();
console.log("number visible:", apex.jQuery("#P20_NUMBER_CONTAINER").is(":visible"));
Output:
number visible: true
Older code sometimes passes a parameter to hide or show that hid a whole table row in legacy themes. That parameter is deprecated, and modern themes do not need it.
setFocus
Moves the keyboard focus into the item, specifically into the part designed to receive it, such as the input of a popup LOV rather than its button.
item.setFocus()
apex.item("P20_NUMBER").setFocus();
console.log("focus is on:", document.activeElement.id);
Output:
focus is on: P20_NUMBER
setStyle
Sets a single CSS property on the element meant to receive styles.
item.setStyle(pPropertyName, pPropertyValue)
apex.item("P20_TEXT").setStyle("backgroundColor", "#fff3cd");
console.log($x("P20_TEXT").style.backgroundColor);
Output:
rgb(255, 243, 205)

Use it sparingly. Adding and removing CSS classes keeps styling in your stylesheet, where the theme and dark mode can adjust it, whereas an inline style set from JavaScript overrides both.
Validating Items in the Browser
getValidity
Returns the item's ValidityState, the standard HTML constraint validation object, with flags such as valid, valueMissing, typeMismatch, and rangeOverflow. APEX calls it for every item when a page is submitted with client-side validation switched on.
item.getValidity() → ValidityState
const text = apex.item("P20_TEXT");
text.node.required = true;
text.setValue("");
const validity = text.getValidity();
console.log("valid:", validity.valid, "- valueMissing:", validity.valueMissing);
Output:
valid: false - valueMissing: true
getValidationMessage
Returns the message APEX would show for an invalid item, or an empty string when the item is valid. To replace the default wording, put your own text in the item's data-valid-message attribute.
item.getValidationMessage([pLabel]) → string
const text = apex.item("P20_TEXT");
text.node.required = true;
text.setValue("");
console.log(text.getValidationMessage());

// a message of your own, in the attribute that APEX reads
text.element.attr("data-valid-message", "Enter the product name, for example Trail Runner Pack.");
console.log(text.getValidationMessage());
Output:
Text Field must have some value.
Enter the product name, for example Trail Runner Pack.
Client-side checks save a round trip, but they never replace server-side validations, because anything in the browser can be bypassed.
Refreshing Items and Waiting Until They Are Ready
refresh
Reloads the item from the server. For a select list, radio group, or checkbox group based on a SQL list of values, that means fetching the list again, which is what APEX itself does to a cascading list when its parent changes. The item fires apexbeforerefresh and apexafterrefresh around the reload.
item.refresh()
const category = apex.item("P20_CATEGORY");
category.element.on("apexafterrefresh", () =>
    console.log("categories after refresh:", category.element.find("option").length));
apex.jQuery("#P20_DEPARTMENT").val(apex.jQuery("#P20_DEPARTMENT option[value!='']").eq(1).val());
category.refresh();
Output:
categories after refresh: 3
Notice the example listens for apexafterrefresh rather than reading the options straight after calling refresh. The reload is asynchronous, so reading immediately would give you the old list.
isReady
Returns true once the item has finished loading. Most items are ready instantly, but items built on libraries that load asynchronously, such as the rich text editor, may not be when your page-load code starts.
item.isReady() → boolean
const editor = apex.item("P20_RICH_TEXT");
console.log("rich text editor ready:", editor.isReady());
console.log("text field ready:", apex.item("P20_TEXT").isReady());
Output:
rich text editor ready: true
text field ready: true
whenReady
Returns a promise that resolves when the item is ready. It is the safe way to set the value of a rich text editor from page-load code, where calling setValue too early silently does nothing.
item.whenReady() → Promise
const editor = apex.item("P20_RICH_TEXT");
await editor.whenReady();                        // the editor library has loaded
editor.setValue("<p>Ships in <strong>2 days</strong>.</p>");
console.log(editor.getValue());
Output:
<p>Ships in <strong>2 days</strong>.</p>
Working with Number Fields
A number field has the full item interface, plus behavior that understands numbers and its format mask. Its item_type is NUMBER, and the methods it inherits unchanged, such as disable and hide, work exactly as described above. The examples use a field with the format mask 999G999G990D00.
getValue
Returns the value exactly as the field shows it, formatted by the mask, and always as a string.
numberField.getValue() → string
const number = apex.item("P20_NUMBER");
console.log(JSON.stringify(number.getValue()));   // as formatted in the field
console.log(number.getNativeValue());
Output:
"1,250.00"
1250
getNativeValue
Returns the value as a JavaScript number you can calculate with. This is the method to use whenever arithmetic is involved.
numberField.getNativeValue() → number
const number = apex.item("P20_NUMBER");
console.log(number.getValue(), typeof number.getValue());
console.log(number.getNativeValue(), typeof number.getNativeValue());
number.setValue("abc");
console.log(number.getNativeValue());
Output:
1,250.00 string
1250 number
null
Watch the last line. Oracle's documentation says a value that is not a number returns NaN, but in APEX 26.1 it actually returns null. Test for both with value === null || isNaN(value) and your code will survive either behavior.
setValue
Accepts a JavaScript number as well as a string, and formats it with the field's mask.
numberField.setValue(pValue, [pDisplayValue], [pSuppressChangeEvent])
const number = apex.item("P20_NUMBER");
number.setValue(1999.5);                  // a JavaScript number is accepted
console.log(number.getValue());
number.setValue("2500");
console.log(number.getValue(), "->", number.getNativeValue() + 1);
Output:
1,999.50
2,500.00 -> 2501
displayValueFor
Formats any value with the field's mask, without changing the field itself.
numberField.displayValueFor(pValue) → string
const number = apex.item("P20_NUMBER");      // format mask 999G999G990D00
console.log(number.displayValueFor("1250"));
console.log(number.displayValueFor("1234567.5"));
Output:
1,250.00
1,234,567.50
isChanged
Compares numbers rather than text, so setting the same number in a different form, such as 1250 for 1,250.00, does not count as a change.
numberField.isChanged() → boolean
const number = apex.item("P20_NUMBER");
console.log(number.getValue(), number.isChanged());
number.setValue("1250");                  // the same number, unformatted
console.log(number.getValue(), number.isChanged());
number.setValue("1300");
console.log(number.getValue(), number.isChanged());
Output:
1,250.00 false
1,250.00 false
1,300.00 true
That numeric comparison is what keeps the unsaved-changes warning from firing just because a user retyped the same amount without the thousands separator.
The apex.item Namespace Functions
apex.item.isItem
Returns true when an element with the given ID exists and has an item interface. It returns false for missing IDs and for things that exist but are not items, such as regions.
apex.item.isItem(pItemId) → boolean
console.log(apex.item.isItem("P20_TEXT"));
console.log(apex.item.isItem("P20_NO_SUCH_ITEM"));
console.log(apex.item.isItem("text_items"));   // a region, not an item
Output:
true
false
false
apex.item.create
Creates the item interface for an item plug-in. The plug-in's JavaScript calls it once per item, passing only the functions that differ from the default behavior, and from then on apex.item, dynamic actions, and page submission all treat the plug-in like a built-in item.
apex.item.create(pItemId, pItemImpl) → Deferred | undefined
| Property of pItemImpl | Description |
|---|---|
| item_type | The type name that item_type returns. |
| getValue, setValue | How to read and write the value. Without them, the defaults work for standard form elements. |
| displayValueFor | The display text for a value. |
| isChanged | Whether the value changed since the page loaded. |
| enable, disable, isDisabled | How to enable, disable, and test compound items. |
| show, hide | How to show and hide compound items. |
| setFocusTo, setStyleTo | The element that receives focus, or styles. |
| getValidity, getValidationMessage | Validation, for items that validate themselves. |
| refresh | How to refresh the item. |
| addValue, removeValue, storageType, separator | Support for multiple values. |
| delayLoading | True when the item loads asynchronously. create then returns a jQuery Deferred that the plug-in resolves when ready. |
Here is a minimal star-rating item kept in a plain span, supplying its own getValue, setValue, and isChanged:
// A minimal item plug-in: a span that holds a rating from 1 to 5
apex.jQuery("#text_items .t-Region-body").append('<span id="P20_STARS" class="stars">3</span>');

apex.item.create("P20_STARS", {
    item_type: "STARS",
    getValue: function () {
        return this.element.text();
    },
    setValue: function (value) {
        this.element.text(value);
    },
    isChanged: function () {
        return this.element.text() !== "3";
    }
});

const stars = apex.item("P20_STARS");
console.log(stars.item_type, "value:", stars.getValue(), "changed:", stars.isChanged());
stars.setValue("5");
console.log("value:", $v("P20_STARS"), "changed:", stars.isChanged());
Output:
STARS value: 3 changed: false
value: 5 changed: true
Once created, the span answers to apex.item and even to the $v shorthand, exactly like a built-in item. If you are building a plug-in, the guide to building your first Oracle APEX plug-in covers the surrounding setup.
apex.item.addAttachHandler
Registers a function that APEX calls while the page initializes, passing the context in which items are being created: the whole page, or a region that is being rendered again. An item plug-in uses it to initialize all its items in one place instead of rendering a separate JavaScript call for each one.
apex.item.addAttachHandler(pHandler)
apex.item.addAttachHandler(function (context$) {
    const count = context$.find(".apex-item-text").length;
    console.log("attach handler called with", context$.length, "context;", count, "text items in it");
});
Output:
attach handler called with 1 context; 11 text items in it
Timing is everything here. The handler must be registered before the page initializes, so it belongs in a JavaScript file that the plug-in loads, not in code that runs after the page is ready. Pasting it into the console after load, for example, does nothing.
Recipes
These three recipes solve tasks that come up on almost every form. Each block of code is labeled with where it goes in your application. Blocks labeled Try it simulate what a user would do, such as opening an order or clicking a button, so the recipe can demonstrate itself; you leave those out of your own application.
Require an Item Only in Some Cases
A shipped order needs a shipped date, but other orders do not, so the item cannot simply be marked Value Required. The solution listens for apexbeforepagesubmit, checks the two items only when the request is SAVE, shows the error beside the item, and cancels the submit.
The code goes in the page's Execute when Page Loads attribute. A dynamic action on the Before Page Submit event with an Execute JavaScript Code action works the same way.
// === Try it: open an order from the Orders page ===
$("#orders a[href*='order']").first()[0].click();
// --- on the Order page ---
// === Page › Execute when Page Loads ===
apex.gPageContext$.on("apexbeforepagesubmit", function(event, request) {
    if (request !== "SAVE") return;
    apex.message.clearErrors();
    if (apex.item("P10_STATUS").getValue() === "SHIPPED" && apex.item("P10_SHIPPED_DATE").isEmpty()) {
        apex.message.showErrors([{
            type: "error",
            location: ["inline", "page"],
            pageItem: "P10_SHIPPED_DATE",
            message: "Enter the date the order was shipped.",
            unsafe: false
        }]);
        apex.event.gCancelFlag = true;                          // the page is not submitted
    }
});
// === Try it: set the status to Shipped, leave Shipped Date empty, and click Apply Changes ===
apex.item("P10_STATUS").setValue("SHIPPED");
apex.item("P10_SHIPPED_DATE").setValue("");
$("button").filter((i, b) => b.textContent.trim() === "Apply Changes").trigger("click");
await new Promise((resolve) => setTimeout(resolve, 800));
console.log("submitted:", apex.page.isChanged() ? "no, the changes are still on the page" : "yes");
console.log("inline error:", $("#P10_SHIPPED_DATE_error").text());
Output:
submitted: no, the changes are still on the page
inline error: Enter the date the order was shipped.

The error display comes from apex.message.showErrors, which the guide to displaying error messages with JavaScript explores further. Put the same rule in a server-side validation too: the browser check spares the user a round trip, but only the server can be trusted.
Set Cascading Lists from Code
Setting a department, a category, and a product one after another looks like it should work, and it does not. Each child list reloads its options from the server when its parent changes, so a value you set in the meantime is thrown away, and all three end up as 1, empty, and empty.
The fix is to wait for each child's apexafterrefresh event before setting it. The function goes in the page's Function and Global Variable Declaration, and the call goes wherever the values come from: a button, a search result, or saved preferences.
// === Page › Function and Global Variable Declaration ===
// Sets cascading lists in order: [[parent, value], [child, value], ...]
async function setCascading(values) {
    for (let i = 0; i < values.length; i++) {
        const [name, value] = values[i];
        const child = values[i + 1];
        // the child list reloads when its parent changes: wait for that before setting it
        const reloaded = child
            ? new Promise((resolve) => $("#" + child[0]).one("apexafterrefresh", resolve))
            : null;
        apex.item(name).setValue(value);
        await reloaded;
    }
}
// === Try it: choose a product in all three lists at once ===
await setCascading([["P20_DEPARTMENT", "1"], ["P20_CATEGORY", "9"], ["P20_PRODUCT", "16"]]);
for (const name of ["P20_DEPARTMENT", "P20_CATEGORY", "P20_PRODUCT"]) {
    const value = apex.item(name).getValue();
    console.log(name, value, apex.item(name).displayValueFor(value));
}
Output:
P20_DEPARTMENT 1 Camping
P20_CATEGORY 9 Camp Kitchen
P20_PRODUCT 16 Blaze Two-Burner Stove
This is the same cascading behavior described in the guide to page items and lists of values, seen from the JavaScript side.
Lock a Form When Its Record Is Closed
Once an order is delivered, only its status should be editable. The function disables every item in the form except the status, hides the Apply Changes button, whose HTML DOM ID is save_order, and switches off editing in the order lines grid through its edit action.
The function goes in the page's Function and Global Variable Declaration. Call it from Execute when Page Loads, and again from a dynamic action on the Change event of the status item.
// === Try it: open an order from the Orders page ===
$("#orders a[href*='order']").first()[0].click();
// --- on the Order page ---
// === Page › Function and Global Variable Declaration ===
// A shipped, delivered, or cancelled order can no longer be edited; only its status can change.
function lockOrder() {
    const locked = ["SHIPPED", "DELIVERED", "CANCELLED"].includes(apex.item("P10_STATUS").getValue());
    $("#order_form [id]").each((i, element) => {
        const name = element.id;
        if (/^P10_/.test(name) && name !== "P10_STATUS" && apex.item.isItem(name)) {
            if (locked) apex.item(name).disable(); else apex.item(name).enable();
        }
    });
    $("#save_order").toggle(!locked);                         // the Apply Changes button
    const grid = apex.region("order_lines").call("getActions");
    if (locked) { grid.set("edit", false); grid.disable("edit"); } else grid.enable("edit");
}
// === Page › Execute when Page Loads, and a dynamic action on Change of P10_STATUS ===
lockOrder();
// === Try it: set the status to Delivered ===
apex.item("P10_STATUS").setValue("DELIVERED");
lockOrder();
console.log("disabled:", ["P10_ORDER_DATE", "P10_CUSTOMER_ID", "P10_DISCOUNT_PCT", "P10_NOTES"]
    .filter((name) => apex.item(name).isDisabled()).join(", "));
console.log("Apply Changes visible:", $("#save_order").is(":visible"),
            "- grid editable:", !apex.region("order_lines").call("getActions").lookup("edit").disabled);
Output:
disabled: P10_ORDER_DATE, P10_CUSTOMER_ID, P10_DISCOUNT_PCT, P10_NOTES
Apply Changes visible: false - grid editable: false
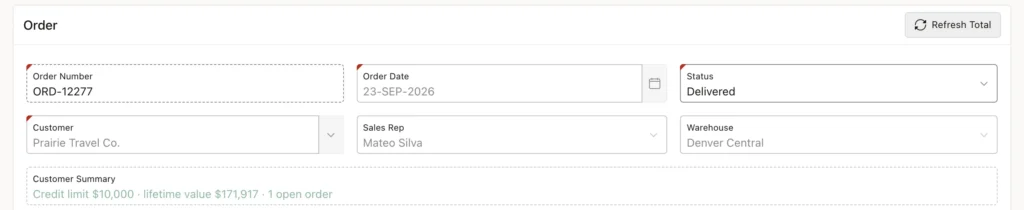
Hiding the button is not a side effect but a necessity. Disabled items are not submitted, so leaving the button in place would let a user save a form with half its values missing. On the server, a read-only condition or an authorization scheme on the items stops a crafted request from changing a closed order, and the interactive grid guide covers the grid actions used here.
Conclusion
The apex.item interface gives every page item the same set of methods, which is what makes APEX JavaScript portable across item types. Use getValue and setValue to read and write values, remembering that setValue fires the change event unless you suppress it, and that neither touches session state until the page is submitted or the item is sent to the server. Multi-value items add addValue and removeValue, while displayValueFor, isEmpty, hasDisplayValue, and isChanged tell you what the item holds and whether it was edited. Show, hide, enable, disable, setFocus, and setStyle control presentation, with the caveat that disabled items are never submitted. Validation runs through getValidity and getValidationMessage, and refresh, isReady, and whenReady handle items that load asynchronously. Number fields add getNativeValue for arithmetic and compare numbers rather than text, and the apex.item namespace functions let your own plug-ins join the same interface.
