
The fastest way to understand Oracle Forms is to build a form and use it. In this guide, you build CH04_DOCTORS, a form that lists the doctors of a sample clinic ten at a time and lets you find, add, change, and remove them.
Two wizards do all the work. The Data Block Wizard creates a block on the DOCTORS table, and the Layout Wizard draws its items on a canvas. You will not write a line of PL/SQL, yet the form will check its data against the table's constraints, because the wizard writes that code for you.
Sample Form for This Guide
The examples and screenshots use the sample form CH04_DOCTORS from the Oracle Forms code repository on GitHub. Download it, open it in Forms Builder, and connect as CAREWELL to follow along.
| Form | File | What it shows |
|---|---|---|
| CH04_DOCTORS | forms/ch04/ch04_doctors.fmb | The finished doctors form this guide builds |
The forms run against the CareWell Clinic sample schema, which you install first.
What You Need
- Forms Builder 14.1.2, set up to run forms as described in how to use Forms Builder in Oracle Forms 14.1.2.
- A connection to the database as CAREWELL, the owner of the CareWell Clinic sample schema.
The Steps at a Glance
| Step | Where | Result |
|---|---|---|
| 1. Create the form module | File, New, Form | An empty form named CH04_DOCTORS |
| 2. Create the block | Tools, Data Block Wizard | A block on DOCTORS with validation triggers |
| 3. Lay out the block | Layout Wizard | A tabular frame of ten rows on a canvas |
| 4. Save the form | File, Save (Ctrl+S) | ch04_doctors.fmb |
| 5. Run the form | Program, Run Form (Ctrl+R) | ch04_doctors.fmx, running in the launcher |
Step 1: Create the Form Module
When Forms Builder starts, it opens a new, empty form module named MODULE1. To start another one, select the Forms node in the Object Navigator and click Create, or choose File, New, Form.
Rename the module: click its name once to select it, click again to edit it, type CH04_DOCTORS, and press Enter. The module name is the form's name at run time and in the code of other forms. The file name comes later, when you save it.
Step 2: Create a Block with the Data Block Wizard
A data block connects the items of a form to a table. Each item shows a column, each row of the table is a record of the block, and Forms writes the SQL that queries and changes the rows.
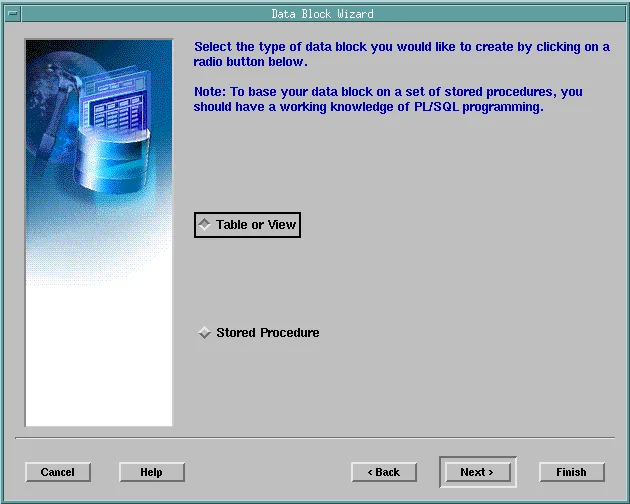
Choose Tools, Data Block Wizard. After a welcome page, which you can turn off, the wizard asks what the block is based on: a Table or View, or a set of Stored Procedures that query and change the data. Keep Table or View and click Next.
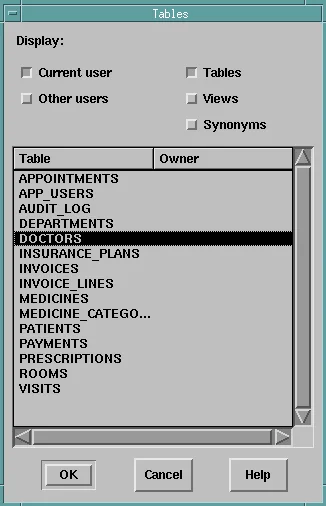
On the next page, enter the table, or click Browse to pick it from a list. The list shows the tables, views, and synonyms of the current user or of other users. Select DOCTORS and click OK.
Choose the Columns
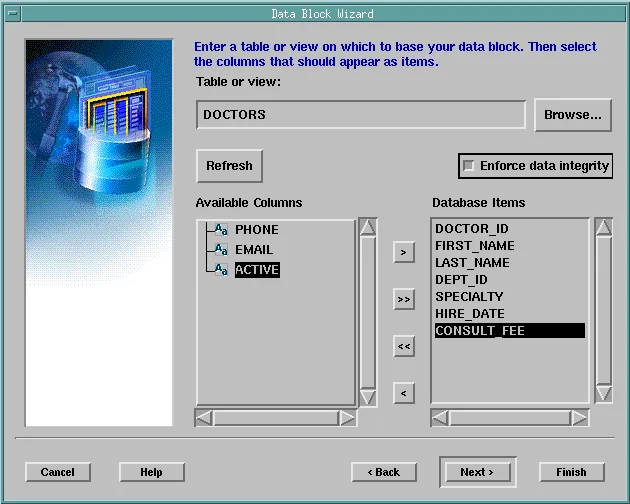
The wizard lists the table's columns under Available Columns. Move the columns the block needs to Database Items: select one and click the single arrow, or click the double arrow to move them all.
For this form, move DOCTOR_ID, FIRST_NAME, LAST_NAME, DEPT_ID, SPECIALTY, HIRE_DATE, and CONSULT_FEE, and leave PHONE, EMAIL, and ACTIVE. A column you leave out is not part of the block. The form never shows it, and when it inserts a row, the database gives that column its default value.
Turn On Enforce Data Integrity
Select Enforce data integrity. The wizard then reads the table's constraints and writes triggers that check them in the form, as the user types, instead of waiting for the database to reject the row on save.
Click Next. The wizard proposes the table name, DOCTORS, as the block name; keep it. On the last page, keep Create the data block, then call the Layout Wizard, and click Finish. The block appears under Data Blocks in the Object Navigator, and the Layout Wizard starts.
Step 3: Lay Out the Block with the Layout Wizard
The block has items, but nothing to show them on yet. The Layout Wizard creates a frame, a rectangle that arranges the items of one block, on a canvas and places the items in it.
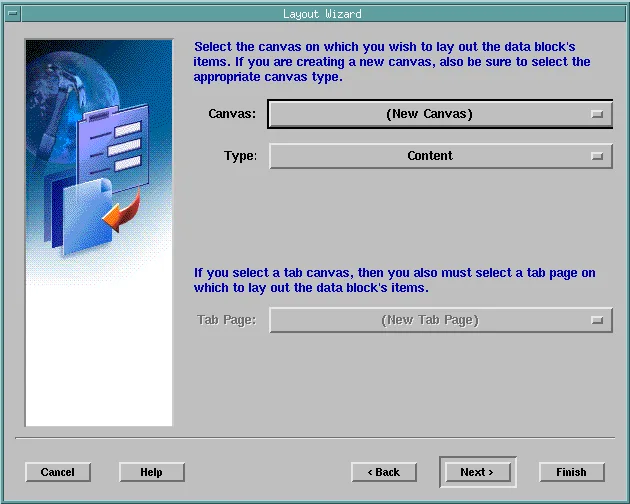
The first page asks for the canvas. A form's first block needs a new one, so keep (New Canvas) and the type Content, the canvas that fills a window.
Next, choose the items to show and click the double arrow to show them all. You can pick an Item Type for each one, such as list item or check box, but text items are right for this block.
Set Prompts and Sizes
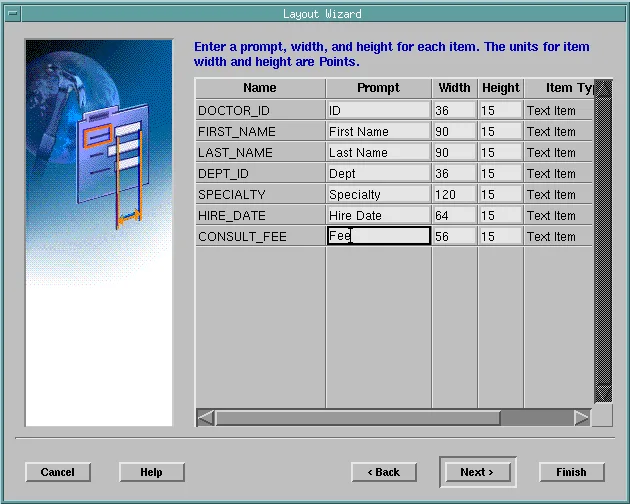
The next page sets each item's Prompt, Width, and Height, in points. The wizard derives a prompt from the column name and a width from the column's length, which for VARCHAR2(30) columns is far too wide for a row of a list.
Click a value to change it. This form uses these settings:
| Item | Prompt | Width |
|---|---|---|
| DOCTOR_ID | ID | 36 |
| FIRST_NAME | First Name | 90 |
| LAST_NAME | Last Name | 90 |
| DEPT_ID | Dept | 36 |
| SPECIALTY | Specialty | 120 |
| HIRE_DATE | Hire Date | 64 |
| CONSULT_FEE | Fee | 56 |
Choose a Tabular Style
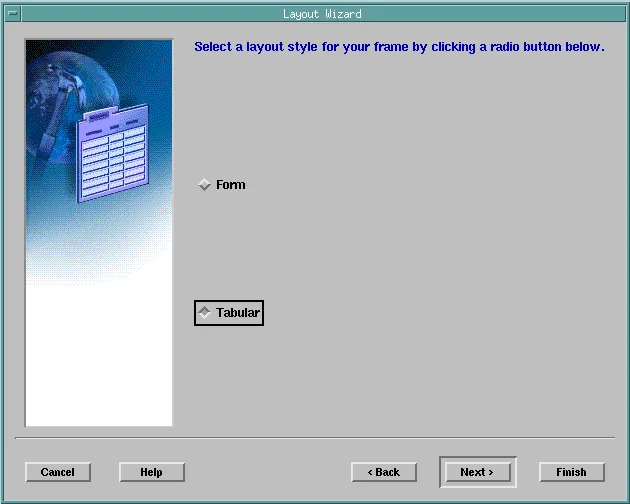
The Style page offers two layouts. Form shows one record at a time, with prompts to the left of the items. Tabular shows several records in rows, with prompts above the columns. Choose Tabular.
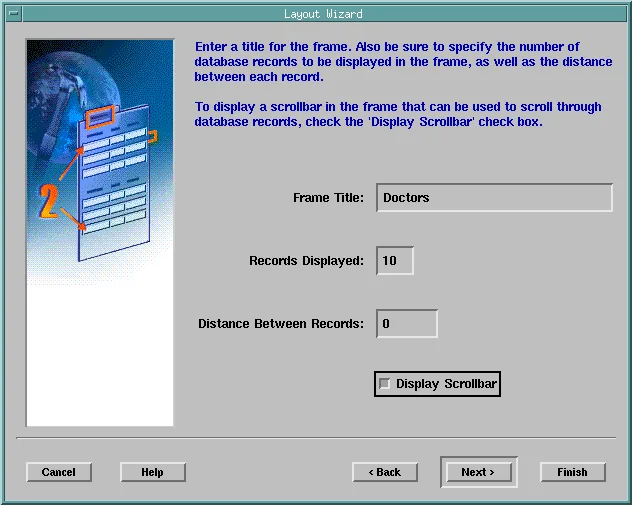
On the Rows page, enter Doctors as the Frame Title, set Records Displayed to 10, and select Display Scrollbar so the user can scroll through all the doctors ten at a time. Distance Between Records adds space between the rows. Click Next, then Finish.
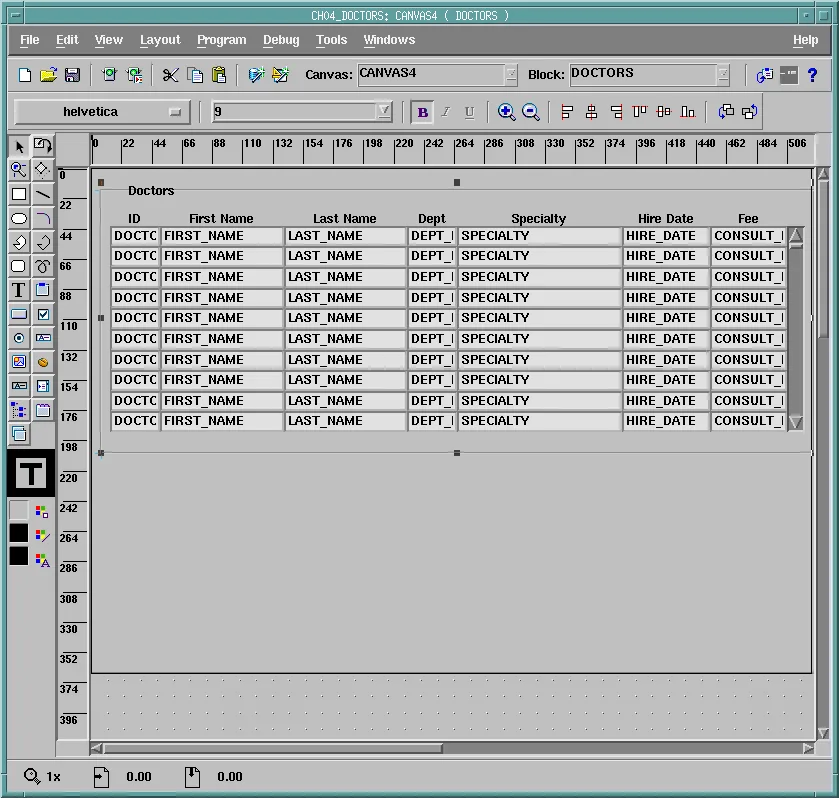
The Layout Editor opens with the result: a frame titled Doctors, ten rows of seven items, prompts above them, and a scroll bar on the right. Each item shows its name, because a design has no data.
The frame keeps its layout. While its Update Layout property is Automatically, the default, it lays the items out again whenever you change the frame, which undoes items moved by hand. To change the layout, select the frame and run the Layout Wizard again, which reopens with your answers, or set the frame's properties.
Step 4: Save the Form
Choose File, Save (Ctrl+S). The first time you save a module, Forms Builder asks for a file name: enter ch04_doctors.fmb. The status bar of the Object Navigator now shows the file.
Save your forms in a folder of their own, and name the files in lowercase. On Linux, where forms are deployed most often, file names are case-sensitive, and lowercase names avoid mismatches between the name a form is opened by and the name of its file. The folder must be one the Forms server searches (its FORMS_PATH), or the form must be opened with its full path.
Step 5: Run the Form
Choose Program, Run Form (Ctrl+R). Forms Builder compiles the form into ch04_doctors.fmx, next to the .fmb file, and runs it. The form opens empty, because the block has no records until you query them.
Query Records
Click Execute Query on the toolbar, or press Ctrl+F11. Forms queries the table and shows the first ten doctors.
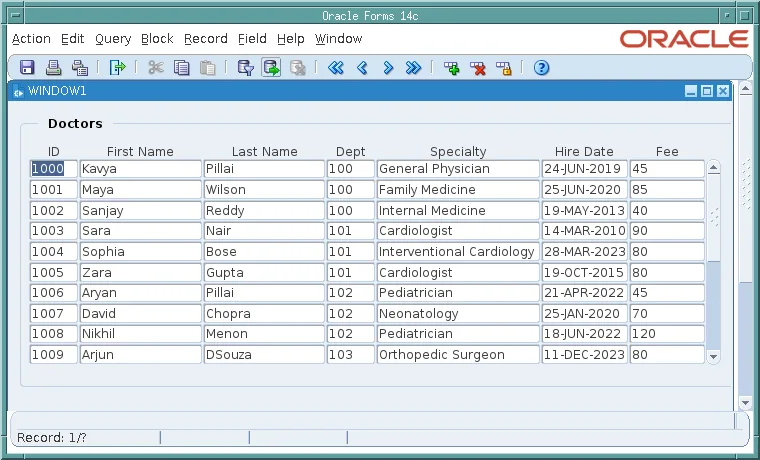
The status line says Record: 1/?. You are on the first record, and Forms does not yet know how many there are, because it fetches rows only as you scroll to them. Scroll down, or press the Down arrow on the last row, and it fetches more. When it has fetched the last one, the question mark becomes the number of records.
Query by Example
To find particular records, query by example. Click Enter Query or press F11: the block empties, and the status line says Enter-Query.
Type the values to look for in the items, such as Cardio% in Specialty, where % stands for any text. Then click Execute Query or press Ctrl+F11.
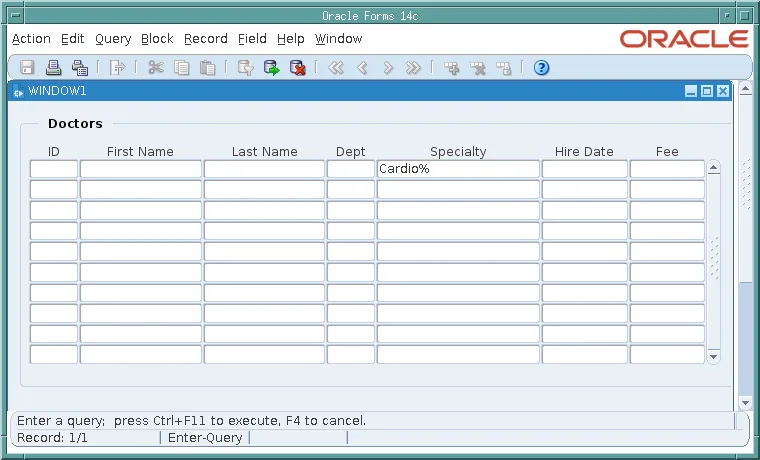
The form shows only the two cardiologists. Values in several items are combined with a logical AND, and you can also use operators such as >1000 or #between 40 and 80.
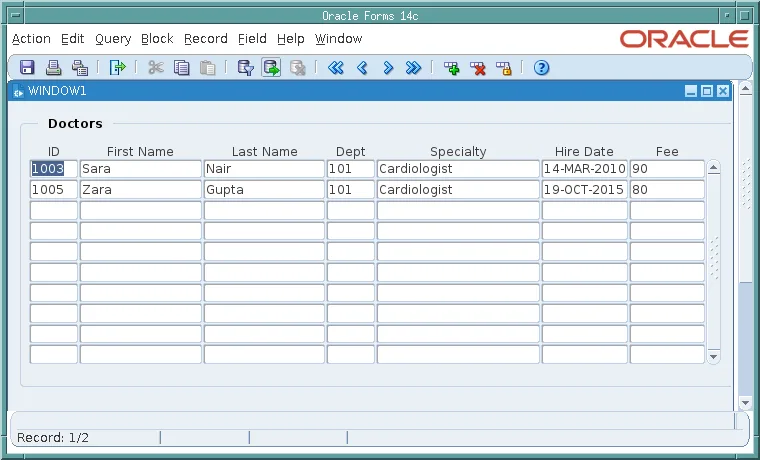
Insert a Record
With the two cardiologists on screen, click the second one, and click Insert Record (Ctrl+Down). Forms adds an empty record below it.
Type the new doctor's values, pressing Tab to move from item to item: 1099, Anita, Rao, 101, Cardiologist, 01-OCT-2026, and 75. Then click Save (Ctrl+S). Forms inserts the row, commits, and reports it in the status line.
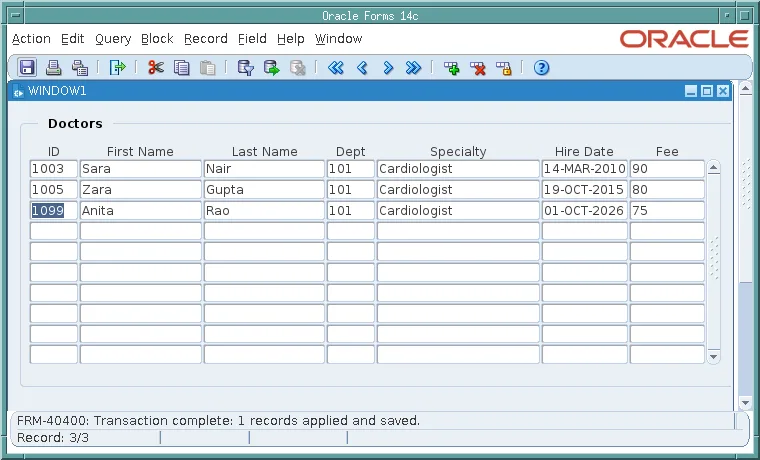
A query in SQL*Plus shows the row, including the ACTIVE column that is not in the block, which the database filled with its default.
Check the new row in SQL*Plus:
select doctor_id, first_name, last_name, specialty, consult_fee, active
from   doctors
where  doctor_id = 1099;
Output:
 DOCTOR_ID FIRST_NAME LAST_NAME SPECIALTY    CONSULT_FEE A
---------- ---------- --------- ------------ ----------- -
      1099 Anita      Rao       Cardiologist          75 Y
In a real form, the user would not type the key. It would come from a sequence instead.
Update and Delete a Record
To change a record, type over its values and save. Change Anita Rao's fee to 85, click Save, and Forms updates the row. Forms updates only the records you changed, and it locks each row the moment you start changing it, so no one else can change it at the same time.
To delete a record, click it and click Remove Record (Ctrl+Up). The record disappears from the block, and Save deletes the row. Delete Anita Rao now to leave the sample data as it was.
Some values cannot be changed at all. The ID of a queried doctor is its primary key, and the wizard made the item accept a value only in a new record.
The Checks the Form Makes for You
Enter a negative fee and press Tab to leave the item. The form refuses the value and keeps the cursor in the item.
Output:
WHEN-VALIDATE-ITEM trigger failed on field - DOCTORS.CONSULT_FEE
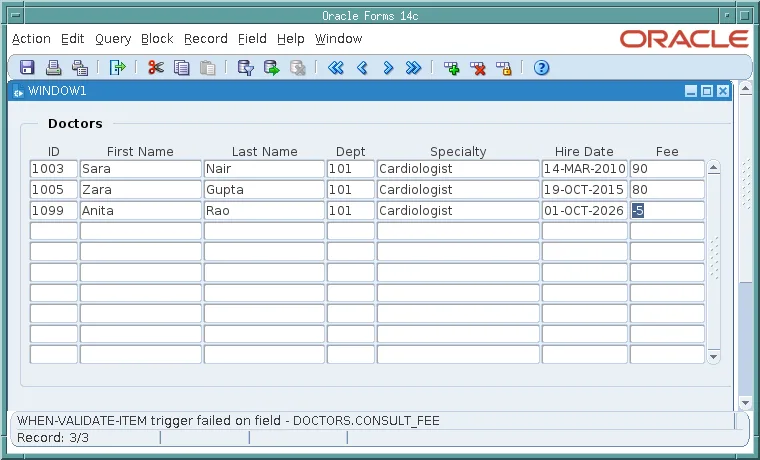
The check comes from the table's constraint DOCTORS_FEE_CK, consult_fee >= 0, which the wizard turned into a trigger.
Now leave a required item empty: insert a record, type an ID and a first name, and press Tab twice to go past Last Name. Forms stops you again.
Output:
FRM-40202: Field must be entered.
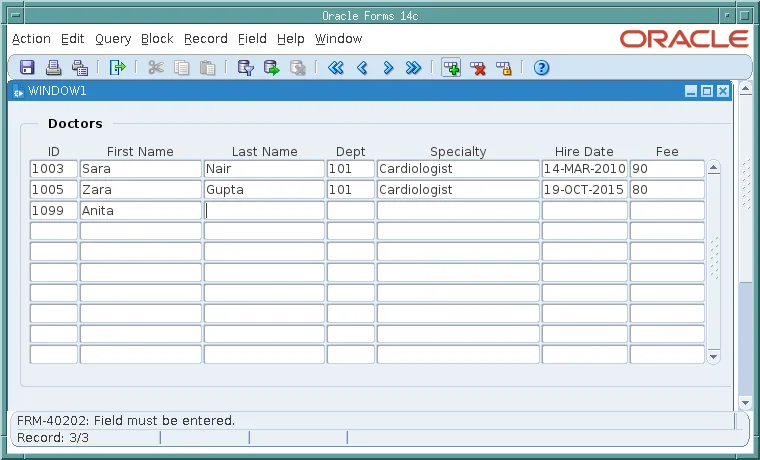
This check is not a trigger. The wizard set the Required property of every item whose column is NOT NULL, and Forms enforces it itself.
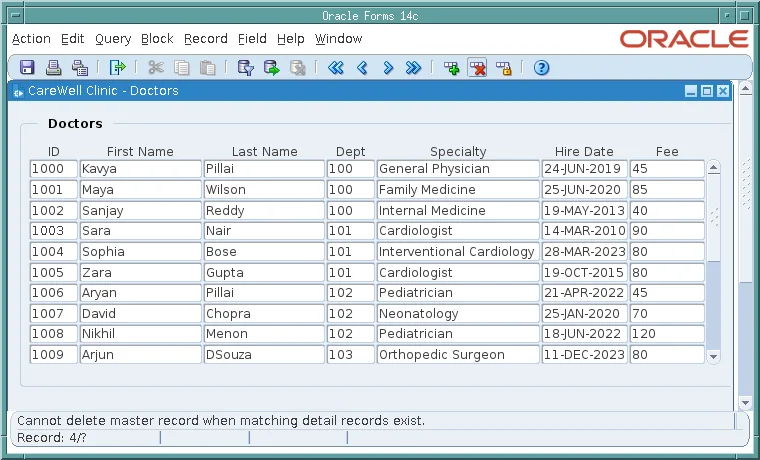
Finally, try to delete Sara Nair, one of the first doctors, who has appointments and visits. The form refuses before it removes the record from the screen.
Output:
Cannot delete master record when matching detail records exist.
Without these checks, the user would learn about a problem only when saving, from an Oracle error such as ORA-02292, after typing or deleting several records.
To leave the form, choose Action, Exit, or press F4. If a record has changes that cannot be saved, such as the record with no last name, Forms asks whether to close the form anyway. Answer Yes to discard them.
What the Wizards Built
Back in Forms Builder, expand the form in the Object Navigator. The wizards created:
- The block DOCTORS, with seven items named after their columns.
- A canvas, CANVAS4, and on it the frame FRAME5 that holds the layout.
- A window, WINDOW1, the one window a new form always has, which shows the canvas.
- A KEY-DELREC trigger on the block, and a WHEN-VALIDATE-ITEM trigger on most items.
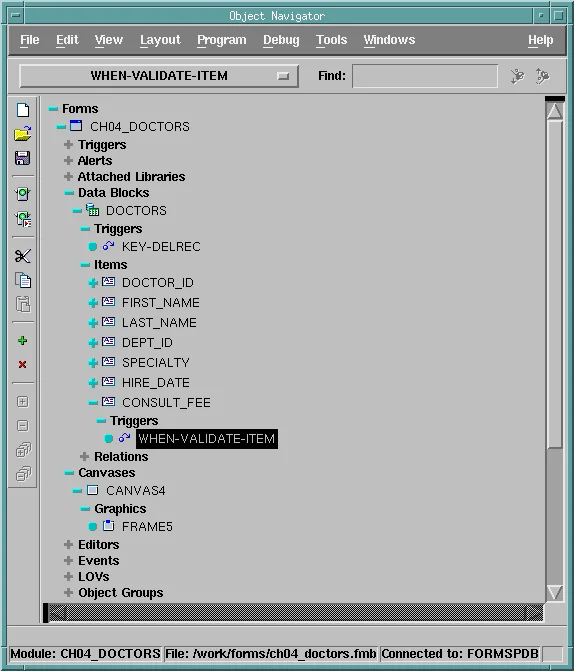
Forms Builder numbers the default names of the objects it creates, so yours may have other numbers. Rename them to something meaningful, such as MAIN_CNV for a canvas, before you write code that uses them.
Item Properties from the Columns
| Property | Taken from |
|---|---|
| Data Type | Char, Number, or Date, from the column type. |
| Maximum Length | The column's length, so the user cannot type more than the column holds. |
| Required | Set for NOT NULL columns. |
| Update Allowed | Set to No for the primary key. |
| Enforce Primary Key (block) | Forms checks that a new or changed key does not already exist before saving. |
Select an item and press F4 to see them.
The Generated Triggers
Select the trigger under CONSULT_FEE and press F11 to read its code.
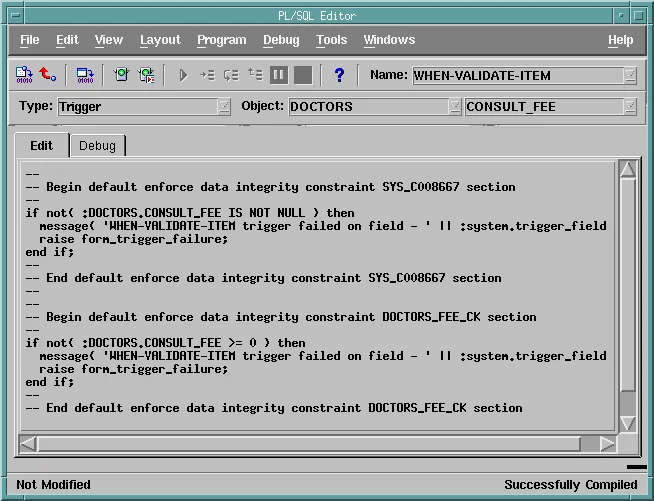
Forms fires a WHEN-VALIDATE-ITEM trigger when the user leaves an item whose value has changed. The code checks each constraint of the column, here the NOT NULL constraint and DOCTORS_FEE_CK. When the value breaks one, it displays a message and raises FORM_TRIGGER_FAILURE, which makes the validation fail and keeps the cursor in the item.
The trigger on DEPT_ID checks with a query that the department exists, enforcing the foreign key DOCTORS_DEPT_FK. KEY-DELREC fires when the user asks to delete a record. The wizard's code looks for rows that refer to the doctor in each table with a foreign key to DOCTORS (departments, appointments, visits, and users) and deletes the record only if there are none.
The generated code is plain PL/SQL, and you can change it. Its messages are not friendly, and some checks repeat what a property already does, so in real applications you will often write your own validation with messages users understand.
A Finishing Touch: the Window Title
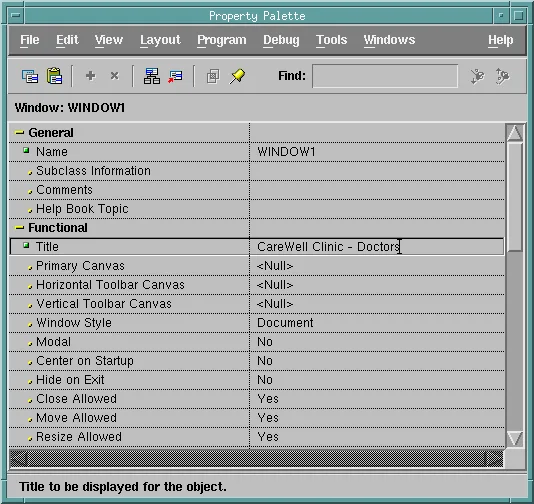
The running form's window is titled WINDOW1, the name of its window object. To give it a proper title, select WINDOW1 under Windows in the Object Navigator, press F4, and set the Title property to CareWell Clinic - Doctors.
Save the form and run it again. The window now has its title, and this run also shows the delete that the wizard's KEY-DELREC trigger refused.
For another walk-through with validations and buttons added by hand, see the older guide on how to create a form in Oracle Forms.
Conclusion
Your first form in Oracle Forms takes only a few minutes: create a form module, let the Data Block Wizard build a block on a table with Enforce data integrity turned on, and let the Layout Wizard arrange its items in a tabular frame. Save it as a lowercase .fmb file and run it with Ctrl+R. You can then query with Ctrl+F11, query by example with F11, and insert, remove, and save records, while the properties and triggers the wizards generated check every value against the table's constraints.
