
Reports answer the question "what do we have?" Forms answer "change this one thing." Every application needs both, and while a report can be dropped on a page and left alone, a form has moving parts: it has to find one row, show it, work out whether the user is creating or editing, save the right columns, and refuse to overwrite somebody else's work.
The good news is that APEX assembles all of that for you. The better news is that once you can name the parts, you can change any of them. This guide opens up a generated form to see what makes it tick, then builds a real order form with select lists, a searchable customer picker, a number assigned at insert time, and an editable grid of order lines underneath.
The Five Parts of an APEX Form
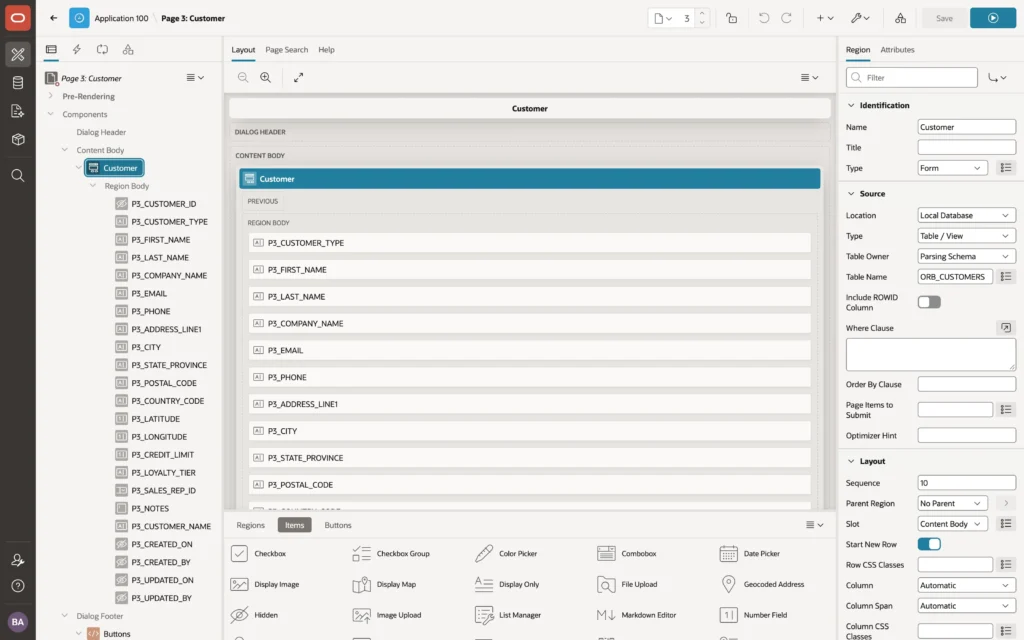
Open any form the wizards generated and you will find the same five ingredients. Learn them here and every form in every APEX application becomes readable.
1. The Form Region
The region's type is Form. Like a report it has a Source, which is usually a table but can equally be a SQL query, a REST data source, or JSON. The difference is arithmetic: a report region deals in many rows, a form region deals in exactly one.
Its Attributes tab carries the same Edit settings you meet on an interactive grid: whether editing is on, which of add, update, and delete are allowed, an optional column that restricts operations row by row, the lost update strategy, and separate authorization schemes for each operation.
2. Items Bound to Columns
Every column becomes a page item, and each item's Source group names the form region it belongs to and the column it maps to. That binding is the whole trick: because each item knows its column, the form's processes can fill the items and save them again without you writing a line of SQL.
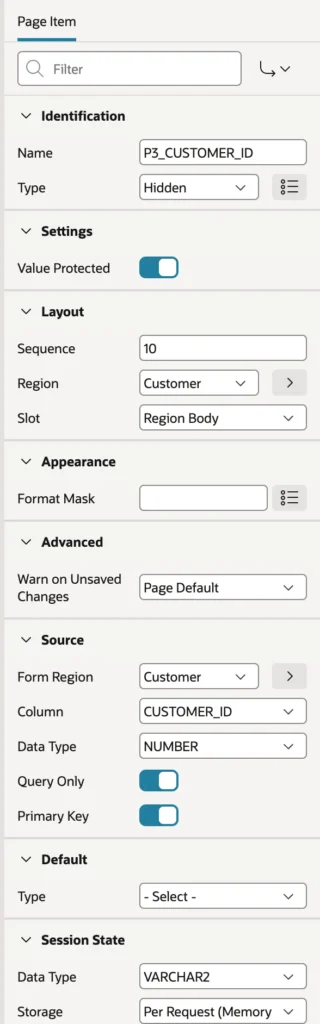
The primary key item is worth studying, because four settings work together to keep it honest.
| Setting | Why it is there |
|---|---|
| Type is Hidden | Users never see or type a surrogate key |
| Primary Key is on | The processes use it to find the row to fetch and save |
| Query Only is on | The form never writes the key, leaving the database to generate it |
| Value Protected and Checksum Required | Editing the hidden value in the browser, or pasting a different key into the URL, produces an error instead of someone else's record |
That last row is the one people skip and later regret. Without it, a curious user who changes a number in the address bar walks straight into a record they were never meant to open.
3. Buttons That Declare Their Intent
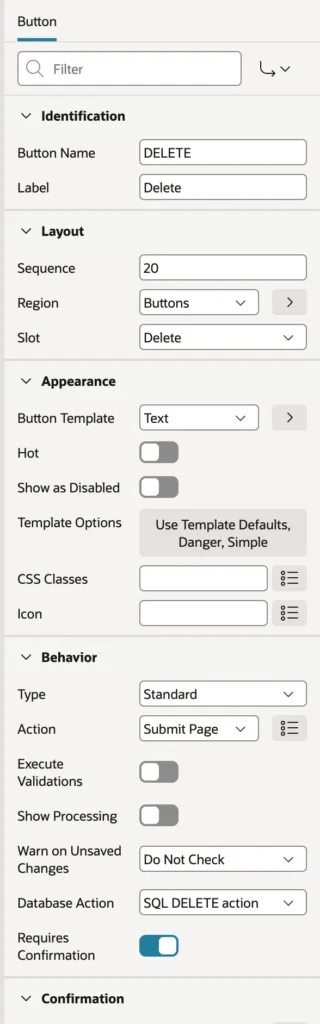
A form has four buttons: Cancel, Delete, Save, and Create. What makes them more than decoration is the Database Action property, which is set to SQL Insert, SQL Update, or SQL Delete. The button does not perform the operation. It announces which operation the user asked for, and the save process reads that announcement.
Two other button settings do quiet but useful work. Server-side conditions decide which buttons appear: Create shows only when the key item is empty, while Save and Delete show only when it has a value, so one page serves both new and existing rows. And Delete switches off Execute Validations, because validating a row you are about to remove wastes everyone's time.
4. Two Processes, One to Read and One to Write
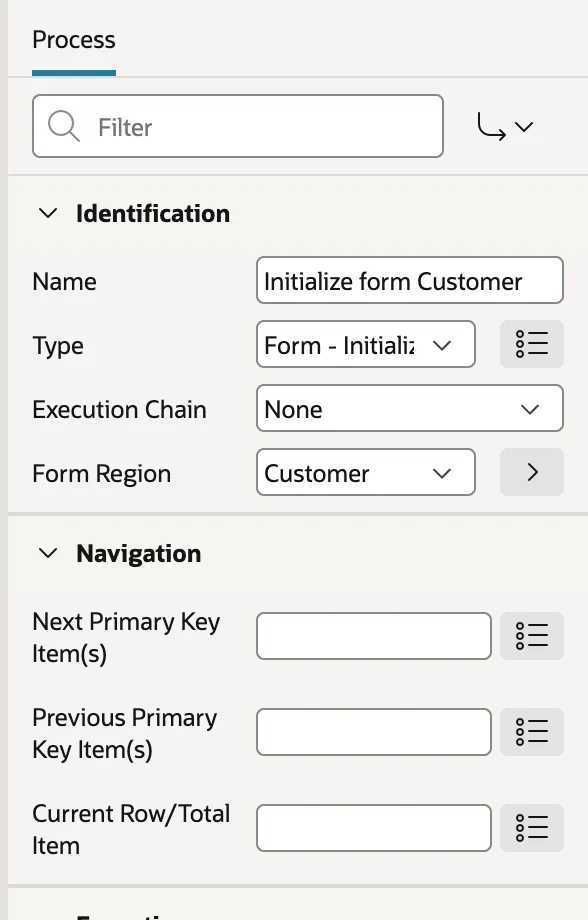
The initialization process runs Before Header, while the page is still being prepared. If the key item holds a value it fetches that row and fills the items. If not, it loads the defaults instead, giving you a blank form ready for input. Its next and previous key settings can also add record navigation to a form.
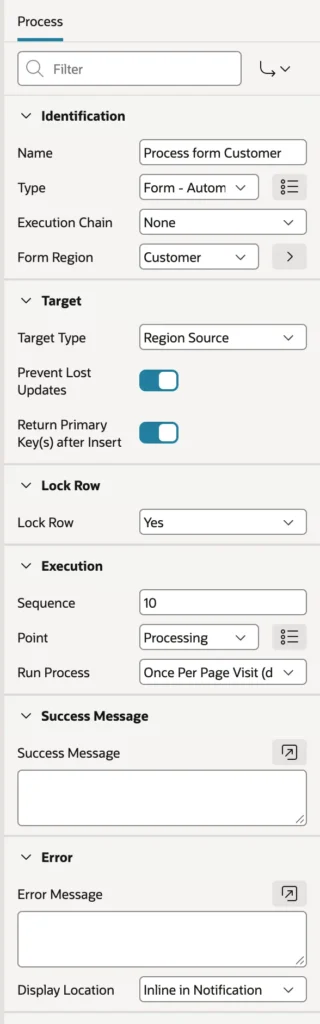
The save process runs at Processing, after the page has been submitted and validated. It looks at the database action of whichever button was pressed and performs the matching insert, update, or delete. Four of its settings are worth knowing before you need them.
- Target Type: Region Source writes back to the form's own table. Table or View writes somewhere else, and PL/SQL Code hands the job to your code, which is how you save a form built on a join, or call an API instead of touching a table.
- Prevent Lost Updates: APEX remembers the row as it was when the form loaded and refuses to save if someone else changed it meanwhile, rather than quietly flattening their work.
- Lock Row: locks the row while the save runs.
- Return Primary Key after Insert: puts the new row's key back into the key item, which later processes and branches can then use. This one earns its keep below.
5. Closing the Dialog
When the form lives on a modal dialog page, a third process closes it after a successful save. Its condition tests the request, so it fires after Create, Save, or Delete, but not after a validation error leaves the user with corrections to make. The calling page then receives a Dialog Closed event, which is what makes the report behind it refresh.
Every submission carries a request, which is normally the name of the button pressed. Conditions such as When Button Pressed read it, and PL/SQL can read it as :REQUEST.
Building an Order Form
An order is a good test case, because it is not one row. It is a header in one table and lines in another, which is the shape of most business documents: invoices, deliveries, timesheets, purchase requests.
Let the Database Do What the Database Does Best
Two values on a new order line should never be the user's problem. The line number has to be unique within its order, and the unit price normally comes from the product. Rules like these belong in the database, where they hold no matter how the data arrives, whether from your form, a data load, or an API call.
create or replace trigger orb_order_items_bi
    before insert on orb_order_items
    for each row
begin
    -- Number the new line after the order's last line.
    if :new.line_no is null then
        select nvl(max(line_no), 0) + 1
          into :new.line_no
          from orb_order_items
         where order_id = :new.order_id;
    end if;
    -- Use the product's current price unless a price was entered.
    if :new.unit_price is null then
        select unit_price
          into :new.unit_price
          from orb_products
         where product_id = :new.product_id;
    end if;
end orb_order_items_bi;
/
Put that logic in a trigger and your form gets simpler, not more complex. The same goes for the order total, which a trigger can recalculate whenever the lines change.
Creating the Page
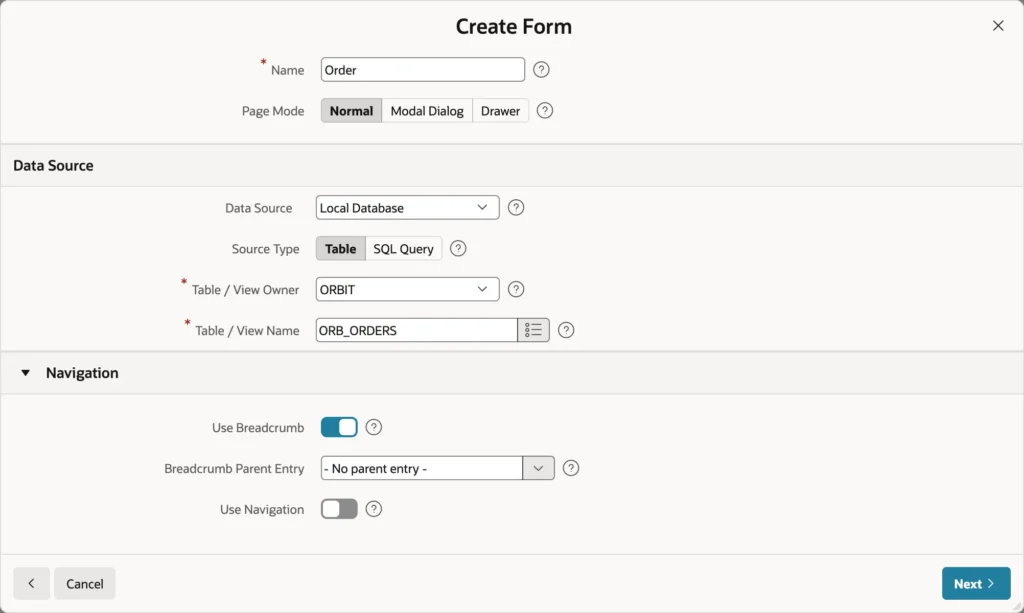
- Click Create Page, then Form.
- Give it a number and a name, and keep Page Mode as Normal. An order with its lines is too big for a dialog.
- Set Data Source to Local Database and Source Type to Table, then choose your orders table.
- Switch off Use Navigation, because users will arrive here from the orders report rather than the menu.
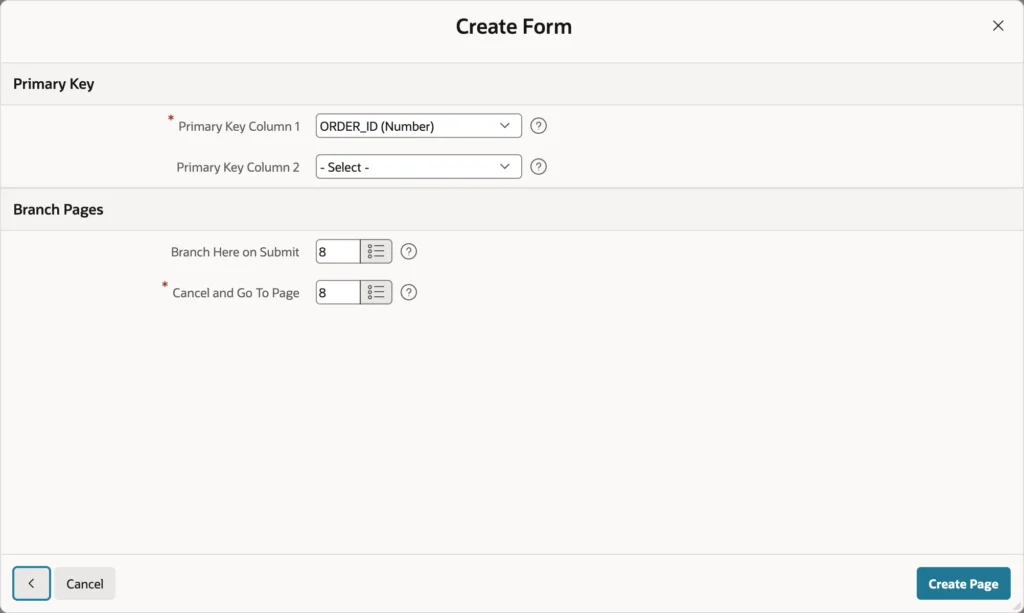
- Click Next and confirm the primary key column.
- Set both Branch Here on Submit and Cancel and Go To Page to your report page, so users end up back where they started.
Fixing What the Wizard Guesses
The wizard builds the region, the items, the four buttons, both processes, and the branch. It even spots foreign keys and turns them into select lists. What it cannot do is know your data, and a first run makes that obvious.
- The customer list shows each customer's type rather than their name, because the wizard grabbed the first text column it found.
- Columns with a handful of legal values are plain text fields.
- Labels are column names, so users are asked for a Discount Pct.
- Calculated and audit columns are editable, which they should not be.
None of that takes long to fix, and the fixes are the same on every form you will ever build.
Select Lists for Fixed Values
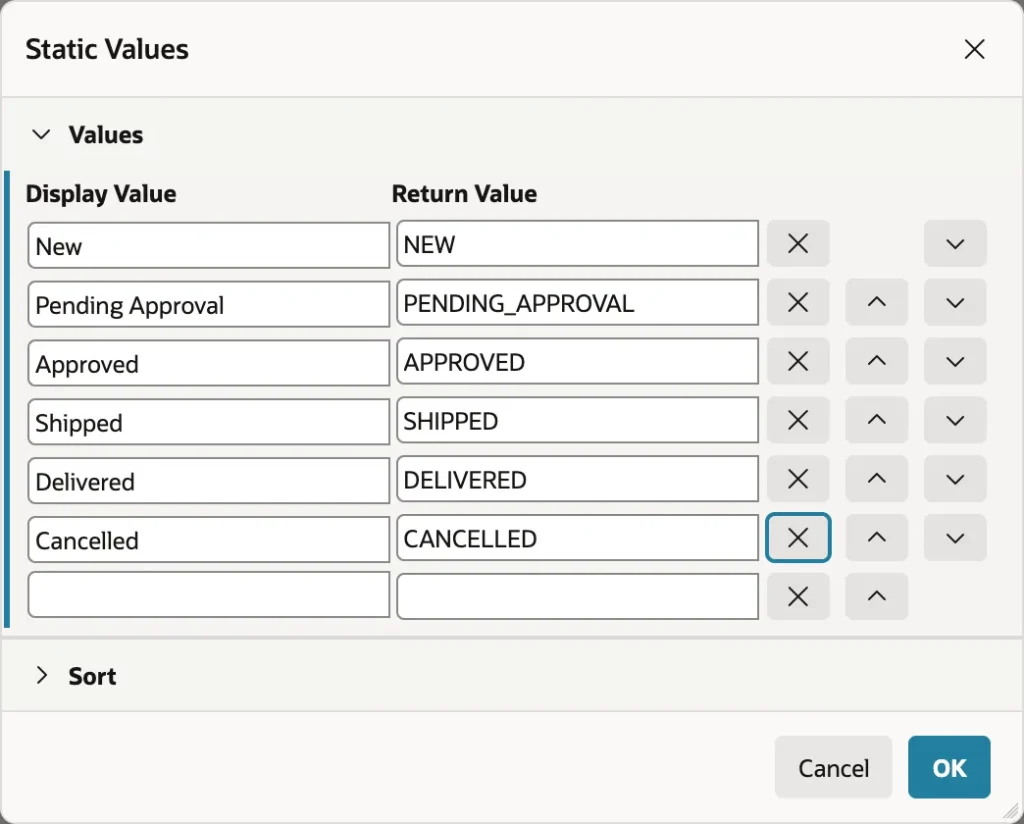
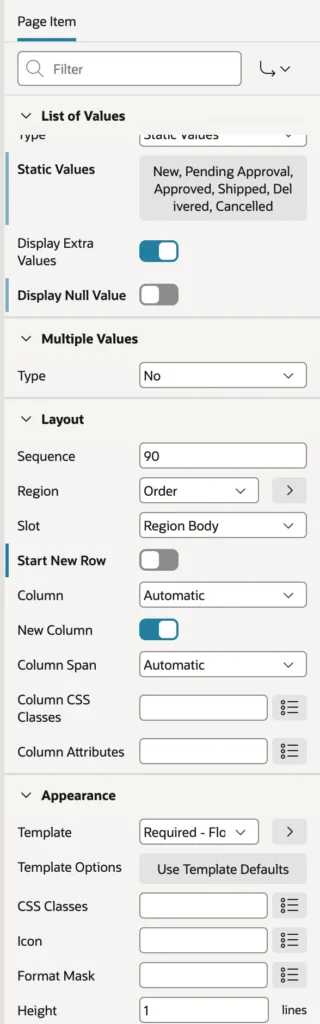
When a column allows six values and a check constraint enforces them, a text field is an invitation to typos. Set the item type to Select List, set the list of values type to Static Values, and enter each display value with the code it stores. Switch off Display Null Value when the column is mandatory, and give the item a sensible default value so new rows start in the right state.
A Searchable Picker for Long Lists
A select list of 250 customers is a scrolling contest. A Popup LOV gives users a search field instead, and the switch costs one property change plus a query.
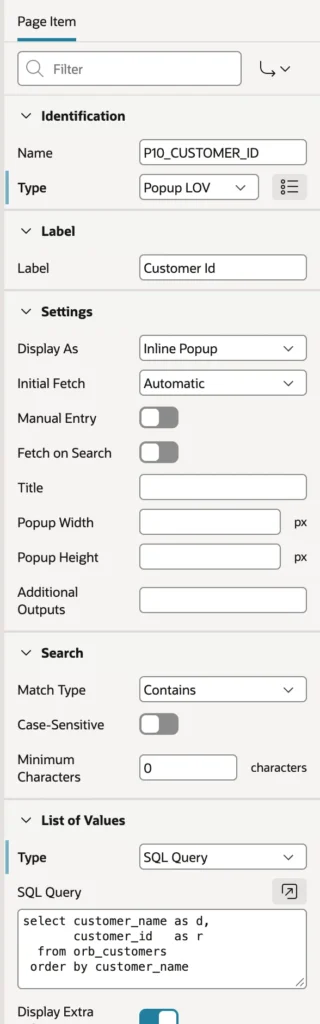
select customer_name as d,
       customer_id   as r
  from orb_customers
 order by customer_name
The convention is worth committing to memory: the first column is the display value, the second is the return value stored in the table. Where a select list is still the right control, replace the wizard's query with one that shows something readable, such as a full name rather than a first name. If your tables expose a virtual column that already joins first and last names, use it, and notice how a little database design keeps the application simpler. Getting the display value back out in code is a related trick worth knowing.
Defaults, Labels, and Formats
Three small changes make a form feel finished. Default a date item to today with a PL/SQL expression of trunc(sysdate), default numeric items such as a discount to zero, and give every date picker a format mask so dates read the same everywhere. Then rewrite the labels in the words your users use.
Display Only Is Not Query Only
Some columns should be visible but untouchable, and APEX splits that into two separate decisions that are easy to confuse.
| Property | Controls |
|---|---|
| Display Only | How the item looks: text the user cannot edit |
| Query Only | Whether the save process writes the item back to the table |
A total calculated by the database is both display only and query only, because nobody types it and the form must never write it. An order number generated during insert is display only but not query only, because the save process does have to write it. Audit columns filled by a trigger are both, with a date and time format mask so they stay readable.
Arranging the Items
By default every item starts a new row, which produces a tall, thin form that users scroll through. Switch off Start New Row on the items that should sit beside the previous one, then use Sequence to order them. Rows of three work well for a document header: number, date, and status on one line, then customer, representative, and warehouse. Universal Theme spreads each row evenly and stacks everything on a phone.
Running Your Own Code Before the Insert
Order numbers usually come from a sequence or a database function. You could make that function the item's default, but then every Create form a user opens would burn a number, whether they save the order or abandon it. Numbering the order at the moment it is inserted avoids the gaps.
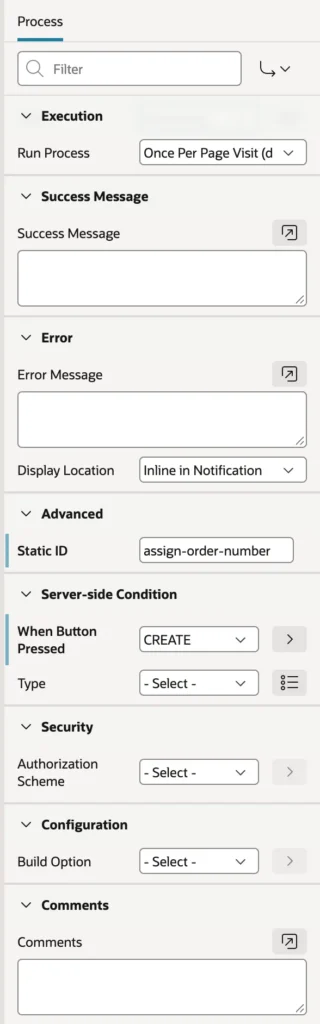
- On the Processing tab, right-click Processes and choose Create Process.
- Name it, and leave the type as Execute Code.
- Enter the PL/SQL that sets the item.
- Give it a sequence lower than the form's save process, so it runs first.
- Set the server-side condition to When Button Pressed, choosing the Create button.
:P10_ORDER_NUMBER := orb_sales.next_order_number;
The process writes the value into session state, and the save process inserts it along with everything else. Writing an item as a bind variable with a colon in front is how PL/SQL reads and writes page items throughout APEX, and it is the same mechanism you use to set any page item from PL/SQL.
Adding the Order Lines
An interactive grid can be the detail of another grid through its Master Region property, but it cannot be the detail of a form that way. The link is a bind variable instead, and this pattern of a form above an editable grid is the backbone of most document screens.
- Right-click the form region and choose Create Region Below. Name it Order Lines and set its type to Interactive Grid.
- Point its source at the lines table.
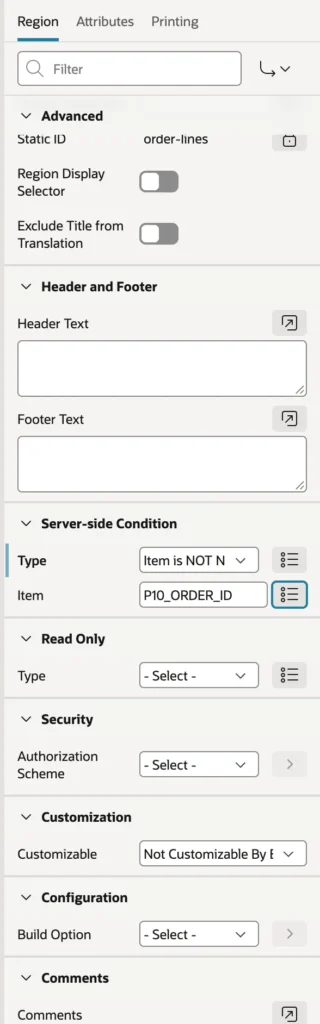
- Enter a where clause of order_id = :P10_ORDER_ID, order by the line number, and add P10_ORDER_ID to Page Items to Submit so the grid always reads the right lines.
- Set a server-side condition of Item is NOT NULL on the key item, because a brand new order has no lines to show.
- On the Attributes tab, switch on Edit Enabled.
Then configure the columns the same way you did the form items. The foreign key back to the header is the interesting one.
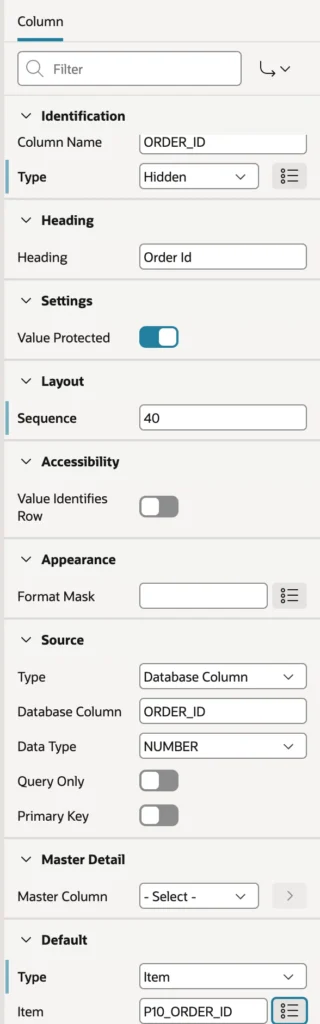
Set that column to Hidden and give it a default of type Item pointing at the form's key item, and every new line attaches itself to the right order without the user knowing there is a key at all. Make the line number display only and let the trigger assign it, give the product a popup list of values, require a quantity, and leave the unit price optional so the trigger can fill it. A calculated line total is display only and query only, like any other virtual column.
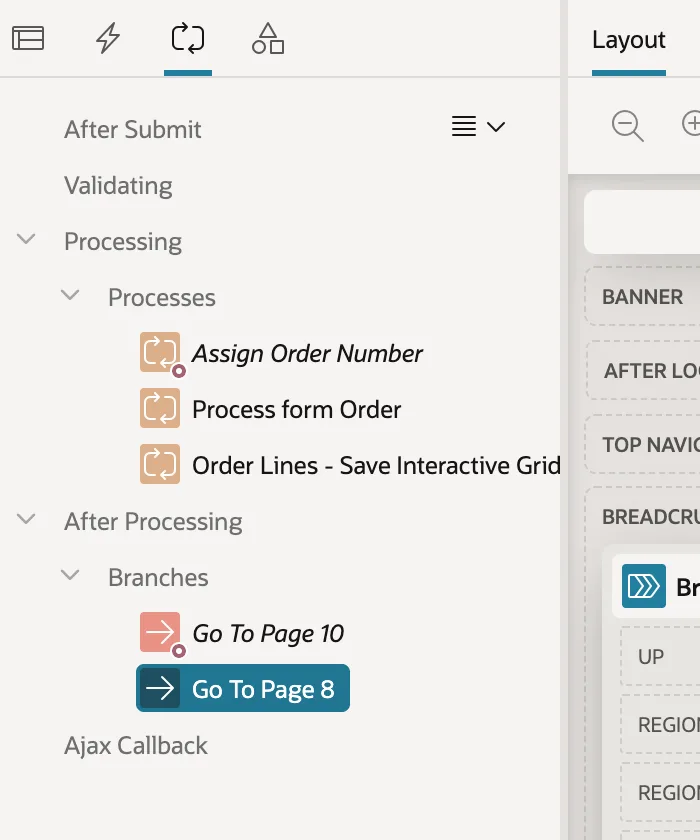
Check the Processing tree before you move on, because the order of these three processes is the difference between a working page and a foreign key error. The number assignment runs first, the form saves the header second, and the grid saves the lines last, by which time the order it points at certainly exists.
Coming Back to the Row You Just Created
There is an awkward moment after a user creates an order: the wizard's branch sends them back to the report, but what they actually want is to add lines to the thing they just made. A second branch fixes it.
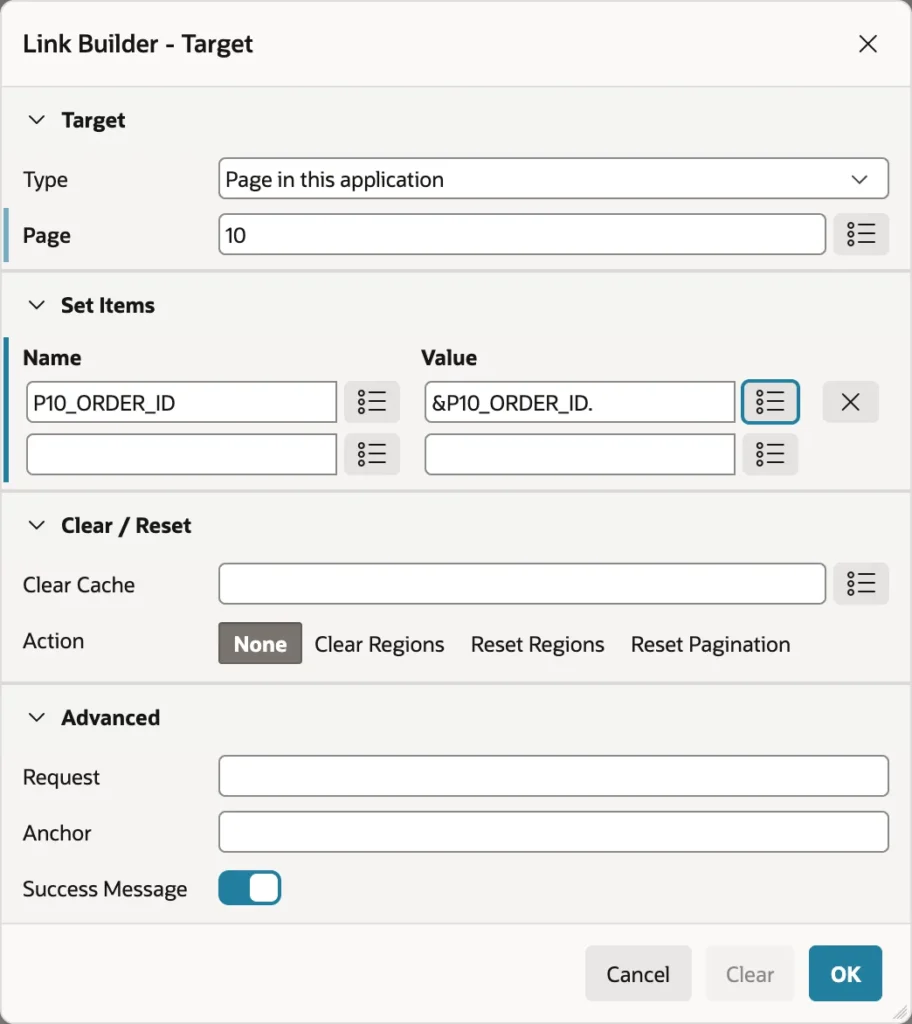
- Right-click Branches and choose Create Branch.
- In the Link Builder, target the same form page and set the key item to its own value, written as an ampersand, the item name, and a trailing period.
- Set the condition to When Button Pressed, choosing Create.
- Give it a lower sequence than the wizard's unconditional branch.
This works because the save process returns the primary key after insert, so the item already holds the new row's key by the time the branch is evaluated. Branches are checked in sequence and the first true one wins, which is why the new branch needs the lower number. The ampersand notation is a substitution string, replaced with the item's value as APEX builds the URL.
Linking the Report to the Form
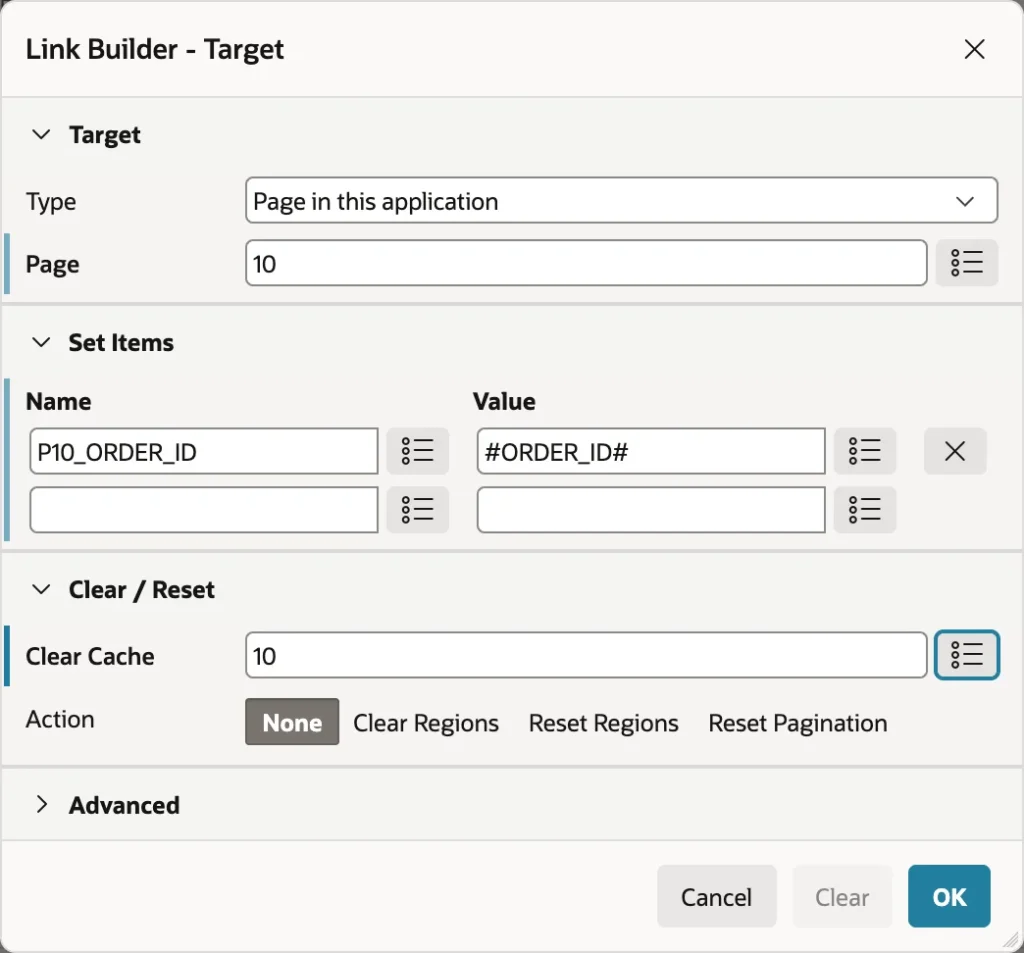
An interactive report opens its single row view by default. Change Link Column to Link to Custom Target, aim it at the form page, pass the row's key into the form's key item, and clear the form page's cache.
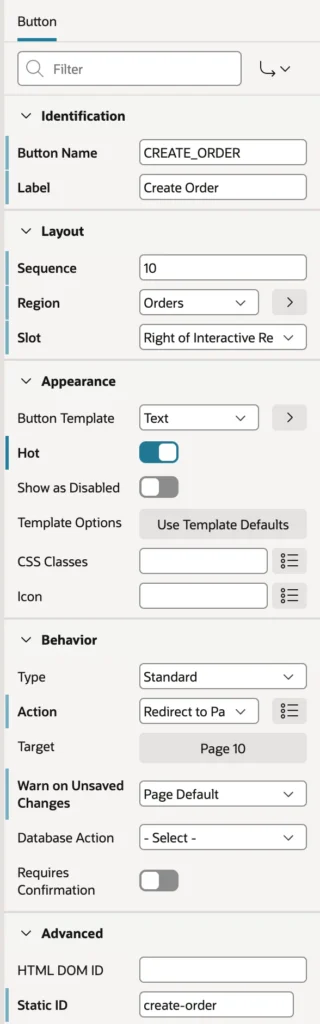
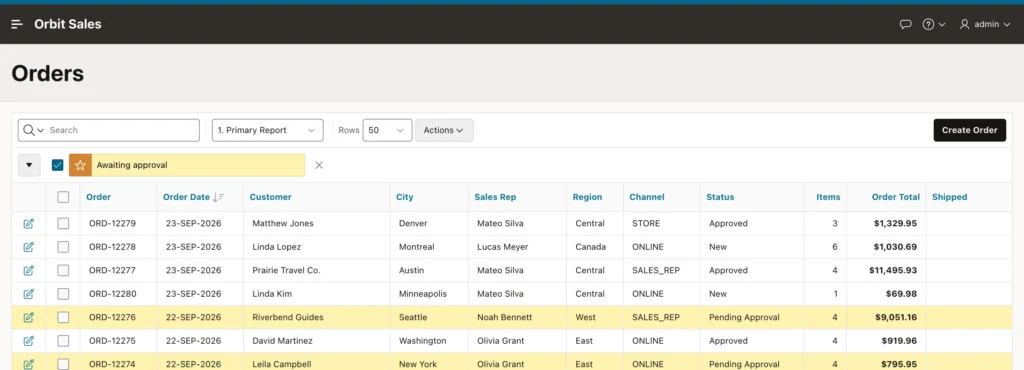
Users also need a way to start from nothing, so add a button to the report region, place it in the slot right of the search bar, mark it Hot, and redirect it to the form page with the cache cleared.
Clearing the cache matters in both links. Without it, a new order opens holding the values of the last one somebody looked at, which is the kind of bug that reaches production because it only shows up on the second click.
Seeing It Work
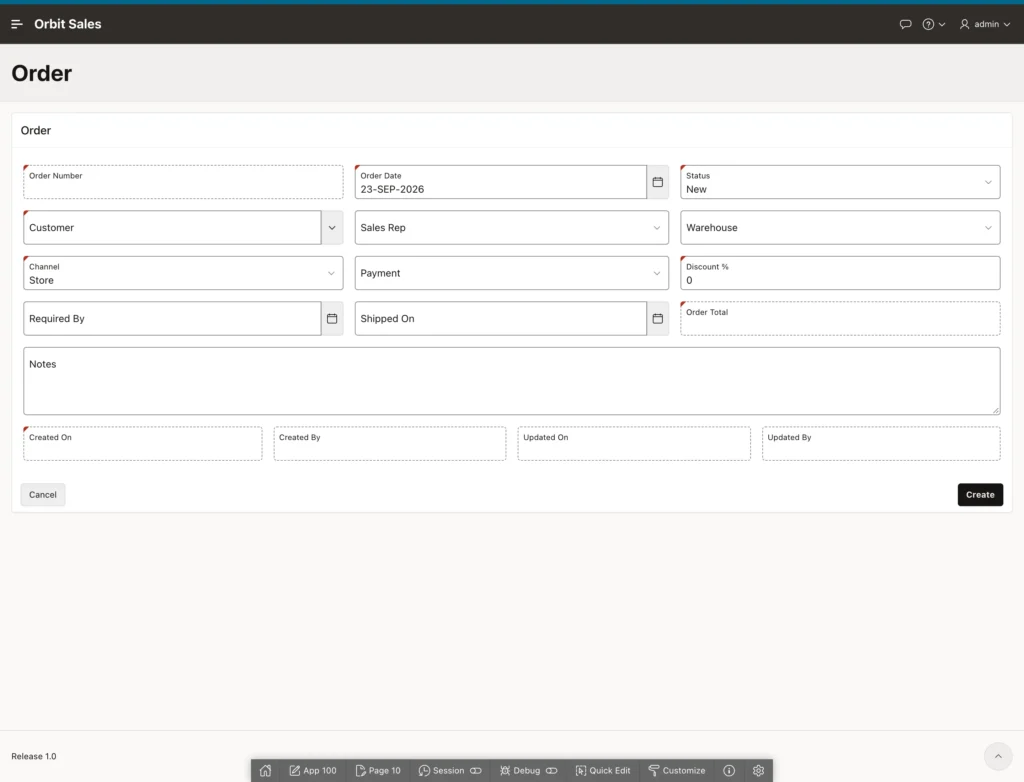
Everything you configured shows up at once on a blank form. Today's date is in place, the status and channel hold their defaults, the discount is zero, the lines grid is hidden because there is nothing to show, and the only button offered is Create.
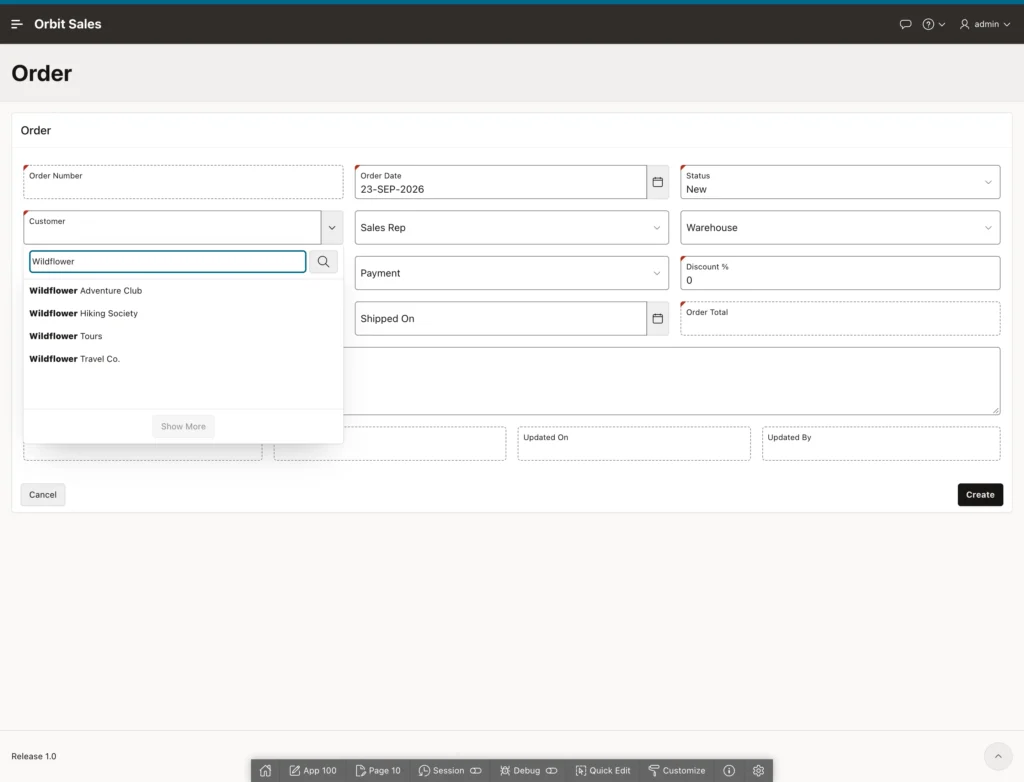
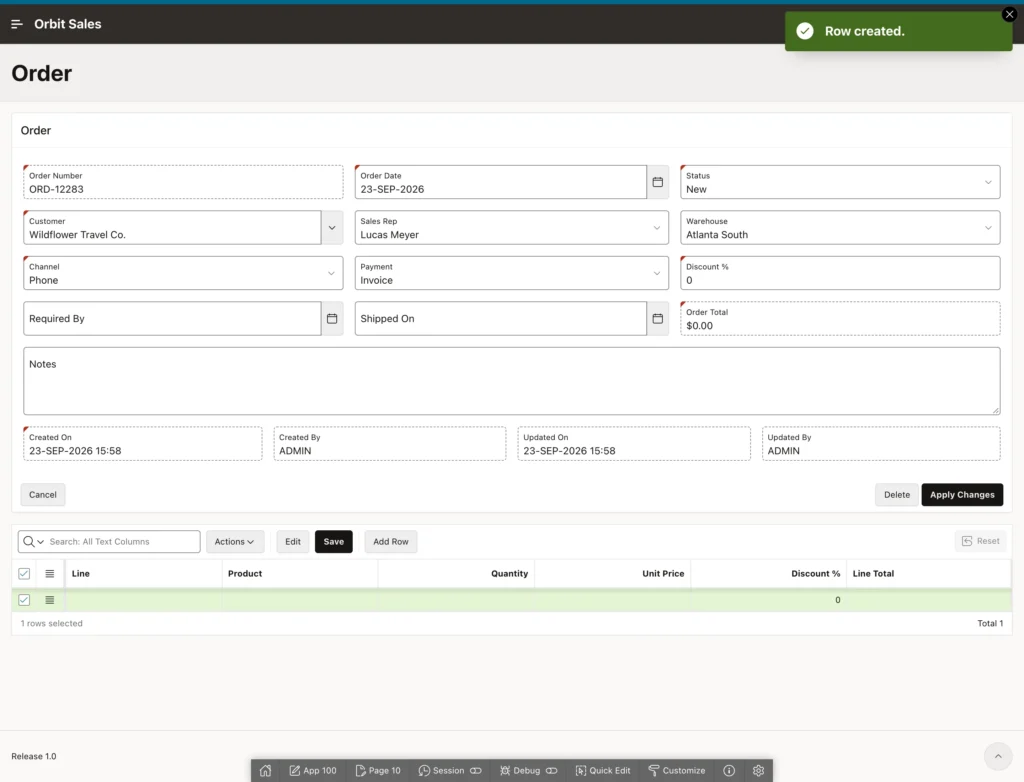
Save the header and the branch brings you straight back to the order, now carrying its generated number, with the audit columns filled by the database and the lines grid finally visible.
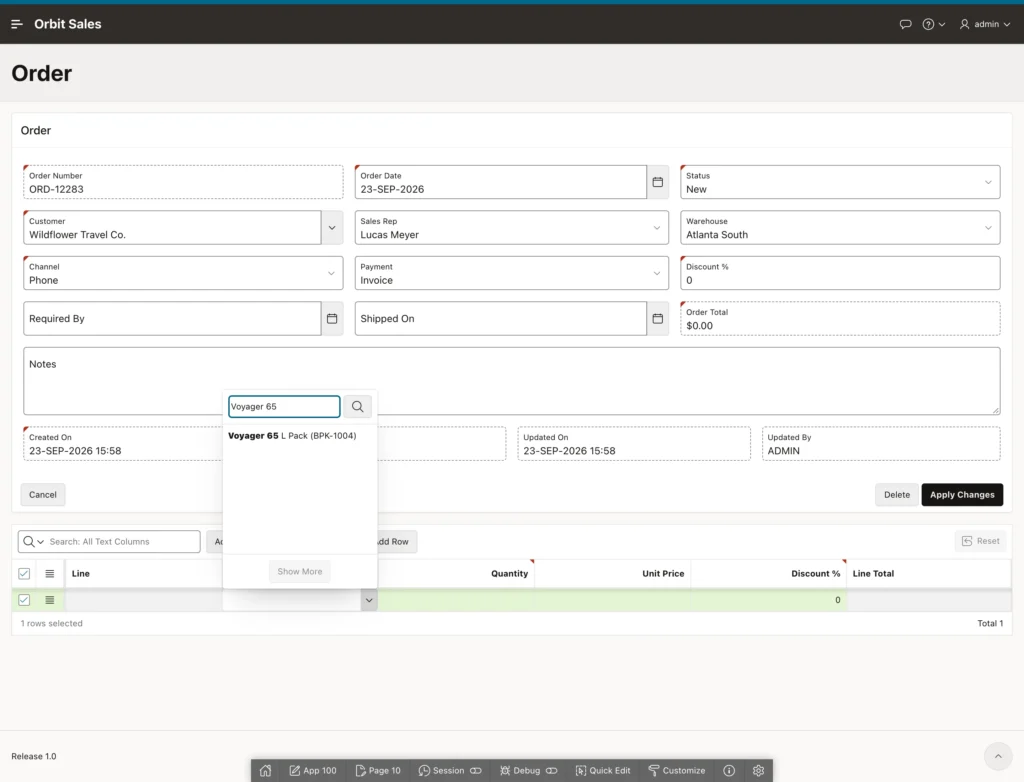
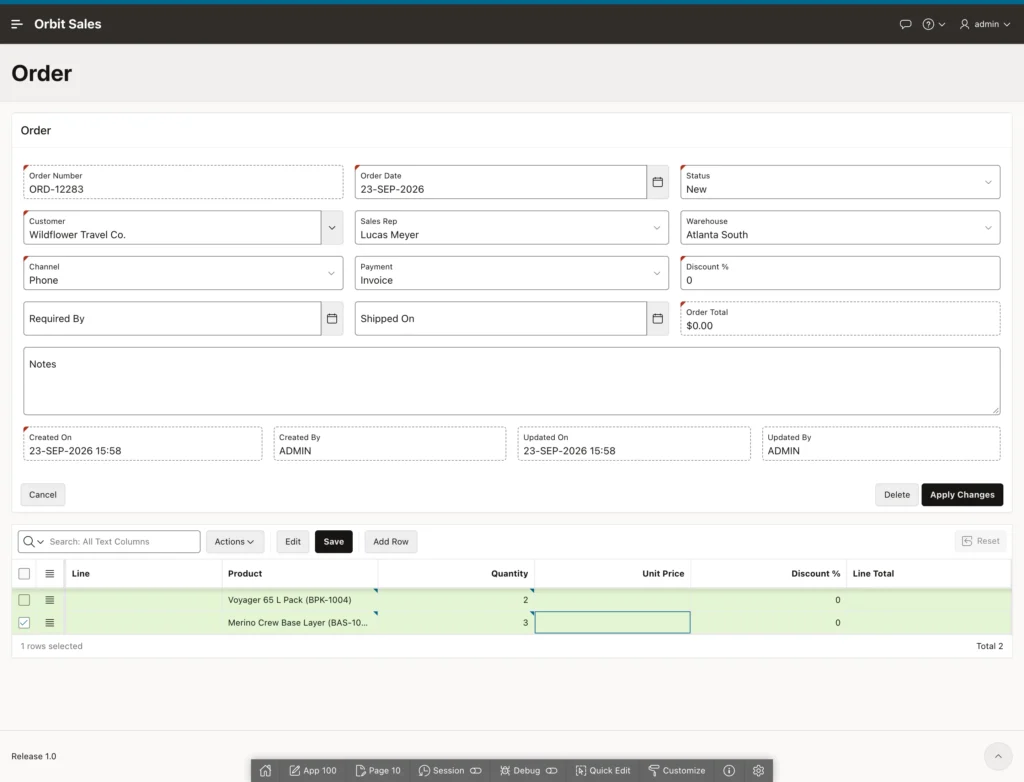
Add a couple of lines and leave the unit price blank on purpose. One submission saves the form and the grid together: the header updates, the lines insert, and the triggers number them, price them, and total the order.
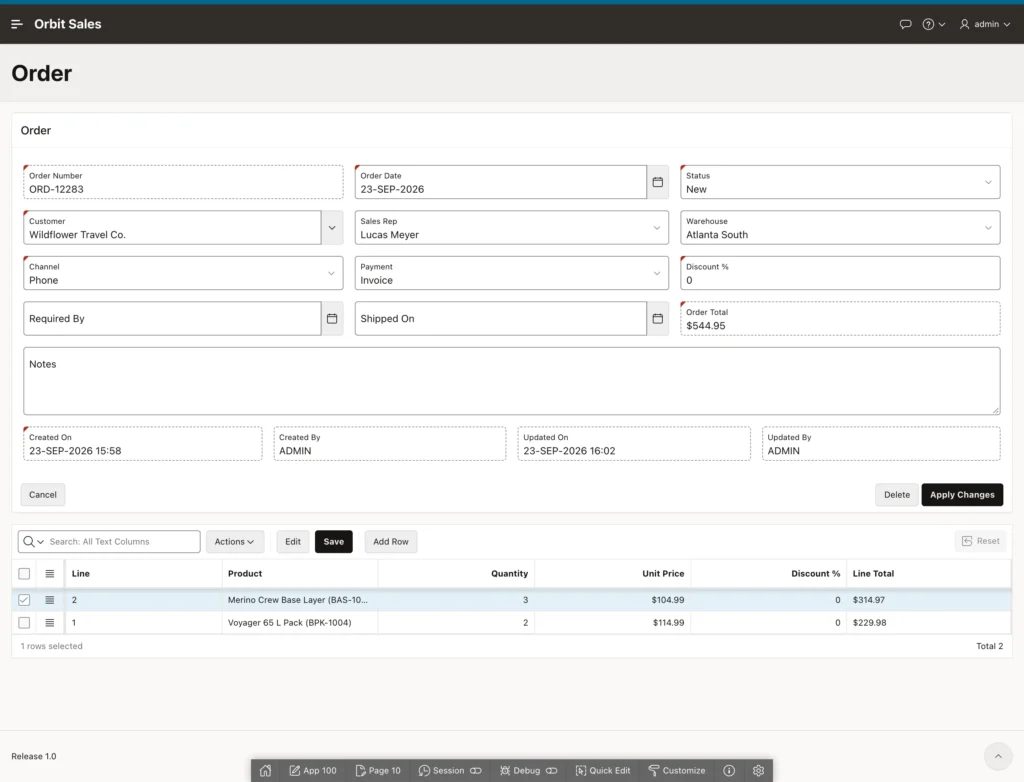
Change the discount and save again, and the total moves without the form doing any arithmetic. That is the payoff for putting the rules in the database: the browser stays simple and the numbers stay right.
Forms on Sources Other Than Tables
Most forms edit a table, but the region is not fussy about where its row comes from.
- A SQL query, such as an order joined to its customer. Set the save process target to a table or view to write to one of them, or to PL/SQL Code to write it yourself.
- A REST source, reading and writing another system's data through its API.
- JSON duality views and JSON sources, for forms over documents.
- A PL/SQL API as the save target, so the form calls a procedure such as place_order rather than writing rows directly. This is the right choice when the business logic is bigger than an insert, and it pairs well with custom error messages from PL/SQL.
Conclusion
An APEX form is five parts working together: a form region bound to a source, items bound to its columns, buttons whose database actions declare what the user asked for, an initialization process that fetches the row, and a save process that writes it. Once you can see those parts, the rest is judgment. Hidden, query-only, checksum-protected keys keep users out of records they should not reach, Prevent Lost Updates keeps two people from flattening each other's edits, and conditions on the buttons let one page serve both new and existing rows. The wizard gets you to a working page in a minute, and the hour after that is where the quality comes from: real select lists instead of text fields, a searchable picker instead of a 250-row dropdown, labels in your users' language, display-only totals the form will not overwrite, and a layout that reads in rows rather than a single column. Push the rules that must always hold into database triggers and PL/SQL, link a detail grid to the form with a bind variable and a page item default, and mind the sequence of your processes and branches. Do that, and the form stops being a screen full of fields and becomes the fastest way for someone to get their work done.
