
An Oracle APEX report does not have to read a table in its own schema. A REST Enabled SQL Service sends a SELECT statement to another Oracle database through Oracle REST Data Services (ORDS) and shows the rows in a normal report. The remote tables need no copy, database link, or REST module.
APEX stores the endpoint and the login once, in a service and a web credential, and every report that uses the service reuses them. This guide builds the whole chain: the remote tables, the ORDS endpoint and OAuth client, the trust setup in the APEX database, the service, and an interactive report.
It differs from How to Run SQL over HTTP with REST-Enabled SQL, which calls the endpoint with curl and has no APEX page. It also differs from How to Show Data from a REST API in a Report in Oracle APEX, which reads a REST module that returns fixed JSON.
Here APEX sends the SQL itself. This guide uses stock levels in warehouses as the example, and the steps work for any remote tables.
Step 1: Create the Tables in the Remote Schema
The remote database is the one that owns the data. In this example it is a schema named WHSE with two tables, warehouses and stock_levels. Here are the tables with their keys, constraints, and sample rows:
Example:
create table warehouses (
    warehouse_id   number generated by default as identity
                   constraint warehouses_pk primary key,
    warehouse_name varchar2(60) not null
                   constraint warehouses_name_uk unique,
    city           varchar2(40) not null
);

create table stock_levels (
    stock_id      number generated by default as identity
                  constraint stock_levels_pk primary key,
    warehouse_id  number not null
                  constraint stock_levels_wh_fk references warehouses (warehouse_id),
    sku           varchar2(20) not null,
    item_name     varchar2(100) not null,
    quantity      number(8) default on null 0 not null
                  constraint stock_levels_qty_ck check (quantity >= 0),
    reorder_level number(8) default on null 10 not null
                  constraint stock_levels_reorder_ck check (reorder_level >= 0),
    counted_on    date default on null sysdate,
    constraint stock_levels_wh_sku_uk unique (warehouse_id, sku)
);

create index stock_levels_sku_ix on stock_levels (sku);

insert into warehouses (warehouse_name, city) values ('North Hub', 'Delhi');
insert into warehouses (warehouse_name, city) values ('West Hub', 'Mumbai');
insert into warehouses (warehouse_name, city) values ('South Hub', 'Chennai');

insert into stock_levels (warehouse_id, sku, item_name, quantity, reorder_level)
select w.warehouse_id, s.sku, s.item_name, s.quantity, s.reorder_level
from   warehouses w
join  (select 'North Hub' wn, 'CMP-100' sku, 'Laptop 14 inch' item_name, 25 quantity, 10 reorder_level from dual union all
       select 'North Hub', 'ACC-100', 'Wireless Mouse', 150, 40 from dual union all
       select 'North Hub', 'FUR-100', 'Office Chair', 4, 8 from dual union all
       select 'West Hub',  'CMP-100', 'Laptop 14 inch', 6, 10 from dual union all
       select 'West Hub',  'ACC-110', 'Mechanical Keyboard', 60, 20 from dual union all
       select 'West Hub',  'FUR-110', 'Standing Desk', 3, 5 from dual union all
       select 'South Hub', 'CMP-300', 'Monitor 27 inch', 40, 15 from dual union all
       select 'South Hub', 'ACC-120', 'USB-C Dock', 35, 10 from dual union all
       select 'South Hub', 'FUR-120', 'Desk Lamp', 0, 12 from dual) s
       on s.wn = w.warehouse_name;

commit;

select w.warehouse_name, w.city, s.sku, s.item_name, s.quantity, s.reorder_level
from   stock_levels s
join   warehouses w on w.warehouse_id = s.warehouse_id
order  by w.warehouse_id, s.sku;
Output:
Table WAREHOUSES created.

Table STOCK_LEVELS created.

Index STOCK_LEVELS_SKU_IX created.

1 row inserted.

1 row inserted.

1 row inserted.

9 rows inserted.

Commit complete.

WAREHOUSE_NAME    CITY       SKU        ITEM_NAME                 QUANTITY    REORDER_LEVEL
_________________ __________ __________ ______________________ ___________ ________________
North Hub         Delhi      ACC-100    Wireless Mouse                 150               40
North Hub         Delhi      CMP-100    Laptop 14 inch                  25               10
North Hub         Delhi      FUR-100    Office Chair                     4                8
West Hub          Mumbai     ACC-110    Mechanical Keyboard             60               20
West Hub          Mumbai     CMP-100    Laptop 14 inch                   6               10
West Hub          Mumbai     FUR-110    Standing Desk                    3                5
South Hub         Chennai    ACC-120    USB-C Dock                      35               10
South Hub         Chennai    CMP-300    Monitor 27 inch                 40               15
South Hub         Chennai    FUR-120    Desk Lamp                        0               12

9 rows selected.
The APEX schema has its own table named WAREHOUSES with four hubs, including East Hub. That is deliberate, to prove later that the report reads the remote table and not the local one:
Example:
select warehouse_name from warehouses order by 1;
Output:
WAREHOUSE_NAME
_________________
East Hub
North Hub
South Hub
West Hub
Step 2: Enable ORDS and Create an OAuth Client
REST Enabled SQL is a feature of ORDS, and it must be switched on in the ORDS configuration with restEnabledSql.active set to true. It was already on for this installation. The remote schema also has to be REST-enabled, which gives it a URL alias; here the alias is warehouse.
Instead of the schema password, APEX will log in with an OAuth client that holds the SQL Developer role, the role REST Enabled SQL accepts. Run this as the remote schema. ORDS shows the client secret only once, so copy it when you run the script yourself:
Example:
set serveroutput on

begin
    ords.enable_schema(
        p_enabled             => true,
        p_schema              => 'WHSE',
        p_url_mapping_type    => 'BASE_PATH',
        p_url_mapping_pattern => 'warehouse',
        p_auto_rest_auth      => true);
    commit;
end;
/

declare
    v_client ords_types.t_client_credentials;
begin
    v_client := ords_security.register_client(
                    p_name          => 'apex_sql_client',
                    p_grant_type    => 'client_credentials',
                    p_support_email => 'dba@warehouse.example',
                    p_client_secret => ords_types.oauth_client_secret());
    ords_security.grant_client_role(
        p_client_name => 'apex_sql_client',
        p_role_name   => 'SQL Developer');
    commit;
    dbms_output.put_line('client_id:     ' || v_client.client_key.client_id);
    dbms_output.put_line('client_secret: ' || '(shown once, copy it now)');
end;
/
Output:
PL/SQL procedure successfully completed.

client_id:     CdeIzWuWss1hechozICLzg..
client_secret: (shown once, copy it now)

PL/SQL procedure successfully completed.
The endpoint is now https://localhost:8443/ords/warehouse/_/sql. Replace the host and port with your ORDS address.
Step 3: Let the APEX Database Reach and Trust ORDS
The call to ORDS is made by the database that runs APEX, and it uses HTTPS. Two things are needed there. The APEX schema owner needs a network access rule for the ORDS host and port, and the database needs a wallet that trusts the ORDS certificate.
First create the wallet. The first command saves the ORDS certificate, and the other two put it in an auto-login wallet. Replace WALLET_PASSWORD with a password of your own:
Example:
echo | openssl s_client -connect localhost:8443 2>/dev/null | openssl x509 > /home/oracle/ords_cert.pem

orapki wallet create -wallet /home/oracle/ords_wallet -pwd WALLET_PASSWORD -auto_login

orapki wallet add -wallet /home/oracle/ords_wallet -trusted_cert -cert /home/oracle/ords_cert.pem -pwd WALLET_PASSWORD
Output:
Operation is successfully completed.
Then, connected as an administrator, allow APEX to call the host and tell the APEX instance where the wallet is:
Example:
begin
    dbms_network_acl_admin.append_host_ace(
        host       => 'localhost',
        lower_port => 8443,
        upper_port => 8443,
        ace        => xs$ace_type(
                          privilege_list => xs$name_list('http'),
                          principal_name => 'APEX_260100',
                          principal_type => xs_acl.ptype_db));
    commit;
end;
/

begin
    apex_instance_admin.set_parameter(
        p_parameter => 'WALLET_PATH',
        p_value     => 'file:/home/oracle/ords_wallet');
    commit;
end;
/

select host, lower_port, upper_port, principal, privilege
from   dba_host_aces
where  principal = 'APEX_260100'
and    host = 'localhost';

select apex_instance_admin.get_parameter('WALLET_PATH') as wallet_path
from   dual;
Output:
PL/SQL procedure successfully completed.

PL/SQL procedure successfully completed.

HOST	     LOWER_PORT UPPER_PORT PRINCIPAL	  PRIVILEGE
------------ ---------- ---------- -------------- ----------
localhost	   8443       8443 APEX_260100	  HTTP

1 row selected.

WALLET_PATH
----------------------------------------
file:/home/oracle/ords_wallet

1 row selected.
The host name in the endpoint must be the name in the certificate. The test certificate here is issued to localhost, so the database reaches ORDS as localhost.
Step 4: Create a Web Credential
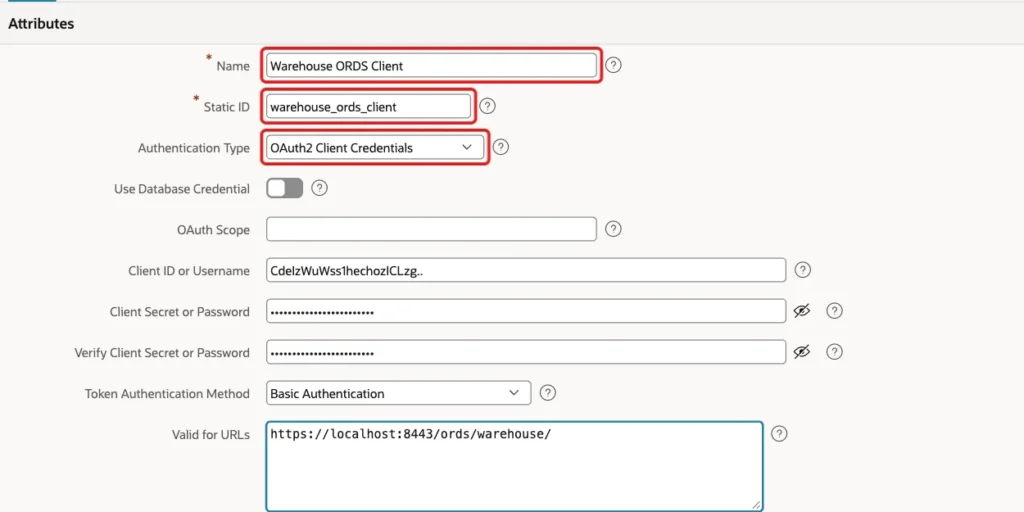
In App Builder, open Shared Components and click Credentials (or open Workspace Utilities, Web Credentials). Click Create. Set Name to Warehouse ORDS Client and Static ID to warehouse_ords_client. Set Authentication Type to OAuth2 Client Credentials.
Enter the client ID and the client secret from Step 2, and repeat the secret in Verify Client Secret or Password. In Valid for URLs enter https://localhost:8443/ords/warehouse/, so that APEX sends the credential only to this address. Click Create.
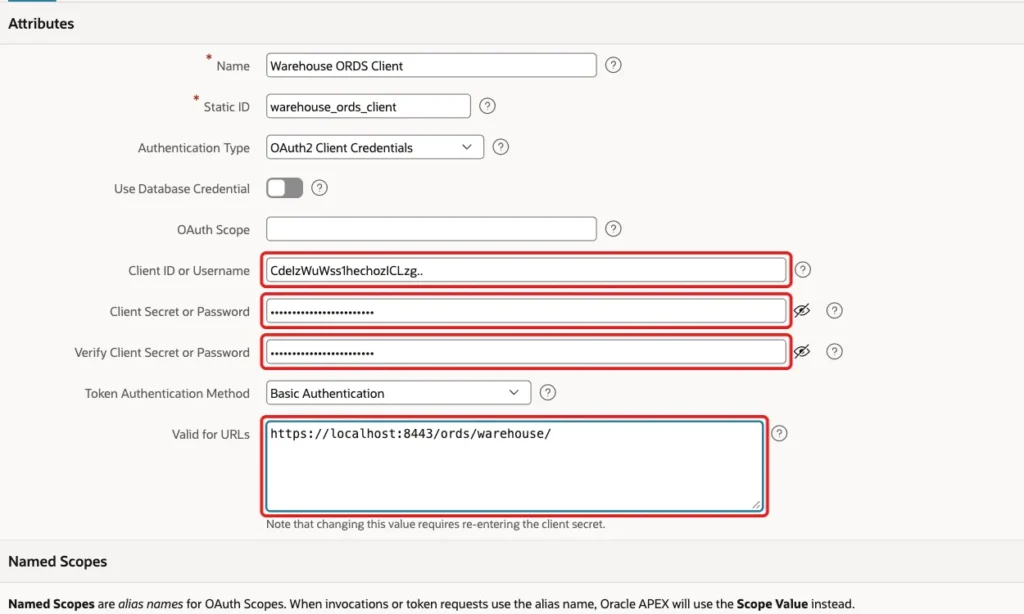
APEX stores the secret encrypted. It cannot be read back, so keep your own copy in a safe place.
Step 5: Create the REST Enabled SQL Service
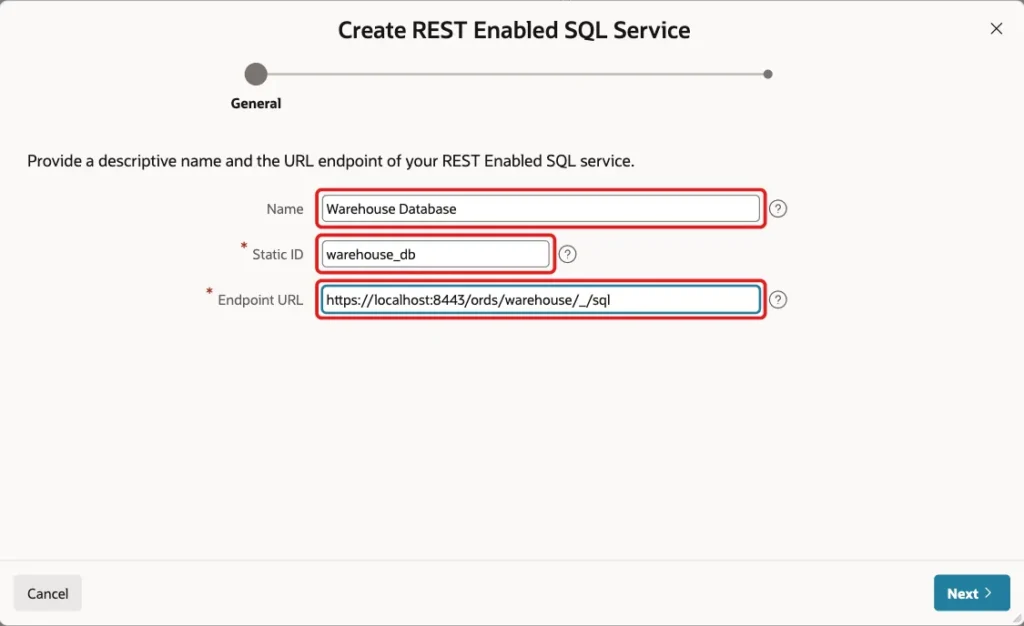
Go to Shared Components and click REST Enabled SQL Databases (Workspace Utilities, REST Enabled SQL). Click Create. On the first screen, set Name to Warehouse Database, Static ID to warehouse_db, and Endpoint URL to the address from Step 2. Click Next.
On the Authentication screen, open the Credentials list and choose Warehouse ORDS Client, the web credential from Step 4. The screen also lets you type a user name and password for Basic Authentication instead; this guide uses the OAuth client.
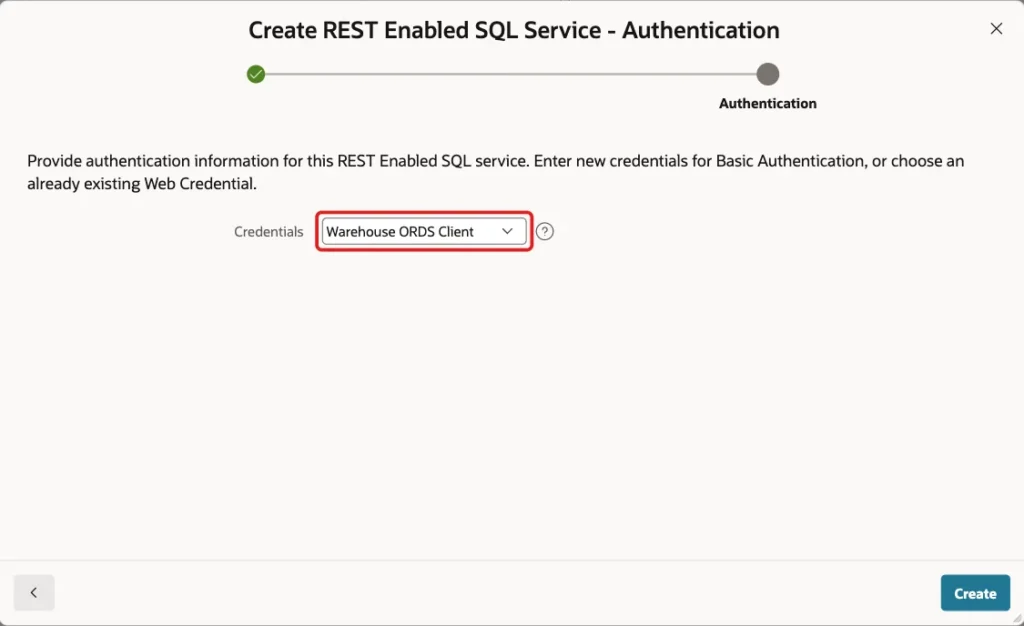
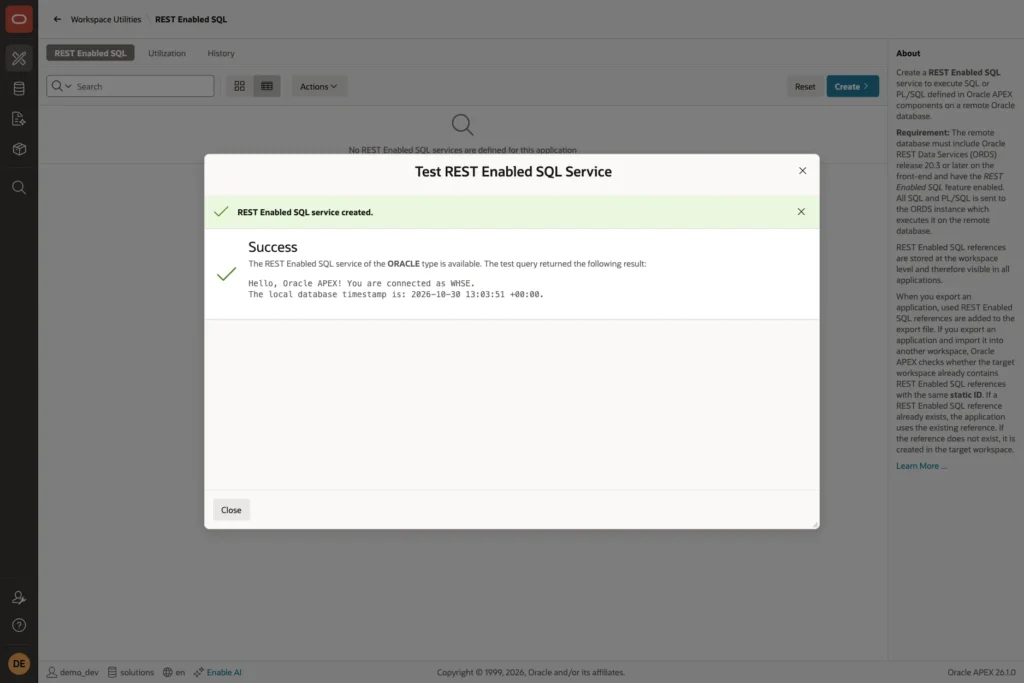
Click Create. APEX tests the service right away by sending a small query. A success message shows that the remote database answered and that the session is connected as WHSE:
Step 6: Create a Report on the Remote Database
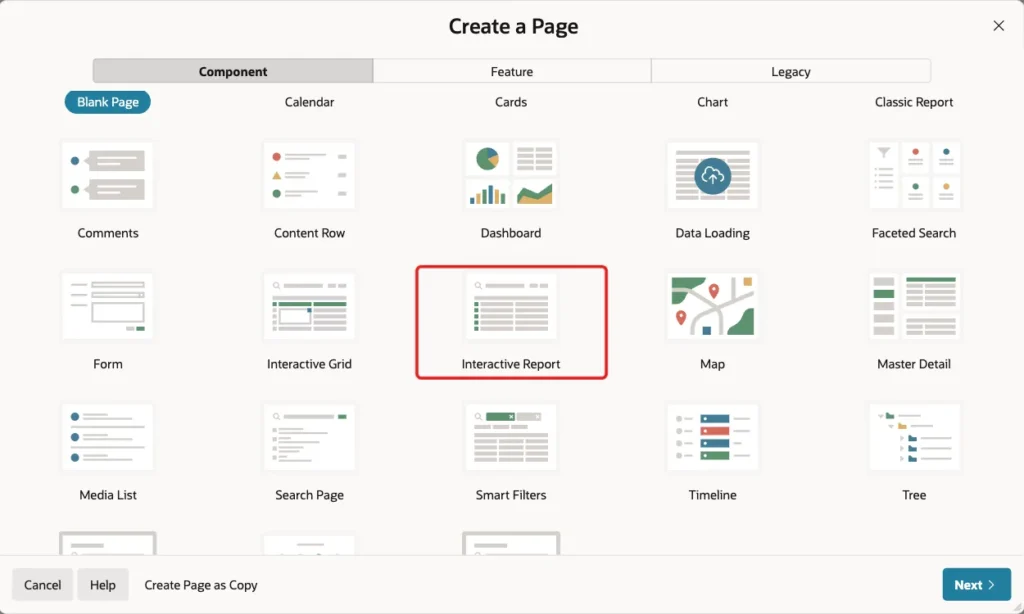
Open the application in Page Designer, click Create, and choose Page. Under Component, choose Interactive Report. Click Next.
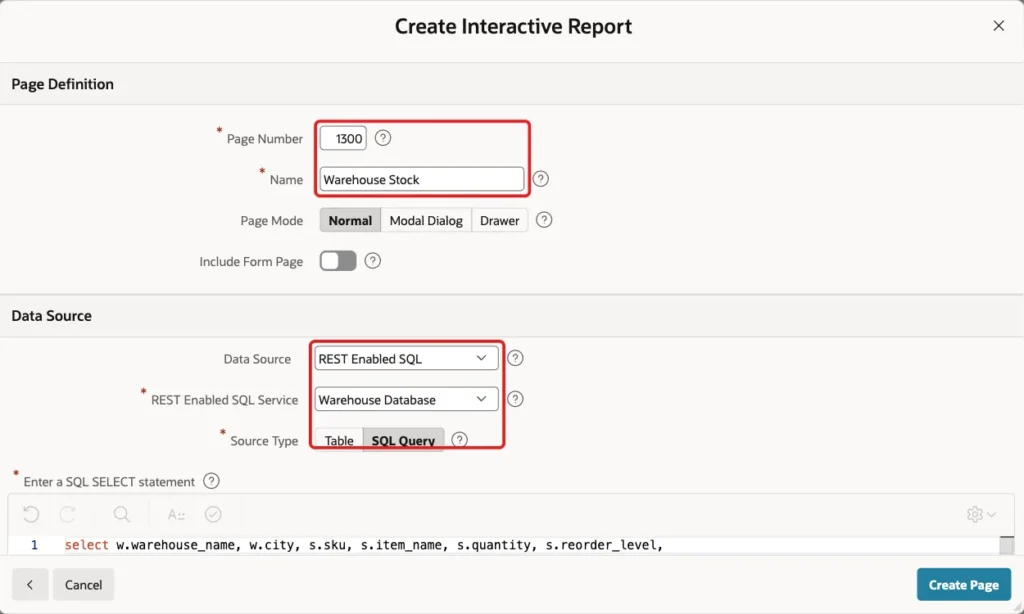
Set Page Number to 1300 and Name to Warehouse Stock. In Data Source, set Data Source to REST Enabled SQL and REST Enabled SQL Service to Warehouse Database. Set Source Type to SQL Query.
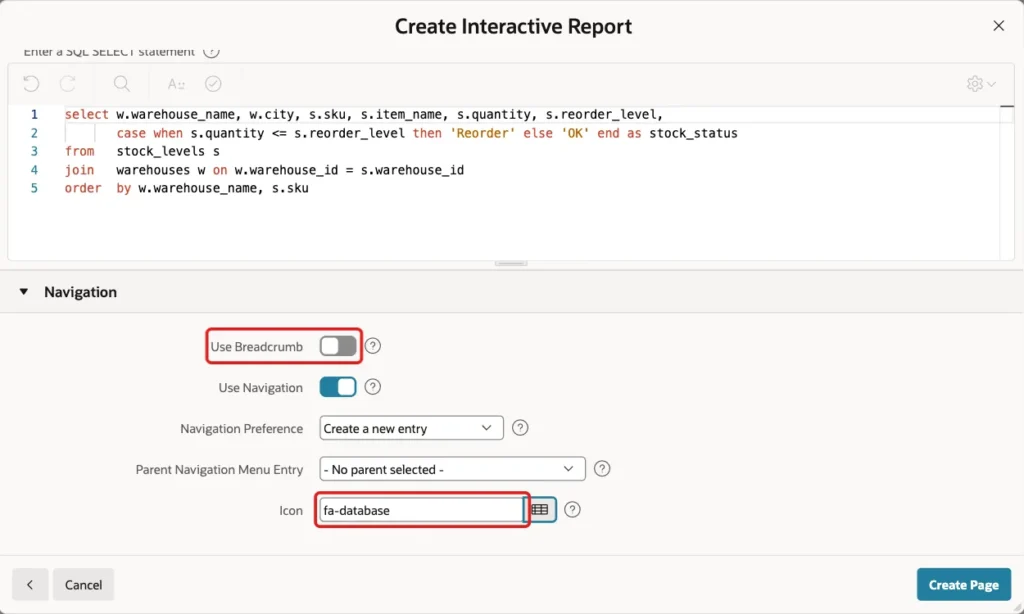
Enter the query below. It joins both remote tables and adds a stock status column. Table works too: choose a table or view of the remote schema and APEX builds the query for you.
Example:
select w.warehouse_name, w.city, s.sku, s.item_name, s.quantity, s.reorder_level,
       case when s.quantity <= s.reorder_level then 'Reorder' else 'OK' end as stock_status
from   stock_levels s
join   warehouses w on w.warehouse_id = s.warehouse_id
order  by w.warehouse_name, s.sku
In the Navigation group, turn off Use Breadcrumb, keep Use Navigation on, and set Icon to fa-database. Click Create Page.
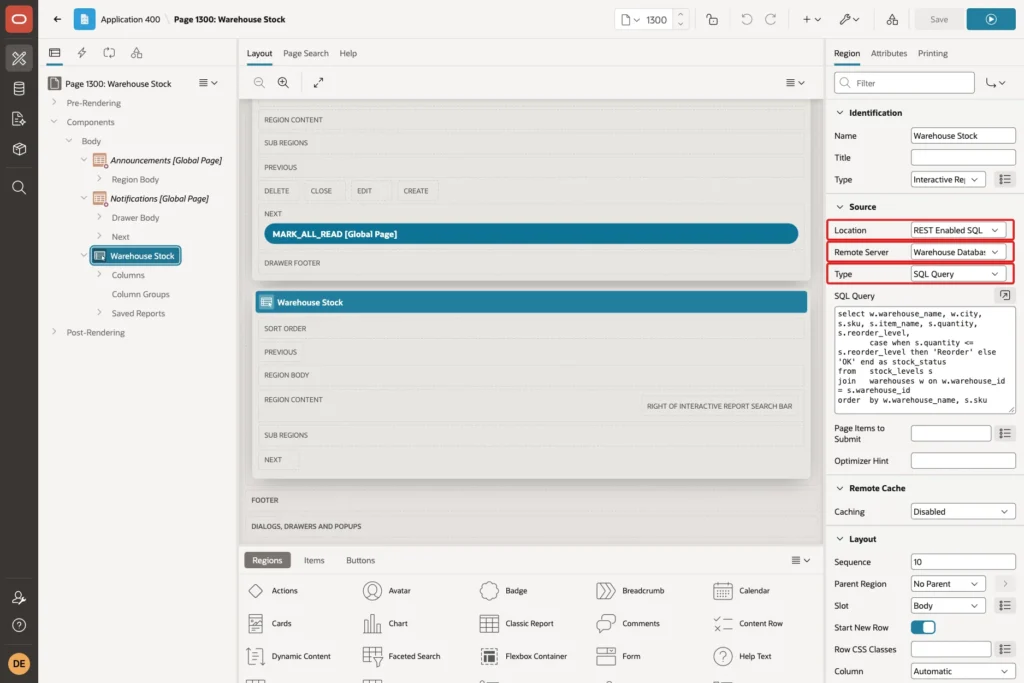
In Page Designer, select the Warehouse Stock region. Under Source, the Location is REST Enabled SQL, the Remote Server is Warehouse Database, and the Type is SQL Query. Change these properties here if the service or query changes later.
Step 7: Run the Report
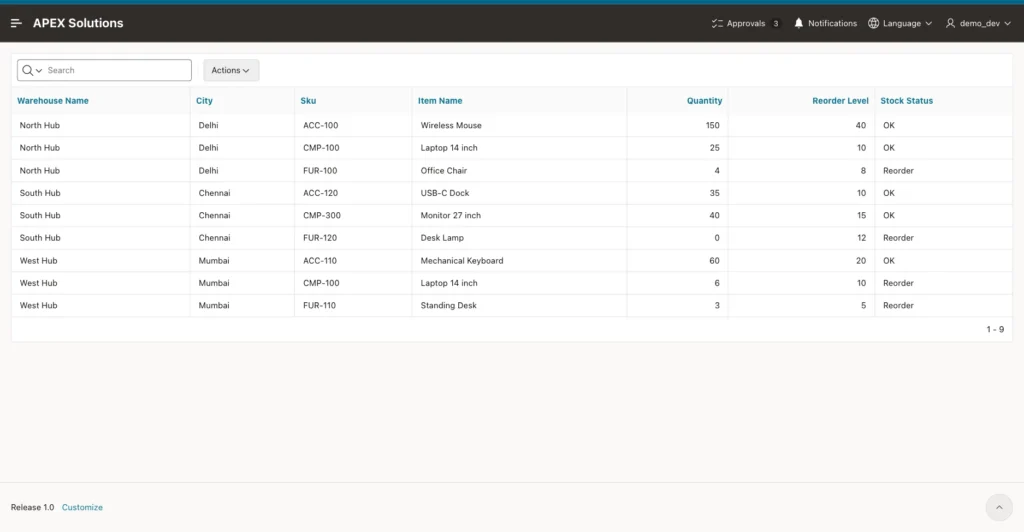
Run the page. APEX sends the query to ORDS, the remote database runs it, and the rows come back as a report. It shows three hubs and nine stock rows.
East Hub from the local WAREHOUSES table is not there, so the data really comes from the remote schema. Office Chair at North Hub, Desk Lamp at South Hub, and the Laptop and Standing Desk at West Hub show Reorder.
Step 8: Test a Change in the Remote Data
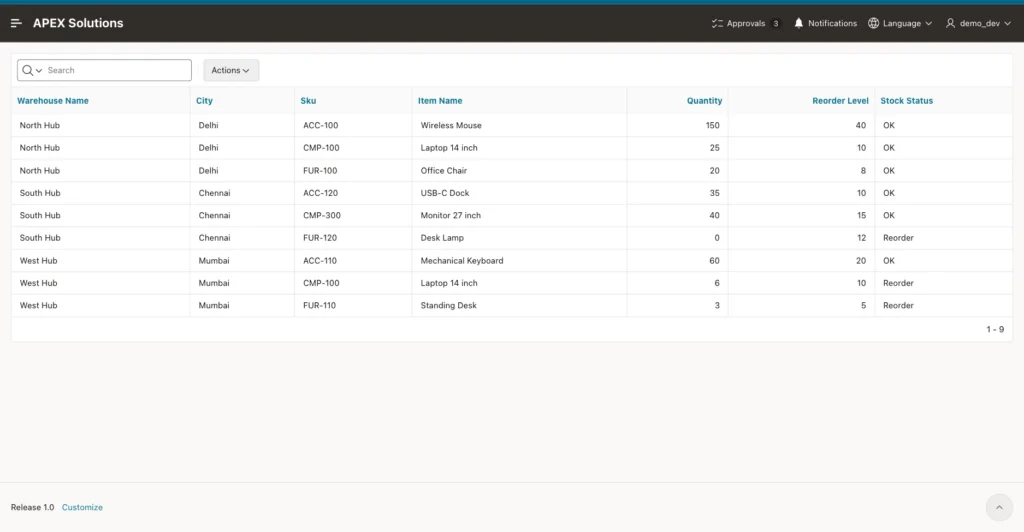
Restock the Office Chair at North Hub from 4 to 20 in the remote schema, and reload the report:
Example:
update stock_levels
set    quantity = 20
where  sku = 'FUR-100'
and    warehouse_id = (select warehouse_id from warehouses where warehouse_name = 'North Hub');

commit;

select s.sku, s.item_name, s.quantity, s.reorder_level
from   stock_levels s
join   warehouses w on w.warehouse_id = s.warehouse_id
where  w.warehouse_name = 'North Hub'
order  by s.sku;
Output:
1 row updated.

Commit complete.

SKU        ITEM_NAME            QUANTITY    REORDER_LEVEL
__________ _________________ ___________ ________________
ACC-100    Wireless Mouse            150               40
CMP-100    Laptop 14 inch             25               10
FUR-100    Office Chair               20                8
The report shows the new quantity at once, and the status of the Office Chair changes from Reorder to OK. Nothing is copied or cached, because the SQL runs on the remote database on every refresh.
Step 9: Test a Wrong Credential
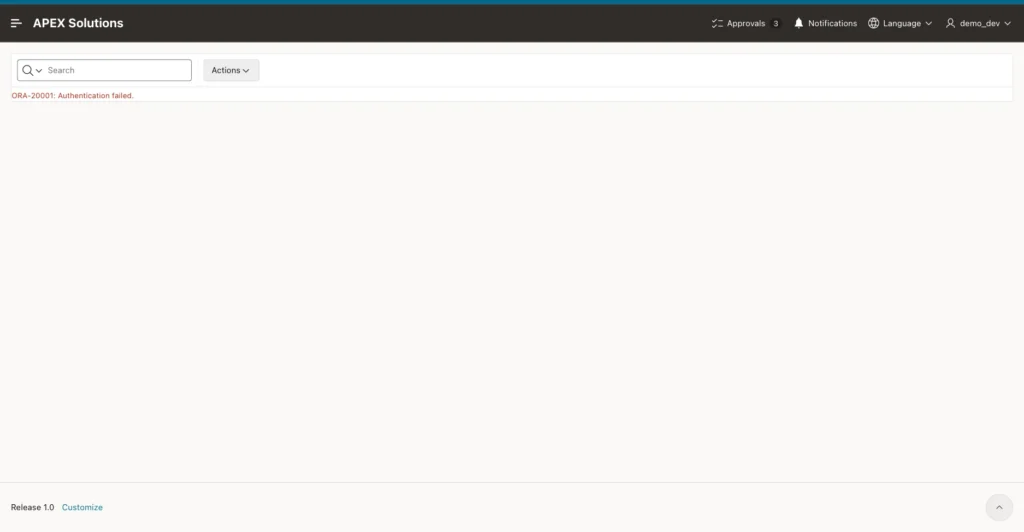
To see what users get when the login is wrong, save a wrong secret in the web credential. This test uses a wrong client secret; the correct one was restored after the test:
Example:
begin
    apex_util.set_workspace('SOLUTIONS');
    apex_credential.set_persistent_credentials(
        p_credential_static_id => 'warehouse_ords_client',
        p_client_id            => 'CdeIzWuWss1hechozICLzg..',
        p_client_secret        => 'wrong-secret');
    commit;
end;
/
Output:
PL/SQL procedure successfully completed.
Reload the report. It shows an authentication error instead of rows.
Things to Know
- The SQL and PL/SQL of the report run as the remote schema, here WHSE, with its privileges. Give the remote schema only the tables APEX needs, and treat the OAuth client like a password.
- The ORDS version on the remote side must support REST Enabled SQL and have restEnabledSql.active set to true.
- The database that runs APEX must trust the ORDS certificate. This test used a self-signed certificate, so the wallet holds that certificate; with a certificate from a public authority the wallet needs the authority's root certificate instead.
- The credential's Valid for URLs list limits where APEX may send the secret. Keep it as narrow as the endpoint.
- The region has a Remote Cache group in Page Designer. Caching was Disabled in this test, which is why Step 8 showed the change immediately.
- A credential saved from a script, as in Step 9, replaces the one in the workspace. Save the correct secret again afterwards, or the report keeps failing.
Related Guides
- How to Run SQL over HTTP with REST-Enabled SQL
- How to Show Data from a REST API in a Report in Oracle APEX
Conclusion
To query a remote database from Oracle APEX, REST-enable the remote schema in ORDS, create an OAuth client with the SQL Developer role, and make sure the APEX database trusts the ORDS certificate. Then create a web credential and a REST Enabled SQL Service.
Build reports on the service with the Create Page wizard or by setting the region Location to REST Enabled SQL. The remote database runs the SQL on every refresh, so the report always shows current data.
See my articles more often when you search Google.
