
An email template keeps the subject, the layout and the wording of a message in one place in Shared Components. Your code only passes the values, such as a name or a number, and Oracle APEX fills them into the placeholders. A text change then never needs a code change.
This guide builds a template for an order approval mail with APEX_MAIL.SEND and a placeholders JSON. It uses orders as the example, and the same steps work for any message. Every part was tested in a running application.
The guide How to Send Emails, Print Documents, and Create Barcodes Using APEX_MAIL and APEX_BARCODE writes the subject and the body in the code of each call.
Here the text lives in a template instead. The guide How to Email a Report Automatically Every Week in Oracle APEX sends a fixed mail with an attachment, and this one sends a personal mail for each record.
Step 1: Create the Table
The orders and customers tables already exist in this example. The only new table is ORDER_MAIL_LOG. It keeps one row for each mail that was sent, with the order, the address and the template, so you can prove what was sent.
The foreign key points to ORDERS with ON DELETE CASCADE, and SENT_ON uses DEFAULT ON NULL, so an insert never has to set it.
Example:
create table order_mail_log (
  log_id       number generated by default on null as identity,
  order_id     number              not null,
  sent_to      varchar2(120 char)  not null,
  template_id  varchar2(100 char)  not null,
  mail_id      number              not null,
  sent_on      date                default on null sysdate not null,
  constraint order_mail_log_pk primary key (log_id),
  constraint order_mail_log_order_fk foreign key (order_id) references orders (order_id) on delete cascade
);

create index order_mail_log_order_ix on order_mail_log (order_id);

select table_name, constraint_name, constraint_type from user_constraints
where table_name = 'ORDER_MAIL_LOG' and constraint_type in ('P', 'R') order by constraint_type;

select order_id, customer_id, status from orders where order_id in (22, 30, 31) order by order_id;
Output:
Table ORDER_MAIL_LOG created.

Index ORDER_MAIL_LOG_ORDER_IX created.

TABLE_NAME        CONSTRAINT_NAME            CONSTRAINT_TYPE
_________________ __________________________ __________________
ORDER_MAIL_LOG    ORDER_MAIL_LOG_PK          P
ORDER_MAIL_LOG    ORDER_MAIL_LOG_ORDER_FK    R

   ORDER_ID    CUSTOMER_ID STATUS
___________ ______________ _________
         22             35 NEW
         30             11 NEW
         31             18 NEW
Orders 22, 30 and 31 are in the status NEW, and they are the ones the tests approve.
Step 2: Open the Email Templates Page
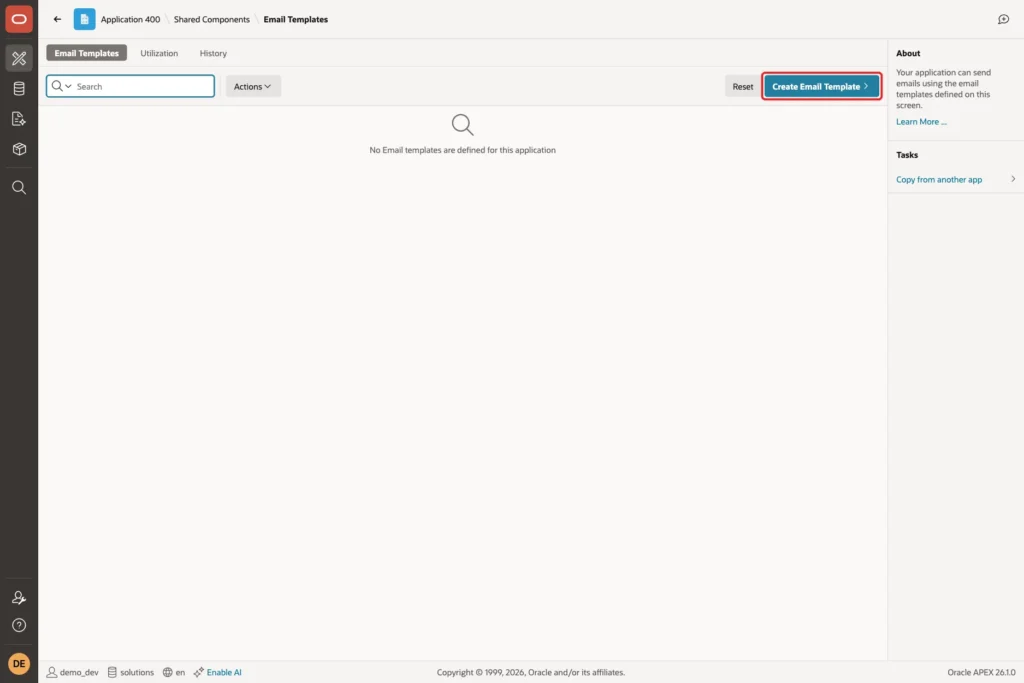
Open Shared Components and click Email Templates. The list is empty. Click Create Email Template.
Step 3: Name the Template and Write the Subject
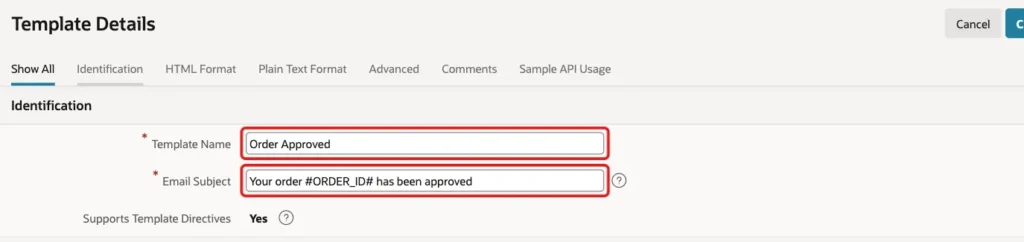
The Template Details page opens. Enter the name Order Approved. In the Email Subject, write the text with a placeholder between hash signs: Your order #ORDER_ID# has been approved.
Supports Template Directives shows Yes. That means you can use conditions such as {if}, which Step 4 does.
Step 4: Write the HTML Format
The HTML Format has a header, a body and a footer. The body is required. Put the greeting and the order details in the body, and use a placeholder for every value that changes.
Example:
<p>Hello #CUSTOMER_NAME#,</p>
<p>Your order <strong>#ORDER_ID#</strong> placed on #ORDER_DATE# was approved by #APPROVED_BY#.</p>
<p>The order total is <strong>#TOTAL_AMOUNT#</strong>.</p>
{if NOTE/}<p>Note from the approver: #NOTE#</p>{endif/}
The last line is a template directive. The paragraph with the note appears only when the placeholder NOTE has a value. The header holds a heading and the footer holds the line that says the mail is automatic.
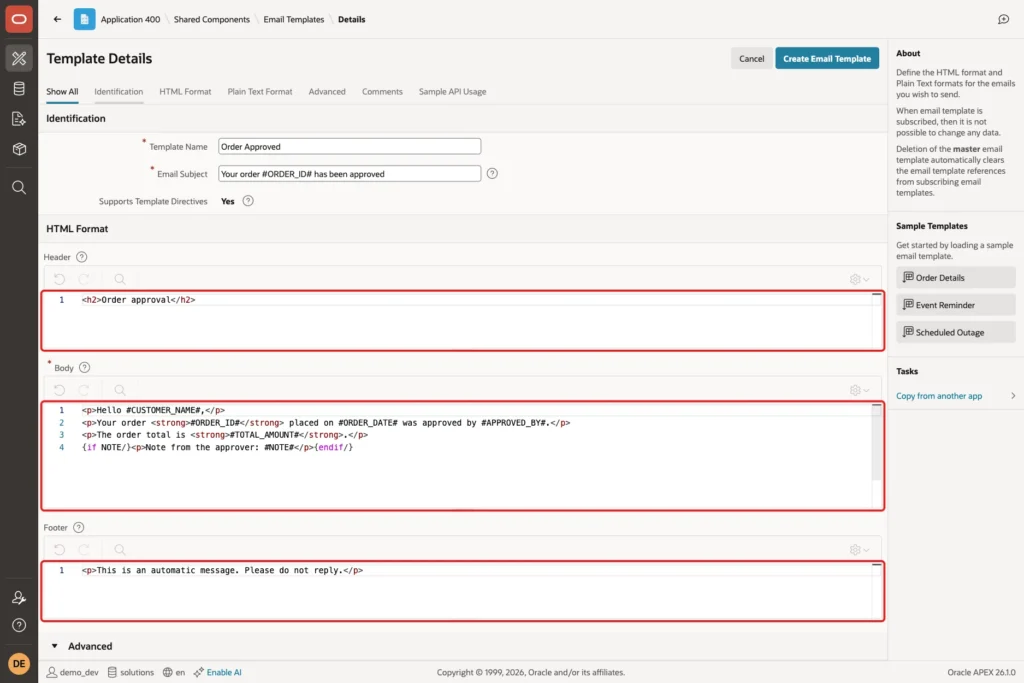
The HTML Template field below the footer can stay empty. APEX then wraps your parts in its own default layout, which the test mail in Step 8 shows.
Step 5: Write the Plain Text Format and the Static ID
Some mail programs show only text, so write the same message in the Plain Text Format. It uses the same placeholders and the same directive.
Example:
Hello #CUSTOMER_NAME#,

Your order #ORDER_ID# placed on #ORDER_DATE# was approved by #APPROVED_BY#.
The order total is #TOTAL_AMOUNT#.
{if NOTE/}Note from the approver: #NOTE#
{endif/}
This is an automatic message. Please do not reply.
Then set the Static ID to ORDER_APPROVED. Your code finds the template by this name, so it never depends on an internal number. The Sample API Usage region at the bottom of the page lists every placeholder you used and the call to send the mail.
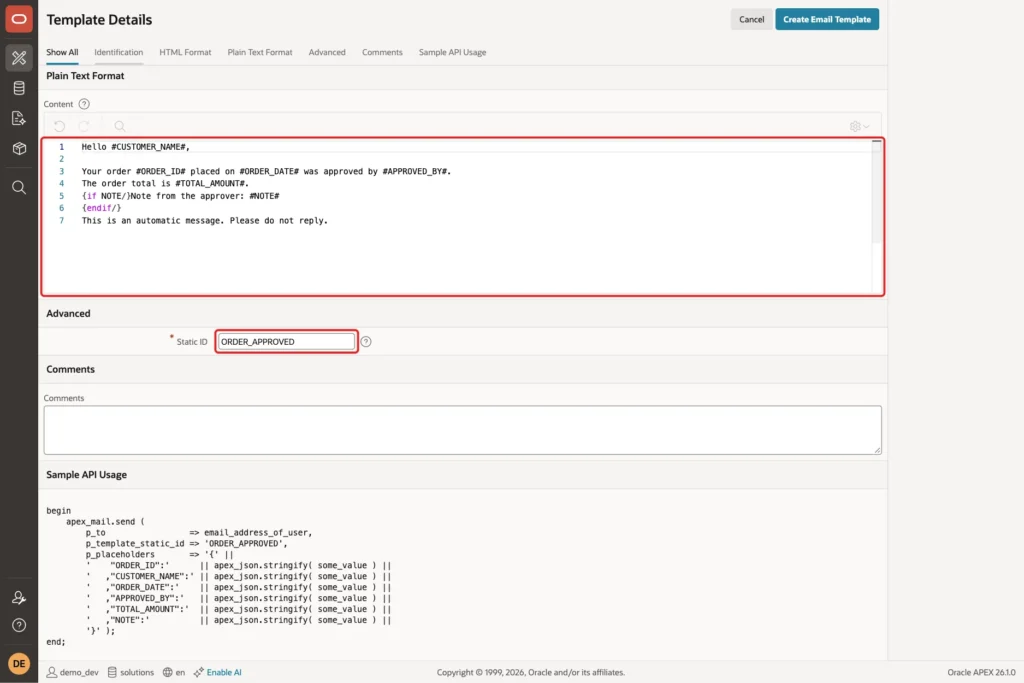
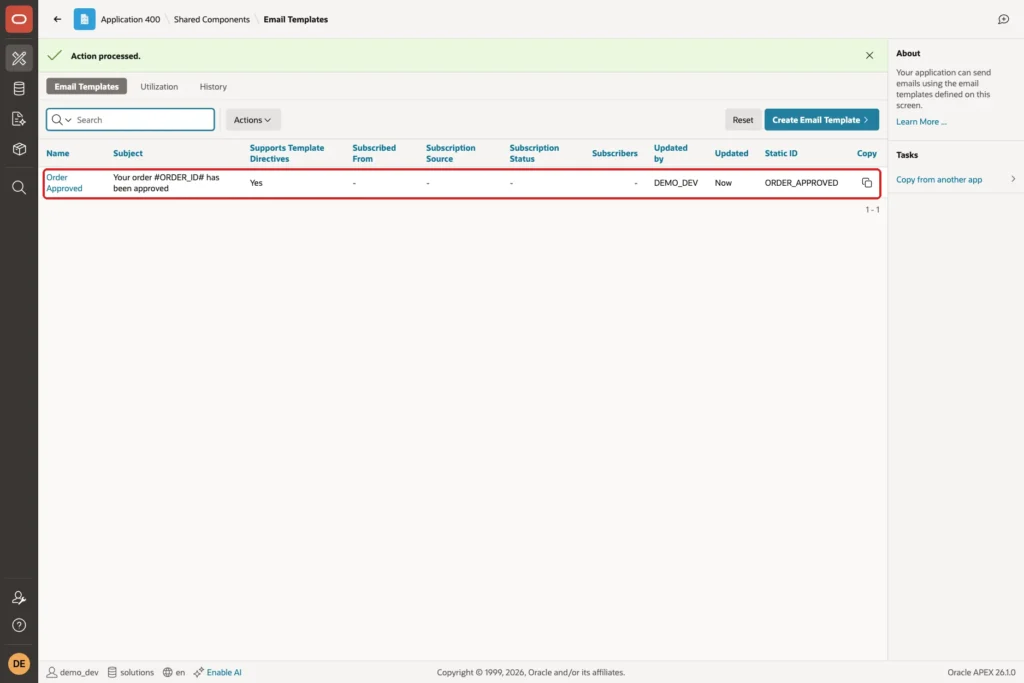
Click Create Email Template. The list now shows the template with its subject and static ID.
Step 6: Create the Package
The package has one procedure, APPROVE_ORDER. It approves the order, reads the values for the mail, sends the mail from the template, writes the log row and pushes the mail queue.
Example:
create or replace package order_mail as
  procedure approve_order (
    p_order_id in number,
    p_note     in varchar2 default null
  );
end order_mail;
/

create or replace package body order_mail as

  procedure approve_order (
    p_order_id in number,
    p_note     in varchar2 default null
  ) is
    l_name    customers.name%type;
    l_email   customers.email%type;
    l_date    orders.order_date%type;
    l_total   order_totals.total_amount%type;
    l_by      varchar2(100 char);
    l_mail_id number;
  begin
    l_by := coalesce(sys_context('APEX$SESSION', 'APP_USER'), user);

    update orders
    set    status      = 'APPROVED',
           approved_by = l_by,
           approved_on = sysdate
    where  order_id = p_order_id
    and    status   = 'NEW';

    if sql%rowcount = 0 then
      raise_application_error(-20001, 'Order ' || p_order_id || ' is not a NEW order.');
    end if;

    select c.name, c.email, o.order_date, nvl(t.total_amount, 0)
    into   l_name, l_email, l_date, l_total
    from   orders o
    join   customers c on c.customer_id = o.customer_id
    left   join order_totals t on t.order_id = o.order_id
    where  o.order_id = p_order_id;

    l_mail_id := apex_mail.send(
      p_to                 => l_email,
      p_from               => 'sales@example.com',
      p_template_static_id => 'ORDER_APPROVED',
      p_placeholders       => '{'
        || '"ORDER_ID":'      || apex_json.stringify(p_order_id)
        || ',"CUSTOMER_NAME":' || apex_json.stringify(l_name)
        || ',"ORDER_DATE":'    || apex_json.stringify(to_char(l_date, 'DD-Mon-YYYY'))
        || ',"APPROVED_BY":'   || apex_json.stringify(l_by)
        || ',"TOTAL_AMOUNT":'  || apex_json.stringify(to_char(l_total, 'FM999G999G990D00'))
        || ',"NOTE":'          || apex_json.stringify(p_note)
        || '}');

    insert into order_mail_log (order_id, sent_to, template_id, mail_id)
    values (p_order_id, l_email, 'ORDER_APPROVED', l_mail_id);

    apex_mail.push_queue;
  end approve_order;

end order_mail;
/
show errors
Output:
Package ORDER_MAIL compiled

Package Body ORDER_MAIL compiled

No errors.
These are the parts that matter:
- The UPDATE only changes an order in the status NEW. If no row changes, the procedure raises an error and sends nothing.
- P_TEMPLATE_STATIC_ID selects the template. P_SUBJ and P_BODY are not needed.
- P_PLACEHOLDERS is a JSON object. Each key is the name of a placeholder without the hash signs.
- APEX_JSON.STRINGIFY quotes each value and escapes special characters. It turns a null note into a JSON null, and the directive then hides the note.
- APEX_MAIL.PUSH_QUEUE sends the mail now. Without it, the background mail job sends it a little later.
Step 7: Test the Package in SQL
Test the package before the page exists. The call needs an APEX session, so the script creates one first. Order 22 is approved with a note, and order 30 without one.
Example:
begin
  apex_session.create_session(400, 1, 'DEMO_DEV');
  order_mail.approve_order(22, 'Packed and ready to ship on Monday.');
  order_mail.approve_order(30);
  commit;
end;
/

select o.order_id, o.status, o.approved_by, to_char(o.approved_on, 'YYYY-MM-DD') as approved_on
from   orders o where o.order_id in (22, 30, 31) order by o.order_id;

select log_id, order_id, sent_to, template_id from order_mail_log order by log_id;
Output:
PL/SQL procedure successfully completed.

   ORDER_ID STATUS      APPROVED_BY    APPROVED_ON
___________ ___________ ______________ ______________
         22 APPROVED    DEMO_DEV       2026-11-01
         30 APPROVED    DEMO_DEV       2026-11-01
         31 NEW

   LOG_ID    ORDER_ID SENT_TO                   TEMPLATE_ID
_________ ___________ _________________________ _________________
        1          22 customer35@example.com    ORDER_APPROVED
        2          30 customer11@example.com    ORDER_APPROVED
Both orders are now APPROVED, order 31 is untouched, and the log has one row for each mail. The test mail server of this example received both messages.
The text of the mail for order 30 has no note line at all, because the note was null. The mail for order 22 has the line Note from the approver: Packed and ready to ship on Monday. Both mails have the subject filled in, for example Your order 30 has been approved.
Now try to approve order 22 a second time. It is no longer NEW, so the package must refuse.
Example:
begin
  apex_session.create_session(400, 1, 'DEMO_DEV');
  order_mail.approve_order(22);
end;
/

select count(*) as log_rows_for_order_22 from order_mail_log where order_id = 22;
Output:
begin
*
ERROR at line 1:
ORA-20001: Order 22 is not a NEW order.
ORA-06512: at "APXSOL.ORDER_MAIL", line 24
ORA-06512: at line 3
Help: https://docs.oracle.com/error-help/db/ora-20001/

   LOG_ROWS_FOR_ORDER_22
________________________
                       1
The error stops the call before any mail is sent. The log still has one row for order 22.
Step 8: Create the Page
Now build a page for the approval. Open Page Designer, click Create and choose Page. Select Blank Page in the wizard.
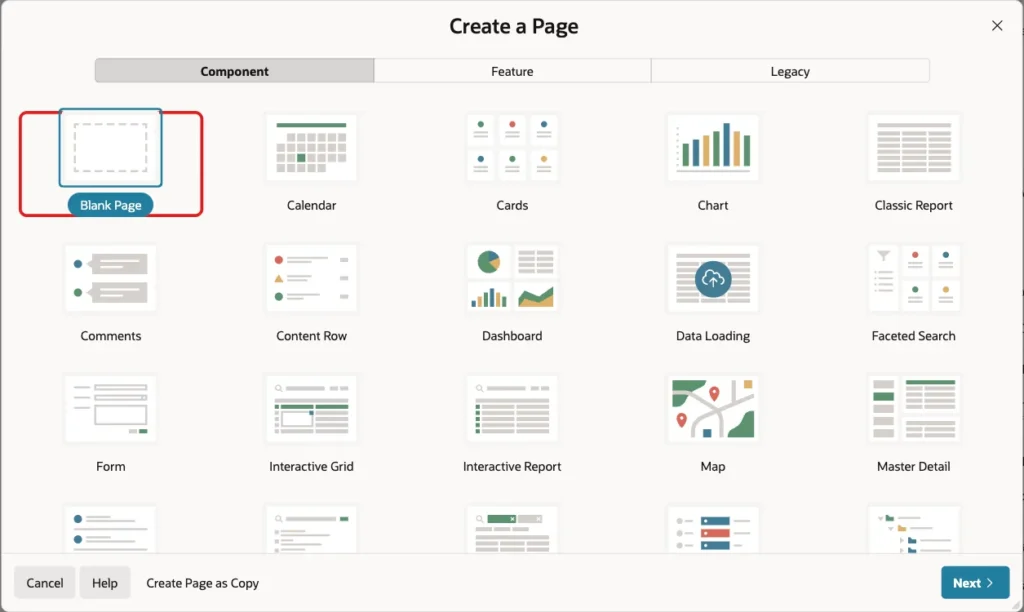
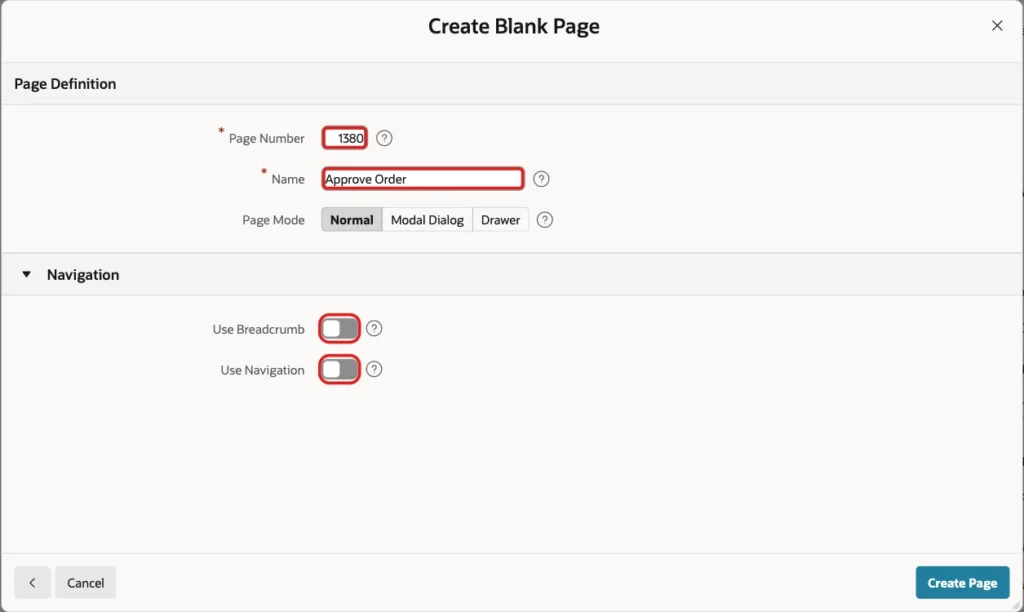
Click Next. Enter the page number 1380 and the name Approve Order. Keep the page mode Normal and switch off Use Breadcrumb and Use Navigation. Click Create Page.
In the page properties, set Security, Authorization Scheme to Is Administrator, so that only administrators can approve orders. Then add these components:
- A Static Content region named Approve an Order.
- A Select List item P1380_ORDER_ID in that region, with the label New Order and Value Required on.
- A Text Area item P1380_NOTE with the label Note for the Customer and a maximum length of 500.
- A button APPROVE_AND_SEND with the label Approve and Send Email, in the Next slot of the region.
- A Classic Report region named Approval Emails Sent on ORDER_MAIL_LOG.
The select list shows only the orders that still need approval. Set its List of Values type to SQL Query, and use the query below. Set the Null Display Value to - Select Order -.
Example:
select 'Order ' || o.order_id || ' - ' || c.name as display_value,
       o.order_id as return_value
from   orders o
join   customers c on c.customer_id = o.customer_id
where  o.status = 'NEW'
order  by o.order_id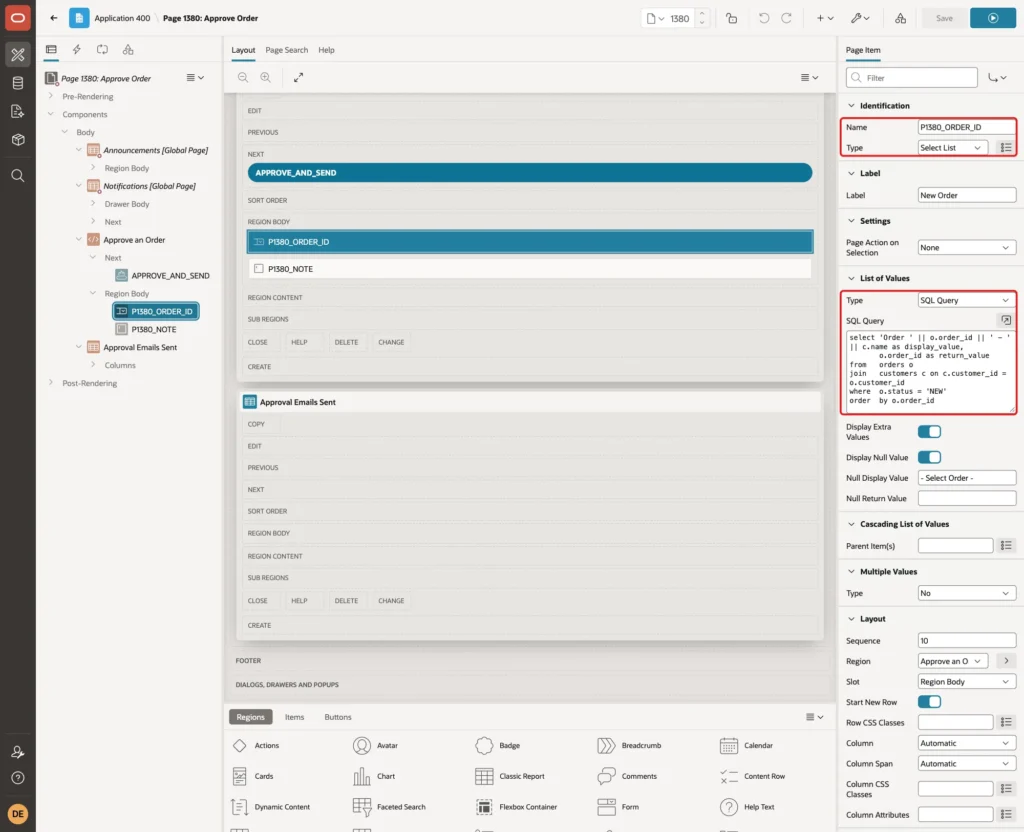
The report region uses this query, and its columns are LOG_ID, ORDER_ID, SENT_TO, TEMPLATE_ID and SENT_ON.
Example:
select l.log_id,
       l.order_id,
       l.sent_to,
       l.template_id,
       to_char(l.sent_on, 'YYYY-MM-DD HH24:MI') as sent_on
from   order_mail_log l
order  by l.log_id desc
Step 9: Add the Process and the Branch
Open the Processing tab and create a process. Name it Approve order and send email, and set the type to Execute Code. The code is one call to the package. Set the success message and run the process only when the button APPROVE_AND_SEND is pressed.
Example:
order_mail.approve_order(
    p_order_id => :P1380_ORDER_ID,
    p_note     => :P1380_NOTE);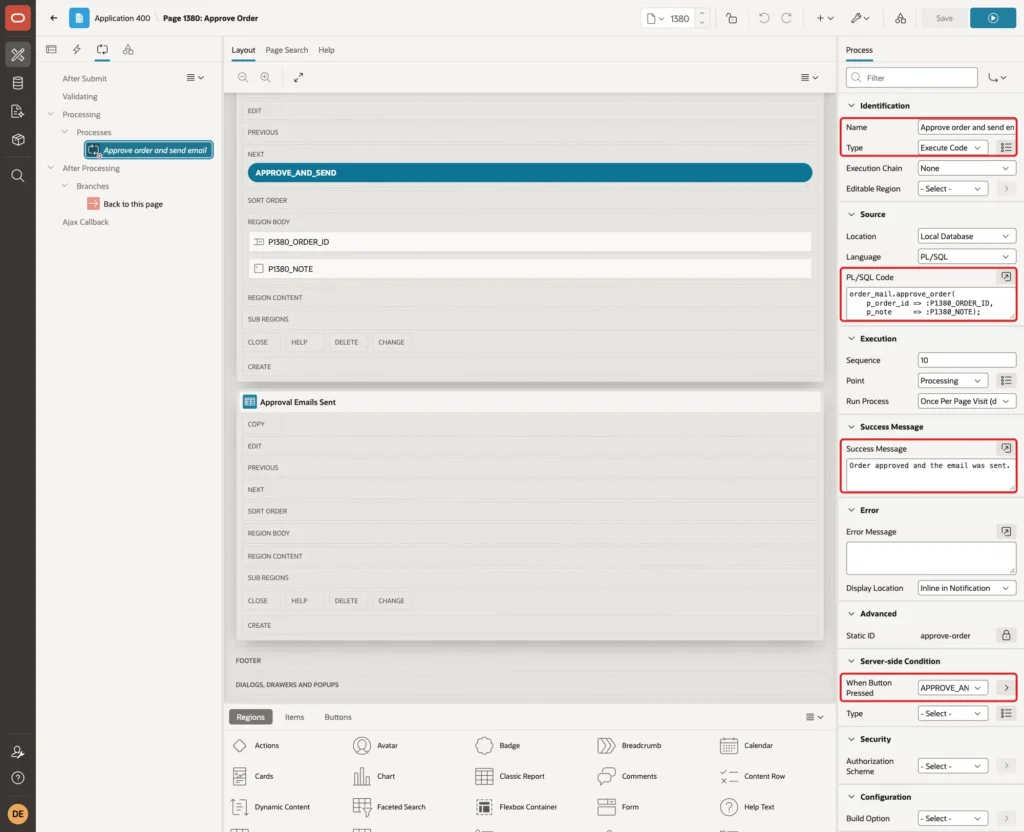
Add a branch to page 1380 with the option to clear the cache of this page, so the form is empty after each approval. The logic is all in the package, so the page has no business code in it.
Step 10: Run the Page
Run the page as an administrator. First click the button without choosing an order. The select list is required, so the page shows the message and sends nothing.
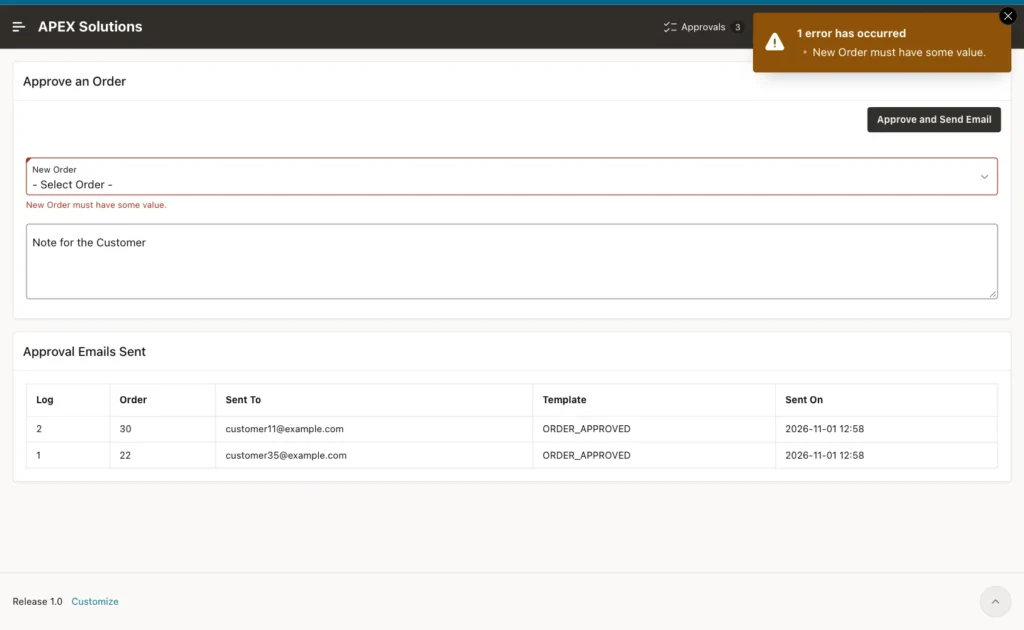
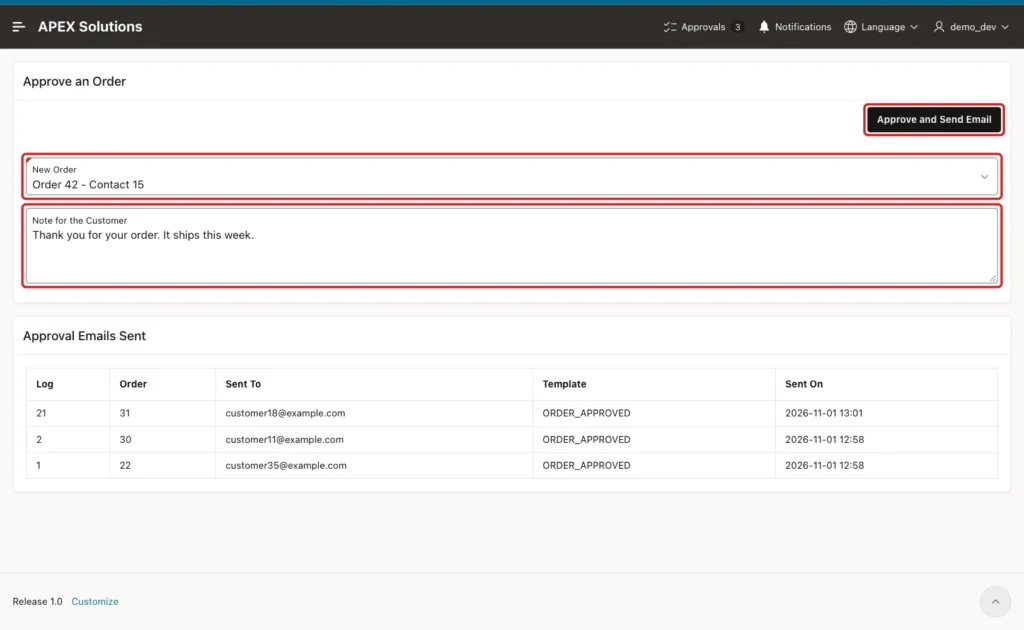
Now choose an order, type a note and click Approve and Send Email.
The page shows the success message. The report lists the new row, and the order is gone from the select list.
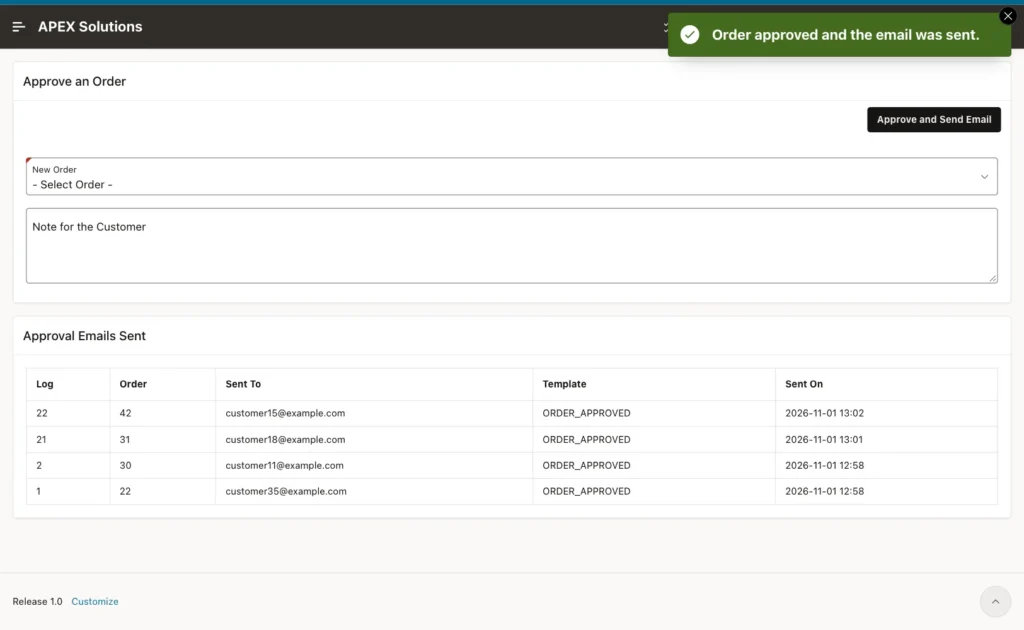
The identity column hands out numbers in blocks, so the log ids jump from 2 to 21. That is normal and harmless.
Step 11: Check the Mail
Open the message in the test mail server. The subject has the order number, the greeting has the customer name, and the details and the note are in place. The header, the footer and the layout come from the template.
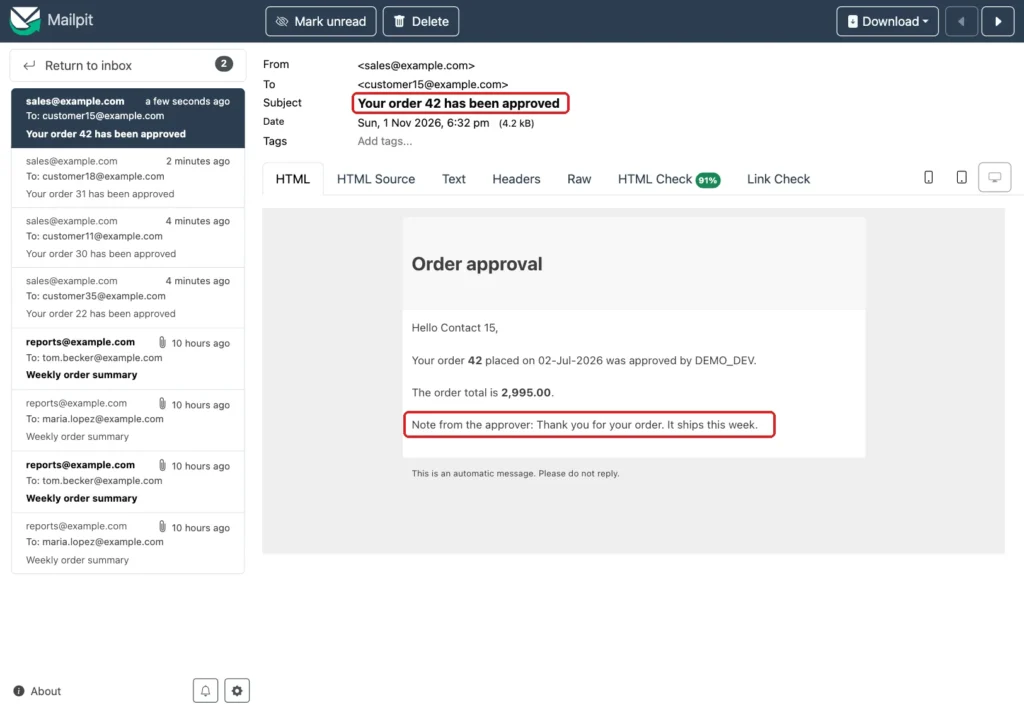
This was the final test of the page with order 42, and the log now has four rows for orders 22, 30, 31 and 42. The check below also shows the template in the data dictionary view.
Example:
select order_id, status, approved_by from orders where order_id in (22, 30, 31, 42) order by order_id;

select log_id, order_id, sent_to, template_id from order_mail_log order by order_id;

select name, static_id, subject from apex_appl_email_templates where application_id = 400;
Output:
   ORDER_ID STATUS      APPROVED_BY
___________ ___________ ______________
         22 APPROVED    DEMO_DEV
         30 APPROVED    DEMO_DEV
         31 APPROVED    DEMO_DEV
         42 APPROVED    DEMO_DEV

   LOG_ID    ORDER_ID SENT_TO                   TEMPLATE_ID
_________ ___________ _________________________ _________________
        1          22 customer35@example.com    ORDER_APPROVED
        2          30 customer11@example.com    ORDER_APPROVED
       21          31 customer18@example.com    ORDER_APPROVED
       22          42 customer15@example.com    ORDER_APPROVED

NAME              STATIC_ID         SUBJECT
_________________ _________________ __________________________________________
Order Approved    ORDER_APPROVED    Your order #ORDER_ID# has been approved
Step 12: Test the Page Security
Sign in as a user who is not an administrator and open the page. APEX refuses it with the message of the authorization scheme, and nothing is shown.
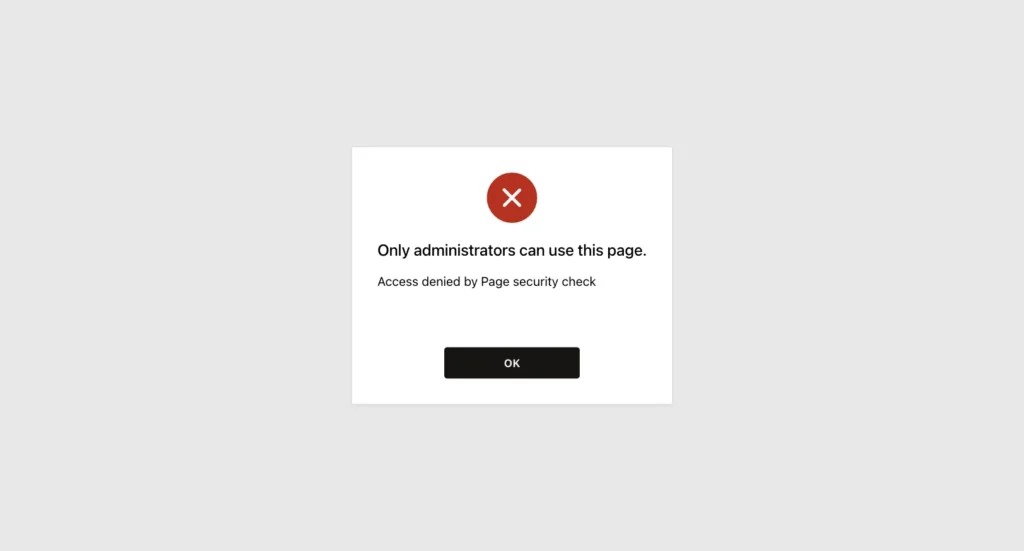
The local test mail server of this example caught every message. In your application, the real SMTP settings go in the instance administration.
Things to Know
- A placeholder in the template is written as #NAME#, and the JSON key is NAME without the hash signs. A key that does not match is not replaced.
- Template directives such as {if NAME/} and {endif/} work only when Supports Template Directives is Yes.
- Use APEX_JSON.STRINGIFY for every value in the JSON. It quotes the value and escapes characters that would break the JSON.
- Find a template by its Static ID, not by its name. You can rename the template, and the code keeps working.
- The Sample API Usage region of the template page writes a ready call for you, with all the placeholders of that template.
- Set the From address to an address your mail server accepts. Many servers refuse mail from a domain they do not know.
Related Guides
- How to Send Emails, Print Documents, and Create Barcodes Using APEX_MAIL and APEX_BARCODE
- How to Email a Report Automatically Every Week in Oracle APEX
Conclusion
An email template holds the subject, the layout and the text of a mail. One call to APEX_MAIL.SEND with a static ID and a placeholders JSON then sends a personal mail for each record.
The tests showed the placeholders filled with the right values, the note appearing only when it exists, a second approval refused, and the page open only to administrators. Change the wording in the template, and the next mail uses it.
See my articles more often when you search Google.
