
A weekly report that people have to open and download is a report that gets forgotten. In Oracle APEX you can build the file with APEX_DATA_EXPORT and send it as an email attachment on a schedule, so it simply arrives on Monday morning.
This guide uses an automation for the schedule, a small package for the work, and a table of recipients. It uses orders as the example, and the same steps work for any query. Every part was tested in a running application.
The guide How to Run a Scheduled Task with Automations in Oracle APEX runs a query and acts on each row it returns.
Here the automation has no query and runs once. The guide How to Export Data to PDF and Excel and Load Files Using APEX_DATA_EXPORT explains the API, and this one puts it on a weekly schedule with email.
Step 1: Create the Tables
REPORT_RECIPIENTS holds the people who get the report, so you can add or stop a person without touching code. ACTIVE_YN turns a recipient off. REPORT_RUNS keeps one row for each run, so you can see when the report was sent and how many people got it.
Example:
create table report_recipients (
  recipient_id number generated by default on null as identity,
  full_name    varchar2(100 char) not null,
  email        varchar2(120 char) not null,
  active_yn    varchar2(1 char)   default on null 'Y' not null,
  created_on   date               default on null sysdate not null,
  constraint report_recipients_pk primary key (recipient_id),
  constraint report_recipients_email_uk unique (email),
  constraint report_recipients_email_ck check (email = lower(email)),
  constraint report_recipients_active_ck check (active_yn in ('Y', 'N'))
);

create table report_runs (
  run_id           number generated by default on null as identity,
  run_on           timestamp with local time zone default on null systimestamp not null,
  recipient_count  number             not null,
  file_name        varchar2(200 char) not null,
  file_bytes       number             not null,
  run_status       varchar2(20 char)  default on null 'SENT' not null,
  constraint report_runs_pk primary key (run_id),
  constraint report_runs_status_ck check (run_status in ('SENT', 'NO RECIPIENTS')),
  constraint report_runs_count_ck check (recipient_count >= 0)
);

create index report_runs_run_on_ix on report_runs (run_on);

insert into report_recipients (full_name, email) values ('Maria Lopez',  'maria.lopez@example.com');
insert into report_recipients (full_name, email) values ('Tom Becker',   'tom.becker@example.com');
insert into report_recipients (full_name, email, active_yn) values ('Anil Rao', 'anil.rao@example.com', 'N');
commit;

select recipient_id, full_name, email, active_yn from report_recipients order by recipient_id;
Output:
Table REPORT_RECIPIENTS created.

Table REPORT_RUNS created.

Index REPORT_RUNS_RUN_ON_IX created.

1 row inserted.

1 row inserted.

1 row inserted.

Commit complete.

   RECIPIENT_ID FULL_NAME      EMAIL                      ACTIVE_YN
_______________ ______________ __________________________ ____________
              1 Maria Lopez    maria.lopez@example.com    Y
              2 Tom Becker     tom.becker@example.com     Y
              3 Anil Rao       anil.rao@example.com       N
A few details in the tables:
- The email address is unique and stored in lower case. Two check constraints keep that rule and the Y or N flag in the database.
- ACTIVE_YN, CREATED_ON, RUN_ON and RUN_STATUS use DEFAULT ON NULL, so an insert never has to set them.
- Anil Rao is inactive on purpose. He must not get any mail, and the tests prove it.
Step 2: Create the Package
The package has one procedure, SEND_REPORT. It builds the file, sends one mail to each active recipient, and writes a row to REPORT_RUNS. The query of the report is a constant at the top, so it is easy to find and change.
Example:
create or replace package weekly_report as
  procedure send_report (p_format in varchar2 default 'XLSX');
end weekly_report;
/

create or replace package body weekly_report as

  c_query constant varchar2(1000) :=
    'select o.status as "Status", count(*) as "Orders", '
 || 'nvl(sum(t.total_amount), 0) as "Total Amount" '
 || 'from orders o left join order_totals t on t.order_id = o.order_id '
 || 'group by o.status order by o.status';

  procedure send_report (p_format in varchar2 default 'XLSX') is
    l_context   apex_exec.t_context;
    l_export    apex_data_export.t_export;
    l_format    apex_data_export.t_format;
    l_file_name varchar2(200 char);
    l_sent      pls_integer := 0;
    l_mail_id   number;
  begin
    l_format := case upper(p_format)
                  when 'CSV' then apex_data_export.c_format_csv
                  else apex_data_export.c_format_xlsx
                end;
    l_file_name := 'order-summary-' || to_char(sysdate, 'YYYY-MM-DD')
                   || case upper(p_format) when 'CSV' then '.csv' else '.xlsx' end;

    l_context := apex_exec.open_query_context(
                   p_location  => apex_exec.c_location_local_db,
                   p_sql_query => c_query);
    l_export  := apex_data_export.export(
                   p_context   => l_context,
                   p_format    => l_format,
                   p_file_name => l_file_name);
    apex_exec.close(l_context);

    for r in (select full_name, email
              from   report_recipients
              where  active_yn = 'Y'
              order  by recipient_id)
    loop
      l_mail_id := apex_mail.send(
        p_to        => r.email,
        p_from      => 'reports@example.com',
        p_subj      => 'Weekly order summary',
        p_body      => 'Hello ' || r.full_name || ', the weekly order summary is attached.',
        p_body_html => '<p>Hello ' || apex_escape.html(r.full_name)
                       || ',</p><p>The weekly order summary is attached.</p>');
      apex_mail.add_attachment(
        p_mail_id    => l_mail_id,
        p_attachment => l_export.content_blob,
        p_filename   => l_export.file_name,
        p_mime_type  => l_export.mime_type);
      l_sent := l_sent + 1;
    end loop;

    insert into report_runs (recipient_count, file_name, file_bytes, run_status)
    values (l_sent, l_export.file_name, dbms_lob.getlength(l_export.content_blob),
            case when l_sent = 0 then 'NO RECIPIENTS' else 'SENT' end);

    if l_sent > 0 then
      apex_mail.push_queue;
    end if;
  end send_report;

end weekly_report;
/
show errors
Output:
Package WEEKLY_REPORT compiled

Package Body WEEKLY_REPORT compiled

No errors.
These are the parts that matter:
- APEX_EXEC.OPEN_QUERY_CONTEXT runs the query, and APEX_DATA_EXPORT.EXPORT turns the result into an Excel file in a BLOB. The column aliases in double quotes become the column headings.
- The file is built once and attached to every mail, so the query runs one time however many people receive it.
- APEX_MAIL.SEND returns an id. APEX_MAIL.ADD_ATTACHMENT uses that id to add the file to the mail.
- APEX_ESCAPE.HTML protects the HTML body from special characters in a name.
- APEX_MAIL.PUSH_QUEUE sends the queued mail now. Without it, the background mail job sends it a little later.
Step 3: Test the Package in SQL
Test the package before the automation exists. The call needs an APEX session, so the script creates one first, and then runs SEND_REPORT. The last query counts the mails that went into the mail queue.
Example:
set serveroutput on
begin
  apex_session.create_session(400, 1, 'DEMO_DEV');
  weekly_report.send_report;
  commit;
end;
/

select run_id, recipient_count, file_name, file_bytes, run_status from report_runs order by run_id;

select count(*) as queued_mails, min(mail_to) keep (dense_rank first order by id) as first_to
from   apex_mail_queue where mail_subj = 'Weekly order summary';
Output:
PL/SQL procedure successfully completed.

   RUN_ID    RECIPIENT_COUNT FILE_NAME                           FILE_BYTES RUN_STATUS
_________ __________________ ________________________________ _____________ _____________
        1                  2 order-summary-2026-11-01.xlsx             4374 SENT

   QUEUED_MAILS FIRST_TO
_______________ __________________________
              2 maria.lopez@example.com
One run, two recipients, and a file of about 4 KB. Anil Rao got nothing because he is inactive. The test mail server of this example also received both mails, each with one attachment.
Step 4: Create the Automation
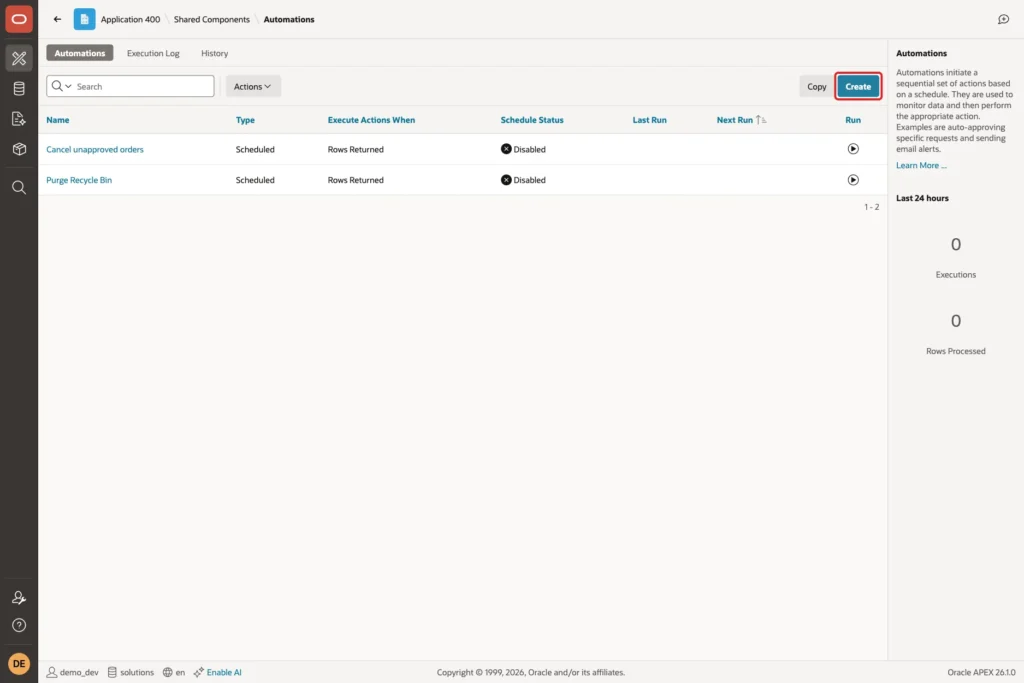
Open Shared Components and click Automations. The page lists the automations of the application. Click Create.
In the wizard, enter the name Send Weekly Order Report and keep the type Scheduled. Set Actions initiated on to Always, because the report does not depend on any query. Choose the Custom schedule with the frequency Daily.
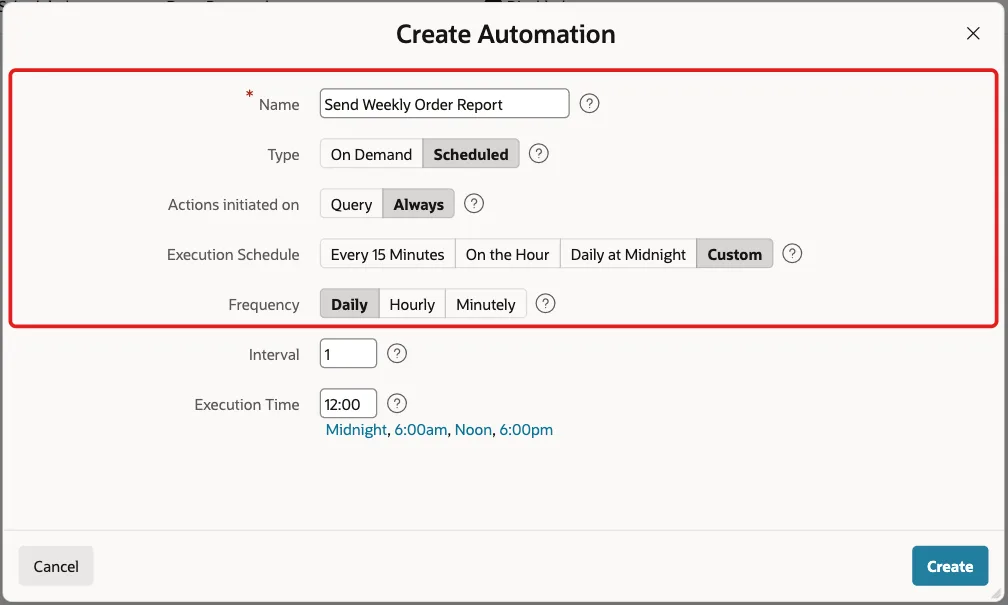
The wizard has no weekly choice, only daily, hourly and minutely. That is why the next step changes the schedule by hand. Click Create, and APEX opens the automation with a first action that does nothing yet.
Step 5: Set a Weekly Schedule
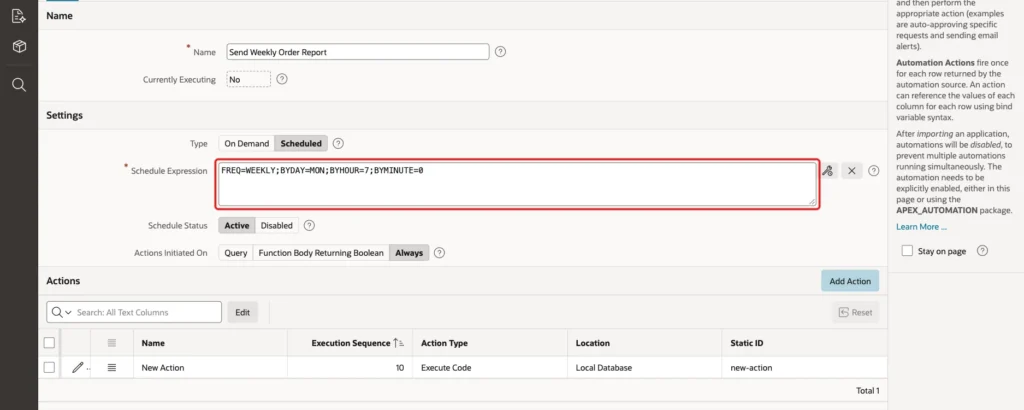
The Schedule Expression is a calendar string. The wizard wrote a daily one. Replace it with a weekly one, and set Schedule Status to Active.
Example:
FREQ=WEEKLY;BYDAY=MON;BYHOUR=7;BYMINUTE=0
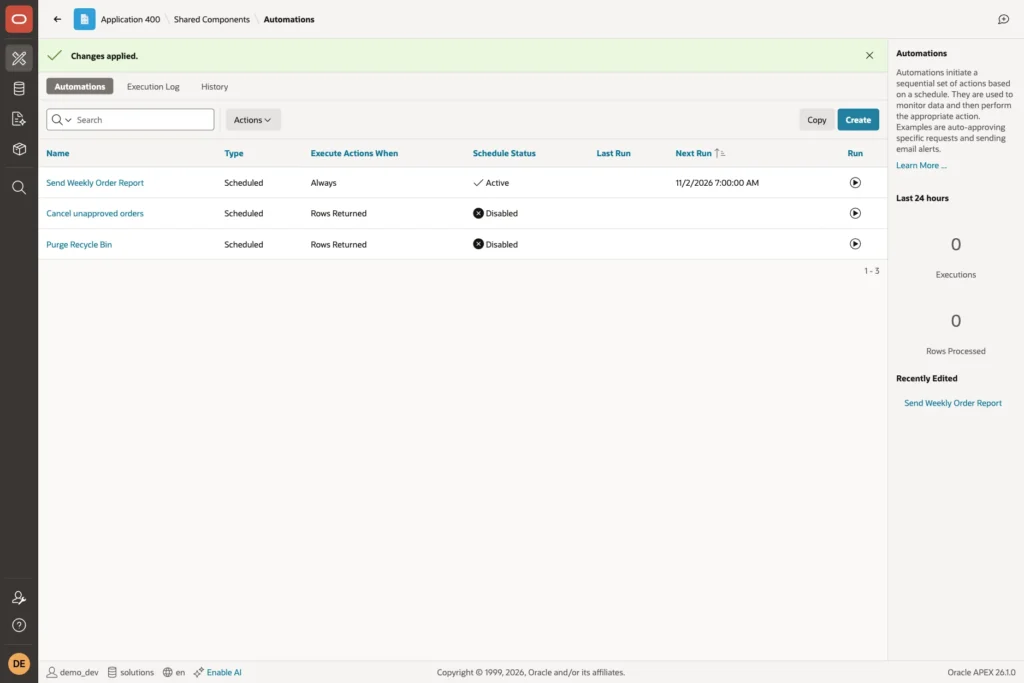
Click Save Changes. The Automations page now shows the status Active and the next run, which is Monday 7:00 AM, one day after this test.
If the mail must arrive at a certain local time, check which time zone the scheduler uses for the job.
Step 6: Add the Action
Open the automation again and edit the action in the Actions region. Rename it to Email the order summary. Keep the type Execute Code with the location Local Database, and replace the code with one call to the package.
Example:
weekly_report.send_report;
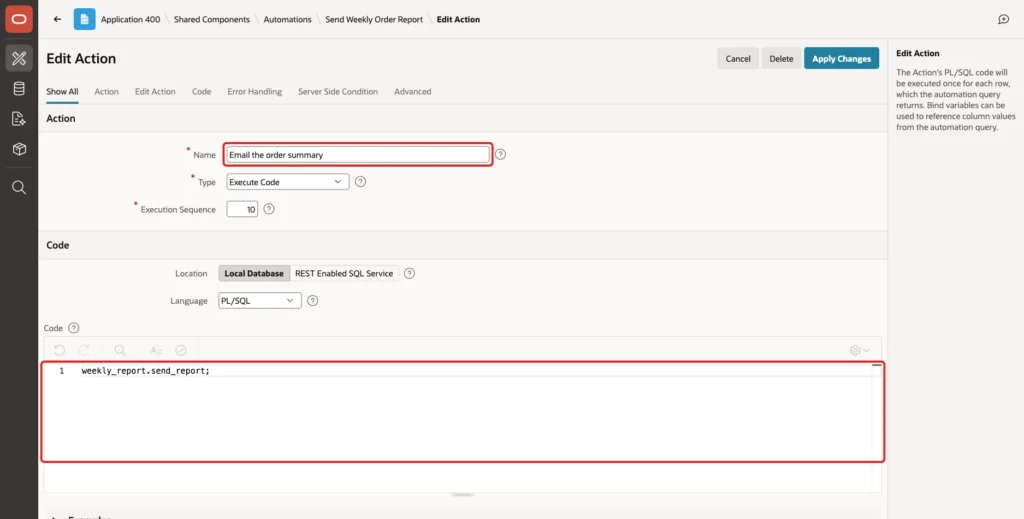
Click Apply Changes. The logic lives in the package, so changing the query or the mail text never needs a change in the automation.
Step 7: Run the Automation and Check the Result
You do not have to wait until Monday. Open the automation and click Save and Run. APEX confirms that the execution started.
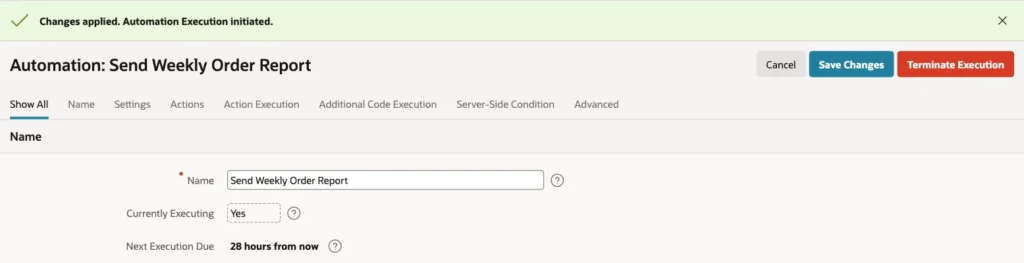
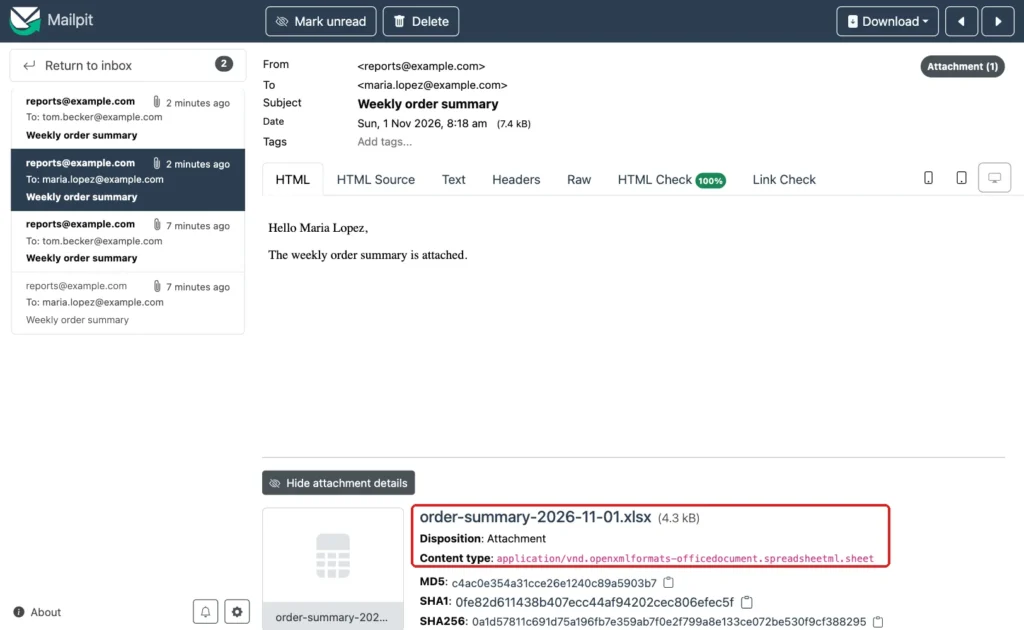
Open the Execution Log. The run is listed with the status Success. The number of successful rows is 0, which is correct: the automation has no query, so it has no rows. The proof of the work is in REPORT_RUNS and in the mailbox.
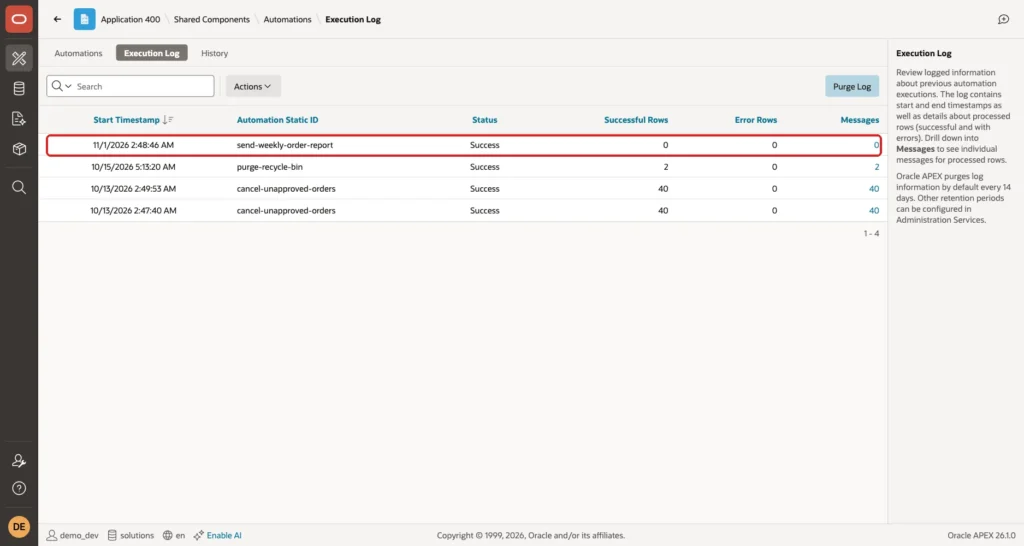
Open the message in the test mail server. It is addressed to one recipient and carries the Excel file as an attachment, with the right content type.
The file was also opened outside APEX. It has the three headings Status, Orders and Total Amount, and one row each for APPROVED, CANCELLED, NEW and SHIPPED, with 51, 16, 36 and 47 orders.
Step 8: Test a Run With No Recipients
A report job should not fail when nobody is on the list. This test sets every recipient to inactive, runs the package, and then turns the two active people back on.
Example:
update report_recipients set active_yn = 'N';
commit;

begin
  apex_session.create_session(400, 1, 'DEMO_DEV');
  weekly_report.send_report;
  commit;
end;
/

select run_id, recipient_count, file_name, file_bytes, run_status from report_runs order by run_id;

update report_recipients set active_yn = 'Y' where email in ('maria.lopez@example.com', 'tom.becker@example.com');
commit;

select full_name, email, active_yn from report_recipients order by recipient_id;
Output:
3 rows updated.

Commit complete.

PL/SQL procedure successfully completed.

   RUN_ID    RECIPIENT_COUNT FILE_NAME                           FILE_BYTES RUN_STATUS
_________ __________________ ________________________________ _____________ ________________
        1                  2 order-summary-2026-11-01.xlsx             4374 SENT
       21                  2 order-summary-2026-11-01.xlsx             4375 SENT
       22                  0 order-summary-2026-11-01.xlsx             4374 NO RECIPIENTS

2 rows updated.

Commit complete.

FULL_NAME      EMAIL                      ACTIVE_YN
______________ __________________________ ____________
Maria Lopez    maria.lopez@example.com    Y
Tom Becker     tom.becker@example.com     Y
Anil Rao       anil.rao@example.com       N
Run 22 has no recipients and the status NO RECIPIENTS, and no new mail was created. The run numbers jump from 1 to 21 because the identity column hands out numbers in blocks. The final list of runs and of the mail queue:
Example:
select run_id, recipient_count, file_name, file_bytes, run_status
from   report_runs
order  by run_id;

select mail_to, mail_subj, mail_send_error
from   apex_mail_queue
where  mail_subj = 'Weekly order summary';
Output:
   RUN_ID    RECIPIENT_COUNT FILE_NAME                           FILE_BYTES RUN_STATUS
_________ __________________ ________________________________ _____________ ________________
        1                  2 order-summary-2026-11-01.xlsx             4374 SENT
       21                  2 order-summary-2026-11-01.xlsx             4375 SENT
       22                  0 order-summary-2026-11-01.xlsx             4374 NO RECIPIENTS

no rows selected
The mail queue is empty because the mails were already sent. Their copies are in the test mail server, which means the local test mail server was used here. In your application, the real SMTP settings go in the instance administration.
Things to Know
- The wizard offers only daily, hourly and minutely schedules. For a weekly run, edit the Schedule Expression as in Step 5.
- An automation with Always has no rows, so the Execution Log shows 0 successful rows. A Success status with 0 rows is normal for this design.
- In the SQL tests the script creates an APEX session first, because the package calls APEX_EXEC and APEX_MAIL. The automation itself needed no extra setup.
- The help text of the automation page says that automations are disabled after an application is imported. Set the Schedule Status to Active again in the new workspace.
- Set the From address to an address your mail server accepts. Many servers refuse mail from an address of a domain they do not know.
- Do not put more rules in the automation than the call. A package is easier to test, as the SQL tests in this guide show.
Related Guides
- How to Run a Scheduled Task with Automations in Oracle APEX
- How to Send Emails, Print Documents, and Create Barcodes Using APEX_MAIL and APEX_BARCODE
Conclusion
A package that builds the file and sends the mail, plus an automation with a weekly schedule, is all you need to email a report every week. The recipients are data, the query is one constant, and every run is logged.
The tests showed the file arriving as an attachment, the inactive recipient being skipped, and an empty list ending cleanly. Keep the work in the package and the schedule in the automation, and both stay easy to change.
See my articles more often when you search Google.
