
The interactive grid is the most programmable region in Oracle APEX, and also the one people most often search for help with. It is built from several widgets: the interactiveGrid widget manages views (the grid view, plus icon, detail, and chart views) and a toolbar, and each view keeps its data in a model. You reach the widget through the region interface's call method, and almost everything else happens through two things: the grid's actions and its view's model.
This guide covers the interactive grid's JavaScript interface with tested examples and real output: its configuration, views and models, selection and focus, actions and the toolbar, data refresh, and events. It then works through six recipes that come up in nearly every grid: getting the selected rows, sending them to the server, adding a toolbar button, adding a delete button with a confirmation, adding a row menu entry, and keeping an order total in step with its lines.
Quick Reference
| Task | Method or option |
|---|---|
| Change the grid's setup | Initialization JavaScript Function, the config option |
| Reach views and their data | getViews, getCurrentView, getCurrentViewId, view.model |
| Find the row of an element | view.getContextRecord |
| Read and set the selection | getSelectedRecords, setSelectedRecords |
| Move focus | gotoCell, focus |
| Drive the grid | getActions, then invoke, set, and toggle |
| Customize the toolbar | getToolbar, $.apex.interactiveGrid.copyDefaultToolbar |
| Reload and resize | refresh, resize |
| Master-detail | setMasterRecord |
| React to the grid | interactivegridselectionchange, modechange, viewchange, viewmodelcreate, reportchange, reportsettingschange, save |
How to Run These Examples
The examples ran in Oracle APEX 26.1 on an editable interactive grid of stores with the static ID stores, and one recipe on an order page with a lines grid. The output under each example is exactly what the browser console printed.
To try one, open a page with an interactive grid, press F12, paste the code into the Console tab, and replace stores with your grid's static ID and the column names with your own. Code that begins with function(options) belongs in the grid's Initialization JavaScript Function attribute, not in the console; in those recipes, the code after "--- after the page loads ---" ran once the page had loaded with that function in place. Several examples use await at the top level, which the console allows; inside a dynamic action, wrap such code in an async function.
For building and using the grid in Page Designer, see the complete interactive grid guide. The region-level methods used throughout, such as call and on, are covered in the guide to controlling regions with apex.region.
Configuring the Grid
A grid is configured declaratively. For anything the attributes do not cover, its Initialization JavaScript Function, under Attributes and then Advanced, receives the configuration object before the grid is created and returns it changed:
function(options) {
    options.initialSelection = false;
    options.toolbar.reset = false;
    options.defaultGridViewOptions = { rowHeader: "sequence" };
    return options;
}
The configuration becomes the widget's config option, where you can read it at runtime. The main options:
| Option | Description |
|---|---|
| editable | Editing settings, with allowedOperations (create, update, delete) and autoAddRow, or false when the grid is not editable. |
| features | General features: filter, flashback, saveReport, and download (formats, email, print). |
| toolbar | Which default toolbar controls show: searchField, columnSelection, savedReports, actionMenu, editing, save, addRow, and reset. false hides the toolbar. |
| toolbarData | The toolbar's full structure, from copyDefaultToolbar. |
| initActions | A function that receives the grid's actions so you can add or change them. |
| initialSelection | Select the first row when the grid loads. |
| reportSettingsArea | Show the area listing the report's filters and other settings. |
| trackParentSelection | A detail grid follows the selection in its master region. |
| saveLoadingIndicator, saveLoadingIndicatorPosition | The progress indicator while saving. |
| text | Texts: addRowButton, noDataFound, noParentSelected, and help. |
| defaultModelOptions | Options for the views' models, as for apex.model.create. |
| defaultGridViewOptions, defaultIconViewOptions, defaultDetailViewOptions, defaultSingleRowOptions | Options for the widgets behind each view. |
// The options of the Initialization JavaScript Function, as the grid received them:
const config = apex.region("stores").call("option", "config");
console.log("editable:", config.editable.allowedOperations.create, config.editable.allowedOperations.update,
            config.editable.allowedOperations.delete, "- autoAddRow:", config.editable.autoAddRow);
console.log("features:", Object.keys(config.features), "- download formats:", config.features.download.formats);
console.log("toolbar:", config.toolbar);
console.log("reportSettingsArea:", config.reportSettingsArea, "- initialSelection:", config.initialSelection,
            "- trackParentSelection:", config.trackParentSelection);
console.log("views:", Object.keys(config.views));
Output:
editable: true true true - autoAddRow: true
features: ["saveReport", "download", "filter", "flashback"] - download formats: ["CSV", "HTML", "XLSX", "PDF"]
toolbar: {
  "reset": true,
  "save": true,
  "columnSelection": true,
  "searchField": true,
  "savedReports": true,
  "editing": true,
  "addRow": true,
  "actionMenu": true
}
reportSettingsArea: {"disabled":false} - initialSelection: true - trackParentSelection: true
views: ["icon", "detail", "grid", "chart"]
You can override options the grid takes from its declarative attributes, but some combinations break the grid. Use the Initialization JavaScript Function for what the attributes do not offer, and leave the rest to Page Designer.
Views and Models
getViews, getCurrentView, and getCurrentViewId
getViews returns the interfaces of all views, or of one view by ID (grid, icon, detail, or chart); getCurrentView and getCurrentViewId return the current one. Which views exist depends on the grid's attributes and saved reports.
interactiveGrid.getViews([pViewId]) → interactiveGridView | object
interactiveGrid.getCurrentView() → interactiveGridView
interactiveGrid.getCurrentViewId() → string
| Property | Description |
|---|---|
| internalIdentifier | The view ID. |
| title, icon | The name and icon shown in the toolbar. |
| model, modelName | The view's model and its ID. |
| view$ | The view's widget element. |
| singleRowMode, singleRowView$ | Whether the grid view is showing a single row, and the widget that shows it. |
| cssClass | Classes of the view's element. |
const stores = apex.region("stores");
console.log("views:", Object.keys(stores.call("getViews")), "- current:", stores.call("getCurrentViewId"));
const grid = stores.call("getCurrentView");
console.log({ internalIdentifier: grid.internalIdentifier, title: grid.title, icon: grid.icon,
              modelName: grid.modelName, singleRowMode: grid.singleRowMode, viewElement: grid.view$.attr("id") });
console.log("records in the view's model:", grid.model.getTotalRecords());
Output:
views: ["grid", "chart"] - current: grid
{
  "internalIdentifier": "grid",
  "title": "Grid",
  "icon": "icon-ig-report",
  "modelName": "stores_grid",
  "singleRowMode": false,
  "viewElement": "stores_ig_grid_vc"
}
records in the view's model: 13
To work with the data, take the model of the view: apex.region("stores").call("getViews", "grid").model, or apex.model.get("stores_grid"). Each view can have its own model instance, and the grid view's is the one to edit. Everything you can do with that model is covered in the guide to reading and changing grid data with apex.model.
view.getContextRecord
Returns, in an array, the record of the row that contains a given element. You typically use it in a click handler for a button or link inside a cell.
view.getContextRecord(pContext) → Record[]
view.getSelectedRecords and setSelectedRecords
Read and set the selection of one specific view. The grid-level methods of the same names, below, work on whichever view is current.
view.getSelectedRecords() → Record[]
view.setSelectedRecords(pRecords, [pFocus], [pNoNotify])
const grid = apex.region("stores").call("getViews", "grid");
const cell = grid.view$.find("td").filter((i, td) => td.textContent.trim() === "Chicago")[0];   // a cell of the grid
const [record] = grid.getContextRecord(cell);
console.log(grid.model.getValue(record, "STORE_NAME"), "- ID", grid.model.getRecordId(record));
grid.setSelectedRecords([record]);
console.log("view selection:", grid.getSelectedRecords().map((r) => grid.model.getValue(r, "CITY")));
Output:
Orbit Chicago River North - ID 7
view selection: ["Chicago"]
Selection and Focus
getSelectedRecords and setSelectedRecords
getSelectedRecords returns the records selected in the current view. setSelectedRecords selects records, given as records or record IDs, including records not yet fetched or visible; an empty array clears the selection. The grid fires selectionchange unless pNoNotify is true.
interactiveGrid.getSelectedRecords() → Record[]
interactiveGrid.setSelectedRecords(pRecords, [pFocus], [pNoNotify])
const stores = apex.region("stores");
stores.on("interactivegridselectionchange", (event, data) =>
    console.log("selectionchange:", data.selectedRecords.map((r) => data.model.getValue(r, "STORE_NAME"))));
stores.call("setSelectedRecords", ["3", "5"]);             // record IDs (or records)
const model = stores.call("getViews", "grid").model;
console.log("selected:", stores.call("getSelectedRecords").map((r) => model.getRecordId(r)));
await new Promise((resolve) => setTimeout(resolve, 300));  // the event follows a moment later
stores.call("setSelectedRecords", [], false, true);         // clear, without the event
await new Promise((resolve) => setTimeout(resolve, 300));
console.log("after clearing:", stores.call("getSelectedRecords").length);
Output:
selected: ["3", "5"]
selectionchange: ["Orbit Seattle Capitol Hill", "Orbit San Francisco Mission"]
after clearing: 0
The event arrives a moment after the call, not during it, and clearing with pNoNotify set produced no event at all.
gotoCell
Moves the focus to the cell of a given record and column, switching to the editable view if needed. It is how you take the user straight to an error. pModelInstanceId is only needed for a detail grid whose instance is not set yet.
interactiveGrid.gotoCell([pModelInstanceId], pRecordId, [pColumn])
const stores = apex.region("stores");
stores.on("interactivegridmodechange", (event, data) => console.log("modechange: editMode", data.editMode));
stores.call("getActions").set("edit", true);                // switch to edit mode
stores.call("gotoCell", null, "4", "CITY");                 // record ID 4, column CITY
const cell = document.activeElement.closest("td, .a-GV-cell") ?? document.activeElement;
console.log("focus in:", cell.textContent.trim() || document.activeElement.value);
stores.call("getActions").set("edit", false);
Output:
modechange: editMode true
focus in: Portland
modechange: editMode false
focus
Moves the focus to the search field, or to the current view when there is no search field. The refresh example below uses it.
interactiveGrid.focus()
Actions and the Toolbar
getActions
Returns the grid's actions context, the same one apex.actions.findContextById("stores") returns. Every toolbar button and menu entry is an action, so invoking actions is how you drive the grid from your own buttons and code. How actions work in general is covered in the guide to keyboard shortcuts and toolbar actions with apex.actions.
interactiveGrid.getActions() → actions
The actions you will use most often:
| Action | What it does |
|---|---|
| edit | Toggle for edit mode. |
| save | Saves the changes. |
| selection-add-row, row-add-row | Adds a row after the selection, or after the current row. |
| selection-delete, selection-duplicate, selection-revert, selection-refresh | The Delete, Duplicate, Revert, and Refresh Rows entries for the selected rows. |
| selection-copy-down, selection-fill, selection-clear | Copy down, fill, and clear the selected cells. |
| single-row-view, close-single-row-view | Open and close the single row view. |
| search | Runs the search in the toolbar's search field. |
| refresh, reset-report, save-report | Refreshes the data, resets the report to its saved state, and saves the report. |
| change-view, change-rows-per-page | Radio groups for the view and the rows per page. |
| show-filter-dialog, show-sort-dialog, show-columns-dialog, show-download-dialog, show-highlight-dialog, show-aggregate-dialog, show-control-break-dialog, show-flashback-dialog, show-help-dialog | Open the dialogs of the Actions menu. |
| selection-mode | Toggles between row and cell selection. |
const actions = apex.region("stores").call("getActions");
const model = apex.region("stores").call("getViews", "grid").model;
console.log("actions:", actions.list().length, "- rows:", model.getTotalRecords());
actions.invoke("selection-add-row");                        // the toolbar's Add Row button
console.log("after selection-add-row:", model.getTotalRecords(), "rows, changed:", model.isChanged());
Output:
actions: 66 - rows: 13
after selection-add-row: 14 rows, changed: true
The new row now waits for the user to fill it in and save, or for selection-delete or Revert Changes to remove it. The same actions power custom add, edit, save, and delete buttons for an interactive grid.
getToolbar
Returns the toolbar's widget element.
interactiveGrid.getToolbar() → jQuery
$.apex.interactiveGrid.copyDefaultToolbar
Returns a copy of the default toolbar structure: an array of control groups, search, reports, views, and actions1 to actions4, each holding its controls. Change the copy in the Initialization JavaScript Function and pass it back as toolbarData:
function(options) {
    const toolbarData = $.apex.interactiveGrid.copyDefaultToolbar();
    toolbarData.toolbarRemove("reset-report");
    toolbarData.toolbarFind("actions3").controls.push({
        type: "BUTTON", action: "orbit-export-stores", label: "Export", icon: "icon-ig-download", iconBeforeLabel: true
    });
    options.toolbarData = toolbarData;
    options.initActions = (actions) => actions.add({ name: "orbit-export-stores", label: "Export",
                                                      action: () => actions.invoke("show-download-dialog") });
    return options;
}
The copy comes with three helper functions: toolbarFind(id) finds a group, control, or menu item by ID or action name; toolbarInsertAfter(id, item) inserts an item after one; and toolbarRemove(id) removes one. The example below runs the same changes on a copy in the console, to show the structure:
$.apex.interactiveGrid.copyDefaultToolbar() → toolbarData
// What an Initialization JavaScript Function does with the toolbar, run here on a copy:
const toolbarData = apex.jQuery.apex.interactiveGrid.copyDefaultToolbar();
console.log("groups:", toolbarData.map((group) => group.id).join(" "));
toolbarData.toolbarRemove("reset-report");                 // remove the Reset button
toolbarData.toolbarFind("actions3").controls.push({
    type: "BUTTON", action: "orbit-export-stores", label: "Export", icon: "icon-ig-download", iconBeforeLabel: true
});
console.log("actions3:", toolbarData.toolbarFind("actions3").controls.map((c) => c.action));
console.log("reset-report:", toolbarData.toolbarFind("reset-report"));
Output:
groups: search reports views actions1 actions2 actions3 actions4
actions3: ["selection-add-row", "orbit-export-stores"]
reset-report: {
  "type": "BUTTON",
  "action": "reset-report",
  "labelKey": "APEX.IG.RESET",
  "iconBeforeLabel": true
}
A single toolbar button that opens the download dialog is a common request, also covered in adding a download button to an interactive grid.
Refreshing and Resizing
refresh
Fetches fresh data from the server, first asking the user if there are unsaved changes. It is what apex.region("stores").refresh() calls, and it returns no promise, so wait for apexafterrefresh if you need to know when it is done.
interactiveGrid.refresh()
resize
Resizes the current view after its container changed size in a way the grid cannot detect. The grid follows window resizes and most layout changes on its own, so you mainly need this after revealing a grid that was inside a hidden tab or collapsed region.
interactiveGrid.resize()
const stores = apex.region("stores");
stores.call("refresh");                                     // same as stores.refresh()
await new Promise((resolve) => setTimeout(resolve, 1500));
console.log("toolbar buttons:", stores.call("getToolbar").find("button").length);
stores.call("resize");                                      // after the grid's container changed size
stores.call("focus");
console.log("focus in:", document.activeElement.id || document.activeElement.className);
Output:
toolbar buttons: 7
focus in: stores_ig_toolbar_search_field
setMasterRecord
Makes a detail grid show the rows of a given master record. A detail grid does this by itself when the master's selection changes. Call it when trackParentSelection is false, so that you decide which master record the detail shows:
interactiveGrid.setMasterRecord(pMasterModel, pMasterRecord)
const master = apex.region("orders");
master.on("interactivegridselectionchange", (event, data) => {
    if (data.selectedRecords.length === 1) {
        apex.region("order_lines").call("setMasterRecord", data.model, data.selectedRecords[0]);
    }
});
The test application has no master-detail grid, so this snippet has no recorded output; adapt the region IDs to your own orders and order_lines grids. Setting up the master-detail itself is covered in creating a master-detail form with an interactive grid.
Interactive Grid Events
The grid's events carry the prefix interactivegrid. Attach handlers with region.on and the full event name.
| Event | Fires when | Data |
|---|---|---|
| selectionchange | The selection changes. | selectedRecords, model |
| modechange | Edit mode is switched on or off. | editMode |
| viewchange | The view changes. | view, created |
| viewmodelcreate | A view's model is created, so you can subscribe to it. | viewId, model |
| reportchange | A different saved report is shown. | |
| reportsettingschange | A report setting changes, such as a filter, sort, or column. | report |
| save | The grid has saved. | status ("success") |
The dynamic action events Selection Change [Interactive Grid], Row Initialization [Interactive Grid], and Save [Interactive Grid] are the declarative side of these events. The setSelectedRecords and gotoCell examples above already listen to selectionchange and modechange.
save
const stores = apex.region("stores");
const model = stores.call("getViews", "grid").model;
const original = model.getRecordValue("2", "CITY");
stores.on("interactivegridsave", (event, data) => console.log("save event:", data.status));
model.setRecordValue("2", "CITY", "Boulder (Pearl St)");
stores.call("getActions").invoke("save");
await new Promise((resolve) => setTimeout(resolve, 2000));
model.setRecordValue("2", "CITY", original);               // put it back
stores.call("getActions").invoke("save");
await new Promise((resolve) => setTimeout(resolve, 2000));
console.log("CITY:", model.getRecordValue("2", "CITY"), "- changes:", model.isChanged());
Output:
save event: success
save event: success
CITY: Boulder - changes: false
reportsettingschange, reportchange, and viewchange
const stores = apex.region("stores");
stores.on("interactivegridreportsettingschange", (event, data) => console.log("reportsettingschange"));
apex.jQuery("#stores_ig_toolbar_search_field").val("Denver");
stores.call("getActions").invoke("search");                 // the toolbar's search
await new Promise((resolve) => setTimeout(resolve, 1500));
console.log("rows:", stores.call("getViews", "grid").model.getTotalRecords());
stores.call("getActions").invoke("reset-report");           // back to the saved report
await new Promise((resolve) => setTimeout(resolve, 1500));
console.log("after reset-report:", stores.call("getViews", "grid").model.getTotalRecords());
Output:
reportsettingschange
rows: 1
after reset-report: 13
Running the toolbar's search through its action changed the report's settings, which fired reportsettingschange, and reset-report brought all 13 rows back.
viewmodelcreate
A view's model is created when the view is first shown, which for the grid view happens while the page loads. To catch it, the handler must be attached before that, so this code belongs in the page's Function and Global Variable Declaration attribute; pasting it into the console after the page has loaded shows nothing.
apex.jQuery(document).on("interactivegridviewmodelcreate", (event, data) => {
    console.log("viewmodelcreate:", event.target.id, "- view:", data.viewId, "- model:", data.model.modelId());
    // subscribe here to see every change of the model
    data.model.subscribe({ onChange: (type) => { if (type === "set") console.log("model: set"); } });
});
apex.jQuery(document).on("interactivegridreportchange", (event) => console.log("reportchange:", event.target.id));
Output:
viewmodelcreate: stores_ig - view: grid - model: stores_grid
Recipes
These recipes put the interface to work on the tasks that come up in almost every application with an interactive grid. Each one says where the code goes, and the blocks marked Try it only do what a user would, such as selecting rows or clicking a button, so the output shows the result.
Get the Selected Rows
A button next to the grid needs the rows the user checked: their primary keys and a few column values. The region's getSelectedRecords returns the selected records in any view, and the current view's model reads their values.
Create a button, Show Selection, with the action Defined by Dynamic Action, and a dynamic action on its Click event with an Execute JavaScript Code action.
// === Try it: select three stores (or click their check boxes) ===
apex.region("stores").call("setSelectedRecords", ["3", "5", "9"]);
// === Button Show Selection › Dynamic Action › Execute JavaScript Code ===
const region = apex.region("stores");
const model  = region.call("getCurrentView").model;
const rows   = region.call("getSelectedRecords").map((record) => ({
    id:   model.getRecordId(record),
    name: model.getValue(record, "STORE_NAME"),
    area: apex.locale.toNumber(model.getValue(record, "FLOOR_AREA_SQFT"))   // "9,800" → 9800
}));
rows.forEach((row) => console.log(row));
console.log("IDs:", rows.map((row) => row.id).join(":"));
console.log("total area:", rows.reduce((sum, row) => sum + row.area, 0));
Output:
{"id":"3", "name":"Orbit Seattle Capitol Hill", "area":9800}
{"id":"5", "name":"Orbit San Francisco Mission", "area":8100}
{"id":"9", "name":"Orbit Atlanta Ponce City", "area":8600}
IDs: 3:5:9
total area: 26500
getRecordId returns the primary key value as a string. Values come back formatted the way the grid shows them, such as "9,800" for a number with a format mask, so convert them with apex.locale.toNumber before doing arithmetic. To react whenever the selection changes rather than on a click, use the dynamic action event Selection Change [Interactive Grid]; in its JavaScript, this.data.selectedRecords and this.data.model are the records and the model. An older walkthrough of the same task is getting the selected rows of an interactive grid.
Send the Selected Rows to the Server
The selected IDs go to the server in one Ajax call, to a process that works with them and answers in JSON. An array is sent as f01, which PL/SQL reads as apex_application.g_f01.
Put the JavaScript in a dynamic action on a button, as in the previous recipe, and the PL/SQL in an Ajax Callback process named STORE_SUMMARY, either an application process or a page process at the Ajax Callback point:
declare
    l_total number := 0;
begin
    apex_json.open_object;
    apex_json.open_array('stores');
    for r in (select store_name, city, floor_area_sqft
                from orb_stores
               where id in (select to_number(column_value) from table(apex_application.g_f01))
               order by store_name)
    loop
        apex_json.write(r.store_name || ' (' || r.city || ')');
        l_total := l_total + r.floor_area_sqft;
    end loop;
    apex_json.close_array;
    apex_json.write('totalSqft', l_total);
    apex_json.close_object;
end;
// === Try it: select three stores ===
apex.region("stores").call("setSelectedRecords", ["3", "5", "9"]);
// === Button Summarize › Dynamic Action › Execute JavaScript Code ===
const region = apex.region("stores");
const model = region.call("getCurrentView").model;
const ids = region.call("getSelectedRecords").map((record) => model.getRecordId(record));
if (!ids.length) {
apex.message.alert("Select at least one store.");
} else {
apex.server.process("STORE_SUMMARY", { f01: ids }) // an array goes as f01
.then((data) => {
console.log(data);
apex.message.showPageSuccess(`${data.stores.length} stores, ` +
`${apex.locale.formatNumber(data.totalSqft, "FM999G999G999")} sq ft in total.`);
});
}Output:
{
  "stores": [
    "Orbit Atlanta Ponce City (Atlanta)",
    "Orbit San Francisco Mission (San Francisco)",
    "Orbit Seattle Capitol Hill (Seattle)"
  ],
  "totalSqft": 26500
}
For a process that runs on page submit instead, put the IDs in a hidden page item joined with colons, submit the page, and split them in PL/SQL with apex_string.split_numbers. The Ajax side of this recipe is explained in the guide to calling the server with apex.server.process.
Add a Toolbar Button That Works on the Selected Rows
A Mark as Flagship button in the grid's toolbar sets a column on every selected row and saves. The toolbar belongs to the grid, so the button is added in the grid's configuration: a control in the toolbar structure from copyDefaultToolbar, and an action, added in initActions, that does the work. The action stays disabled until rows are selected.
The function goes in the region's Initialization JavaScript Function attribute, and the code after "--- after the page loads ---" in the page's Execute when Page Loads attribute.
// === Region Stores › Attributes › Initialization JavaScript Function ===
function(options) {
    const toolbar = $.apex.interactiveGrid.copyDefaultToolbar();
    toolbar.toolbarFind("actions3").controls.push({
        type: "BUTTON", action: "mark-flagship", icon: "fa fa-star", iconBeforeLabel: true, hot: true
    });
    options.toolbarData = toolbar;
    options.initActions = function(actions) {
        actions.add({
            name: "mark-flagship",
            label: "Mark as Flagship",
            disabled: true,                                   // until rows are selected
            action: function() {
                const view = apex.region("stores").call("getCurrentView");
                // FLAGSHIP is a Yes/No column: its value is an object
                view.getSelectedRecords().forEach((record) =>
                    view.model.setValue(record, "FLAGSHIP", { v: true, d: "On" }));
                actions.invoke("save");
            }
        });
    };
    return options;
}
// --- after the page loads ---
// === Page › Execute when Page Loads ===
apex.region("stores").on("interactivegridselectionchange", (event, data) => {
    const actions = apex.region("stores").call("getActions");
    if (data.selectedRecords.length) actions.enable("mark-flagship");
    else actions.disable("mark-flagship");
});
apex.region("stores").on("interactivegridsave", () =>
    apex.message.showPageSuccess("Flagship stores saved."));
// === Try it: select two stores and click the button ===
apex.region("stores").call("setSelectedRecords", ["2", "4"]);
await new Promise((resolve) => setTimeout(resolve, 300));
$("#stores button[data-action='mark-flagship']").trigger("click");
await new Promise((resolve) => setTimeout(resolve, 2000));
const model = apex.region("stores").call("getCurrentView").model;
console.log(["2", "4"].map((id) => model.getValue(model.getRecord(id), "STORE_NAME") + ": " +
                                   model.getValue(model.getRecord(id), "FLAGSHIP").d));
Output:
["Orbit Boulder Pearl Street: On", "Orbit Portland Pearl District: On"]
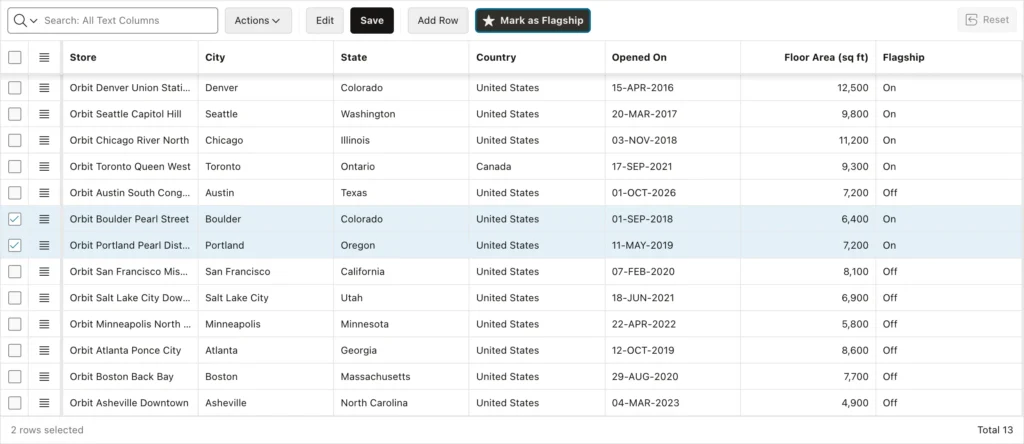
A Yes/No switch column holds an object in the model, { v: true, d: "On" }, with the value and its display text, and setValue takes the same form. hot: true shows the button in the primary style. Because the button runs an action, actions.disable and actions.enable gray it out and back, and the same action could also go in a menu or get a keyboard shortcut.
Add a Delete Button with a Confirmation
The grid can delete selected rows from its Selection Actions menu, but a visible Delete Selected button that asks first and saves at once is often friendlier. The action invokes two of the grid's own actions: selection-delete and save.
The function goes in the region's Initialization JavaScript Function attribute. The code after "--- after the page loads ---" only adds a test store and deletes it through the new button.
// === Region Stores › Attributes › Initialization JavaScript Function ===
function(options) {
    const toolbar = $.apex.interactiveGrid.copyDefaultToolbar();
    toolbar.toolbarFind("actions3").controls.push({
        type: "BUTTON", action: "delete-selected", icon: "fa fa-trash-o", iconBeforeLabel: true
    });
    options.toolbarData = toolbar;
    options.initActions = function(actions) {
        actions.add({
            name: "delete-selected",
            label: "Delete Selected",
            action: function() {
                const count = apex.region("stores").call("getSelectedRecords").length;
                if (!count) {
                    apex.message.alert("Select the stores to delete first.");
                    return;
                }
                apex.message.confirm(`Delete ${count} selected store(s)?`, (okPressed) => {
                    if (okPressed) {
                        actions.invoke("selection-delete");   // marks the rows as deleted
                        actions.invoke("save");               // and saves at once
                    }
                });
            }
        });
    };
    return options;
}
// --- after the page loads ---
// === Try it: add a test store, then select it and delete it ===
const region = apex.region("stores");
const model  = region.call("getCurrentView").model;
const id = model.insertNewRecord();                          // (what Add Row does)
const record = model.getRecord(id);
model.setValue(record, "STORE_NAME", "Orbit Test Store");
model.setValue(record, "CITY", "Testville");
region.call("getActions").invoke("save");
await new Promise((resolve) => setTimeout(resolve, 2500));
console.log("stores:", model.getTotalRecords());
const saved = [];
model.forEach((r) => {
    if (model.getValue(r, "STORE_NAME") === "Orbit Test Store") saved.push(r);
});
region.call("setSelectedRecords", saved);
$("#stores button[data-action='delete-selected']").trigger("click");
await new Promise((resolve) => setTimeout(resolve, 500));
console.log("confirm:", $(".ui-dialog:visible .a-AlertMessage-details").text().trim());
$(".ui-dialog:visible .ui-dialog-buttonpane button").last().trigger("click");   // OK
await new Promise((resolve) => setTimeout(resolve, 2500));
console.log("stores:", model.getTotalRecords());
Output:
stores: 14
confirm: Delete 1 selected store(s)?
stores: 13
selection-delete only marks the rows as deleted, and the grid shows them struck through; save sends the deletes to the server. Leave out the save to let users review the deletes and click Save themselves. A per-row delete button is shown in adding a delete button to interactive grid rows.
Add an Entry to the Row Actions Menu
Each row's actions menu, the button with three lines, can hold entries of your own. The menu is a menu widget whose items the grid view keeps in rowActionMenu$. An entry's action function receives the button that opened the menu, and getContextRecord turns that button into the row's record.
Put the code in the page's Execute when Page Loads attribute.
// === Page › Execute when Page Loads ===
const grid = apex.region("stores").call("getViews", "grid");
const menuItems = grid.rowActionMenu$.menu("option", "items");
menuItems.push(
    { type: "separator" },
    {
        type: "action",
        label: "Store Details",
        icon: "fa fa-info-circle",
        action: function(menu, button) {
            const record = grid.getContextRecord(button)[0];         // the row of the menu
            const model  = grid.model;
            apex.message.alert(`${model.getValue(record, "STORE_NAME")}: ` +
                `${model.getValue(record, "FLOOR_AREA_SQFT").trim()} sq ft, opened ` +
                `${model.getValue(record, "OPENED_ON")}.`);
        }
    }
);
// === Try it: open the row actions menu of Seattle and choose Store Details ===
const row$ = $("#stores .a-GV-row").filter((i, row) => /Seattle/.test(row.textContent)).first();
row$.find("button.a-Button--actions").trigger("click");
await new Promise((resolve) => setTimeout(resolve, 400));
const menu$ = $(".a-Menu:visible");
console.log(menu$.find(".a-Menu-label").map((i, e) => e.textContent).get());
const item = menu$.find(".a-Menu-label").filter((i, e) => e.textContent === "Store Details")[0];
for (const type of ["mousedown", "mouseup", "click"]) {                 // what a mouse click sends
    item.dispatchEvent(new MouseEvent(type, { bubbles: true, cancelable: true, view: window }));
}
await new Promise((resolve) => setTimeout(resolve, 500));
console.log($(".ui-dialog:visible .a-AlertMessage-details").text().trim());
$(".ui-dialog:visible .ui-dialog-buttonpane button").last().trigger("click");
await new Promise((resolve) => setTimeout(resolve, 400));
row$.find("button.a-Button--actions").trigger("click");      // open it again for the picture
Output:
[
  "Single Row View",
  "Add Row",
  "Duplicate Row",
  "Delete Row",
  "Refresh Row",
  "Revert Changes",
  "Store Details"
]
Orbit Seattle Capitol Hill: 9,800 sq ft, opened 20-MAR-2017.
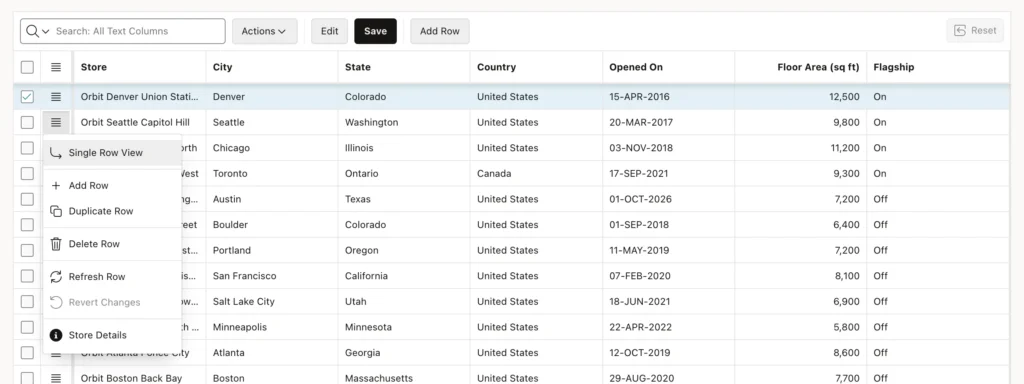
An entry's action can be a function, as here, or the name of an action in the grid's actions context, like the built-in entries.
Keep an Order Total Up to Date as the Lines Change
On an order page, the order total should follow the lines while the user edits them, before anything is saved. Subscribing to the lines grid's model gives a notification for every change, so the recipe recalculates the total when a quantity, price, or discount is set, and when a line is added, deleted, or reverted. The order's own discount, a page item, counts too.
Put the code in the page's Execute when Page Loads attribute.
// === Try it: open an order from the Orders page ===
$("#orders a[href*='order']").first()[0].click();
// --- on the Order page ---
// === Page › Execute when Page Loads ===
const lines = apex.region("order_lines").call("getViews", "grid").model;
// "$179.99" → 179.99
const num = (value) => apex.locale.toNumber(value || "0", "FML999G999G990D00") || 0;

function updateOrderTotal() {
    let total = 0;
    lines.forEach((record, index, id) => {
        if (lines.getRecordMetadata(id).deleted) return;
        total += num(lines.getValue(record, "QUANTITY")) * num(lines.getValue(record, "UNIT_PRICE"))
               * (1 - num(lines.getValue(record, "DISCOUNT_PCT")) / 100);
    });
    // the order's own discount
    total = total * (1 - num(apex.item("P10_DISCOUNT_PCT").getValue()) / 100);
    apex.item("P10_ORDER_TOTAL").setValue(apex.locale.formatNumber(total, "FML999G999G990D00"));
}

lines.subscribe({
    onChange: function(type, change) {
        if ((type === "set" && ["QUANTITY", "UNIT_PRICE", "DISCOUNT_PCT"].includes(change.field)) ||
            ["insert", "delete", "revert"].includes(type)) {
            updateOrderTotal();
        }
    }
});
$("#P10_DISCOUNT_PCT").on("change", updateOrderTotal);
// === Try it: change the quantity of the first line, delete the second, and change the discount ===
console.log("total:", apex.item("P10_ORDER_TOTAL").getValue());
const records = [];
lines.forEach((record) => records.push(record));
lines.setValue(records[0], "QUANTITY", "12");
console.log("line 1 quantity 10 → 12:", apex.item("P10_ORDER_TOTAL").getValue());
lines.deleteRecords([records[1]]);
console.log("line 2 deleted:", apex.item("P10_ORDER_TOTAL").getValue());
apex.item("P10_DISCOUNT_PCT").setValue("10");
console.log("order discount 15% → 10%:", apex.item("P10_ORDER_TOTAL").getValue());
Output:
total: $11,495.93
line 1 quantity 10 → 12: $11,801.91
line 2 deleted: $7,562.82
order discount 15% → 10%: $8,007.69
The recipe calculates each line from its quantity, price, and discount instead of updating the Line Total column, and for a good reason. That column is Display Only, and a Display Only column is protected by a checksum: the model refuses setValue on it with the error Set value not allowed for field, and refuses a calculated value with Set calculated value not allowed for field. The line total that gets saved should come from the database, through a virtual column or the process that saves the lines.
Conclusion
The interactive grid's setup lives in its config option, which the Initialization JavaScript Function can change before the grid is created. getViews and getCurrentView return the views, whose model holds the data. getSelectedRecords, setSelectedRecords, and gotoCell work with selection and focus. getActions returns the actions behind every button and menu entry, and invoking them is the cleanest way to drive the grid from your own code. copyDefaultToolbar is the starting point for a custom toolbar, and the interactivegrid events report selection, edit mode, views, report settings, and saves. With these pieces and the model, the six recipes above cover most of what real applications ask of a grid.
