
The fastest way to a working Oracle APEX 26.1 environment is a database container. Oracle AI Database 26ai Free arrives preinstalled in one image, and the commands are the same on Windows, macOS, and Linux. Most of the half hour it takes is spent waiting for the download.
This guide installs the full stack in eight steps: start the database container, connect with SQLcl, install ORDS, install APEX, create the instance administrator, enable the ORDS gateway, start ORDS, and allow outbound network calls. It ends with day-to-day commands, Podman, and fixes for the common errors.
These steps come from Oracle APEX 26.1 Book: The Complete Guide. Every command was run as printed, on Oracle AI Database 26ai Free 23.26.3, APEX 26.1.0, and ORDS 26.2.3.
Before You Start
You need Java 21, Docker Desktop or Podman with at least 4 GB of memory, SQLcl, and the APEX and ORDS files unzipped into an apex-lab folder. All of that is covered in how to prepare your computer for Oracle APEX 26.1.
In macOS and Linux terminals, a backslash at the end of a line continues a command. In Windows PowerShell, the continuation character is the backtick. Both forms are shown where they differ; on Windows, PowerShell is recommended over the old Command Prompt.
The Plan
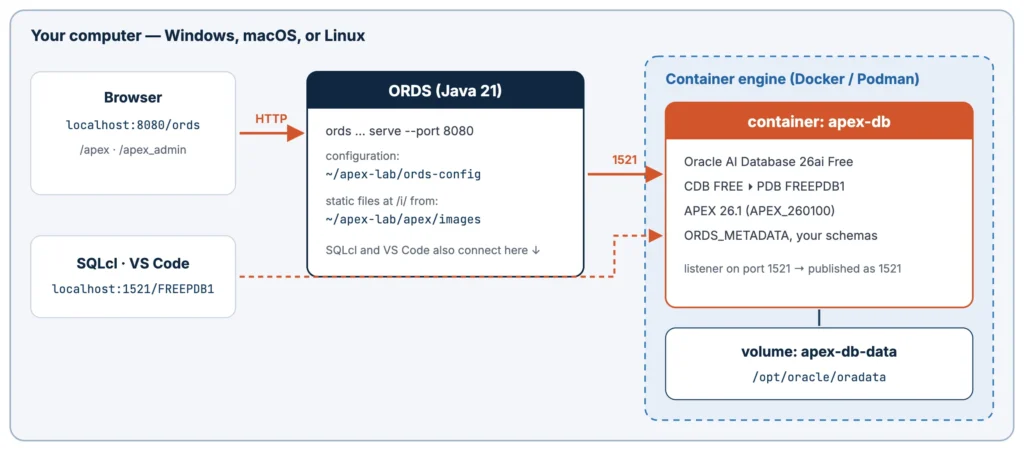
The database runs in a container named apex-db, with its data files in a Docker volume so they survive when the container is removed or upgraded. Port 1521 is published on your computer, so SQLcl, ORDS, and VS Code reach the database at localhost:1521. ORDS runs on your computer, listens on port 8080, and serves the APEX static files from the apex/images folder.
Step 1: Start the Database Container
Oracle publishes the database image on the Oracle Container Registry, and it is public: no sign-in is needed. Use free:latest, the full database (about 13 GB unpacked). free:latest-lite is about 2.4 GB but leaves out optional components; APEX is best served by the full image.
Start the download first, since it is the slow part.
Example:
docker pull container-registry.oracle.com/database/free:latest
Then start the container, replacing Welcome_2026# with your own password for SYS, SYSTEM, and PDBADMIN.
Example (macOS, Linux):
docker run -d --name apex-db \
  -p 1521:1521 \
  -e ORACLE_PWD='Welcome_2026#' \
  -v apex-db-data:/opt/oracle/oradata \
  container-registry.oracle.com/database/free:latest
Example (Windows PowerShell):
docker run -d --name apex-db `
  -p 1521:1521 `
  -e ORACLE_PWD='Welcome_2026#' `
  -v apex-db-data:/opt/oracle/oradata `
  container-registry.oracle.com/database/free:latest
| Option | Meaning |
|---|---|
| -d | Run the container in the background |
| --name apex-db | The name you use to refer to the container |
| -p 1521:1521 | Publish the listener port; if 1521 is taken, use -p 1522:1521 and connect to 1522 |
| -e ORACLE_PWD=... | The password for SYS, SYSTEM, and PDBADMIN |
| -v apex-db-data:/opt/oracle/oradata | Keep the database files in a named volume that outlives the container |
Docker returns at once, but the database is still starting. Follow its log until it is ready, then press Ctrl+C.
Example:
docker logs -f apex-db
Output:
#########################
DATABASE IS READY TO USE!
#########################
With the image already downloaded, this took about 30 seconds. docker ps shows (healthy) once the database is open.
Example:
docker ps --filter name=apex-db
Output (split over two lines to fit):
CONTAINER ID   IMAGE                                                COMMAND
423a3f9fe6cc   container-registry.oracle.com/database/free:latest   "/bin/bash -c $SCRIP…"

CREATED         STATUS                   PORTS                     NAMES
8 minutes ago   Up 8 minutes (healthy)   0.0.0.0:1521->1521/tcp    apex-db
The database is multitenant: a container database called FREE holds a pluggable database called FREEPDB1. You install APEX into FREEPDB1 and connect with the service name FREEPDB1, never into the container database itself.
Step 2: Connect with SQLcl
In a new terminal, connect to the PDB as SYS; SQLcl prompts for the password.
Example:
sql sys@localhost:1521/FREEPDB1 as sysdba
Output:
SQLcl: Release 26.2 Production on Wed Sept 23 18:12:52 2026

Copyright (c) 1982, 2026, Oracle.  All rights reserved.

Connected to:
Oracle AI Database 26ai Free Release 23.26.3.0.0 - Develop, Learn, and Run for Free
Version 23.26.3.0.0

SQL>
Confirm you are in the PDB, then type exit.
Example:
show con_name
Output:
CON_NAME
------------------------------
FREEPDB1
Without SQLcl, every SQLcl command here also runs in SQL*Plus inside the container: docker exec -it apex-db sqlplus / as sysdba, then alter session set container = FREEPDB1;. No password is needed there, because you are already the oracle user inside the container.
Step 3: Install ORDS
Oracle's installation guide for APEX 26.1 recommends installing ORDS before APEX in a new database. The ORDS installer creates its schema, ORDS_METADATA, and its connection-pool account, ORDS_PUBLIC_USER, and writes a configuration folder on your computer. It reads the SYS password from standard input, hence the echo.
Example (macOS, Linux):
cd ~/apex-lab
echo 'Welcome_2026#' | ords --config ~/apex-lab/ords-config install \
  --admin-user SYS \
  --db-hostname localhost --db-port 1521 --db-servicename FREEPDB1 \
  --feature-db-api true --feature-rest-enabled-sql true --feature-sdw true \
  --gateway-mode proxied --gateway-user APEX_PUBLIC_USER \
  --password-stdin
Example (Windows PowerShell):
cd C:\apex-lab
'Welcome_2026#' | ords --config C:\apex-lab\ords-config install `
  --admin-user SYS `
  --db-hostname localhost --db-port 1521 --db-servicename FREEPDB1 `
  --feature-db-api true --feature-rest-enabled-sql true --feature-sdw true `
  --gateway-mode proxied --gateway-user APEX_PUBLIC_USER `
  --password-stdin
The options tell ORDS where the database is, which features to switch on (the Database API, REST-Enabled SQL, and SQL Developer Web, called Database Actions), and how to run APEX pages: through the PL/SQL gateway in proxied mode, on behalf of APEX_PUBLIC_USER.
Output:
Oracle REST Data Services - Non-Interactive Install

Retrieving information.
Cannot configure PL/SQL gateway user APEX_PUBLIC_USER with ORDS because APEX is not installed in the FREEPDB1 database.
The setting named: db.connectionType was set to: basic in configuration: default
The setting named: db.hostname was set to: localhost in configuration: default
The setting named: db.port was set to: 1521 in configuration: default
The setting named: db.servicename was set to: FREEPDB1 in configuration: default
The setting named: plsql.gateway.mode was set to: disabled in configuration: default
...
INFO        Installing Oracle REST Data Services version 26.2.3.r2371104 in FREEPDB1
INFO        ... Verified database prerequisites
INFO        ... Created Oracle REST Data Services proxy user
INFO        ... Created Oracle REST Data Services schema
INFO        ... Granted privileges to Oracle REST Data Services
INFO        ... Created Oracle REST Data Services database objects
INFO        Completed installation for Oracle REST Data Services version 26.2.3.r2371104. Elapsed time: 00:00:07.156
The third line is expected: APEX is not in the database yet, so ORDS installs everything else and leaves the gateway disabled. You switch it on in Step 6.
The configuration folder holds the database connection in databases/default/pool.xml, global settings in global/settings.xml, and the passwords in an encrypted wallet. Back it up, and never commit it to source control.
Step 4: Install Oracle APEX
APEX is installed by running apexins.sql as SYS in the PDB. With the database in a container, the simplest way is to copy the apex folder into the container (about 1 GB) and run the script there. On Windows, write the source path as C:\apex-lab\apex.
Example:
docker exec -u root apex-db mkdir -p /opt/oracle/apex-install
docker cp ~/apex-lab/apex apex-db:/opt/oracle/apex-install/
docker exec -u root apex-db chown -R oracle /opt/oracle/apex-install
Open a shell in the container, change to the apex folder, and start SQL*Plus.
Example:
docker exec -it apex-db bash
cd /opt/oracle/apex-install/apex
sqlplus / as sysdba
At the SQL> prompt, switch to the PDB and run the installer.
Example:
alter session set container = FREEPDB1;
@apexins.sql SYSAUX SYSAUX TEMP /i/
| Argument | Meaning |
|---|---|
| SYSAUX | Tablespace for the APEX engine |
| SYSAUX | Tablespace for uploaded files |
| TEMP | Temporary tablespace |
| /i/ | The image prefix: the URL path where browsers find the APEX static files. Keep /i/, which ORDS serves by default. |
The installer took just under three minutes; on older hardware, allow up to twenty. It ends with a checklist.
Output (the end):
    ok 16 - Installing APEX REST Config                 |   0.02
    ok 17 - Set Loaded/Upgraded in Registry             |   0.00
    ok 18 - Setting Patch Status: APPLIED               |   0.00
    ok 19 - Removing Unused SYS Objects and Public Privs|   0.00
    ok 20 - Validating Installation                     |   0.02
ok 3 - 20 actions passed, 0 actions failed              |   0.10

Thank you for installing Oracle APEX 26.1.0

Oracle APEX is installed in the APEX_260100 schema.

The structure of the link to the Oracle APEX Administration Services is as follows:
http://host:port/ords/apex_admin

The structure of the link to the Oracle APEX development environment is as follows:
http://host:port/ords/apex
Check that it registered correctly.
Example:
select comp_id, version, status
  from dba_registry
 where comp_id = 'APEX';
Output:
COMP_ID    VERSION     STATUS
---------- ----------- -----------
APEX       26.1.0      VALID
If it fails, search the output for the first ORA- error. The usual causes are running in the container database instead of the PDB, running from the wrong folder, and too little space. The installer writes a log such as install2026-09-23_12-27-42.log in the apex folder; fix the cause and run @apexins.sql again, which continues a partial installation.
Step 5: Create the Instance Administrator
The instance administrator, conventionally ADMIN, manages the whole installation: workspaces, instance security, and monitoring. Still in SQL*Plus in the PDB, run apxchpwd.sql, accept ADMIN, and type an email address and password.
Example:
@apxchpwd.sql
Output:
================================================================================
This script can be used to change the password of an Oracle APEX
instance administrator. If the user does not yet exist, a user record will be
created.
================================================================================
Enter the administrator's username [ADMIN]
User "ADMIN" does not yet exist and will be created.
Enter ADMIN's email [ADMIN] admin@example.com
Enter ADMIN's password []
Created instance administrator ADMIN.
The password needs an uppercase letter, a lowercase letter, a digit, and a punctuation character; otherwise the script stops with ORA-20001: Invalid password., and you run it again. The same script resets a forgotten ADMIN password later. Type exit twice to leave SQL*Plus and the container shell.
Older guides unlock APEX_PUBLIC_USER and set its password at this point. With APEX 26.1 and ORDS in proxied mode, that is unnecessary: ORDS connects through ORDS_PUBLIC_USER with a proxy grant.
Step 6: Enable the ORDS Gateway
Run exactly the same ords install command as in Step 3 again. ORDS sees its schema is installed, detects APEX, and switches the gateway on.
Output:
Oracle REST Data Services - Non-Interactive Install

Retrieving information.
Connecting to database user: ORDS_PUBLIC_USER url: jdbc:oracle:thin:@//localhost:1521/FREEPDB1
The setting named: plsql.gateway.mode was set to: proxied in configuration: default
INFO        Oracle REST Data Services schema version 26.2.3.r2371104 is installed.
plsql.gateway.mode set to proxied is the line to look for. ORDS has also granted its pool account the right to connect on behalf of APEX_PUBLIC_USER, which SQLcl can confirm.
Example:
select proxy, client from dba_proxies;
Output:
PROXY              CLIENT
------------------ ------------------
ORDS_PUBLIC_USER   APEX_PUBLIC_USER
ORDS_PUBLIC_USER   APEX_PUBLIC_ROUTER
If APEX is already in the database when you first run ords install, for example on a reinstall, the gateway is configured in one pass and this step is unnecessary.
Step 7: Start ORDS and Open APEX
Start ORDS in standalone mode, with its built-in web server, pointing at the configuration folder and the APEX images folder.
Example (macOS, Linux):
ords --config ~/apex-lab/ords-config serve \
  --port 8080 \
  --apex-images ~/apex-lab/apex/images
Example (Windows PowerShell):
ords --config C:\apex-lab\ords-config serve `
  --port 8080 `
  --apex-images C:\apex-lab\apex\images
Output (shortened):
ORDS: Release 26.2 Production on Wed Sept 23 12:31:34 2026

Configuration:
  /Users/vinish/apex-lab/ords-config

INFO        HTTP and HTTP/2 cleartext listening on host: 0.0.0.0 port: 8080
INFO        Default forwarding from / to contextRoot configured.
INFO        Configuration properties for: |default|lo|
db.connectionType=basic
db.hostname=localhost
db.port=1521
db.servicename=FREEPDB1
db.username=ORDS_PUBLIC_USER
feature.sdw=true
plsql.gateway.mode=proxied
...
WARNING     *** jdbc.MaxLimit in configuration |default|lo| is using a value of 10,
            this setting may not be sized adequately for a production environment ***
INFO        Created Pool: |default|lo|-2026-09-23T12-31-35.441878Z

Mapped local pools from /Users/vinish/apex-lab/ords-config/databases:
  /ords/                              => default                        => VALID

INFO        Oracle REST Data Services initialized
Oracle REST Data Services version : 26.2.3.r2371104
Oracle REST Data Services server info: jetty/12.0.37
Oracle REST Data Services java info: Java HotSpot(TM) 64-Bit Server VM (build 21.0.12.1+1-LTS-4 mixed mode, sharing)
The jdbc.MaxLimit warning is harmless on a development computer: ten pooled connections is plenty for one developer. Leave the window open, since ORDS runs until you press Ctrl+C, and open http://localhost:8080/ords/ in your browser.
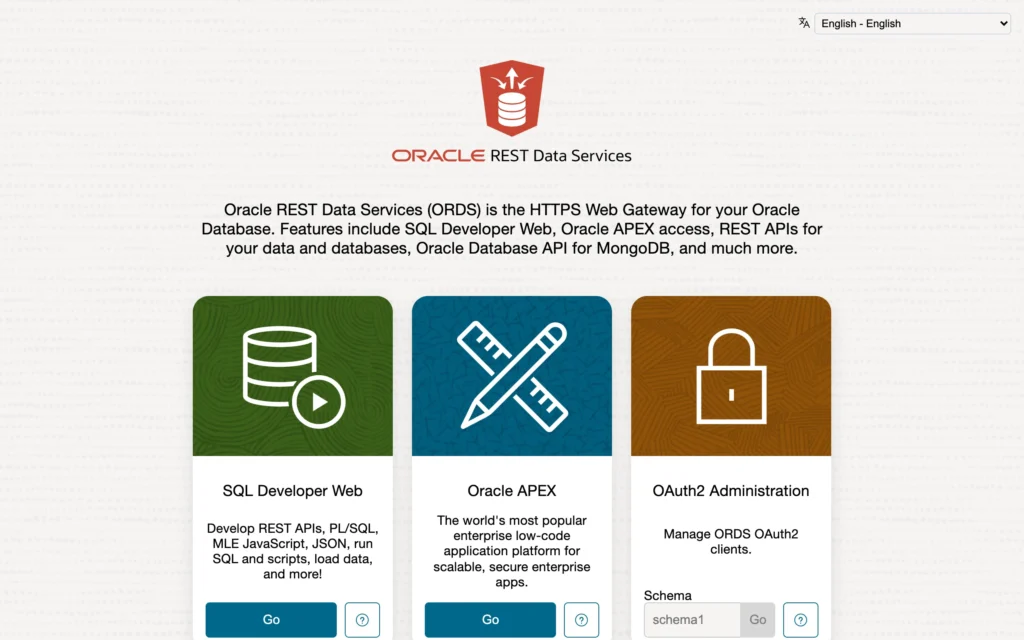
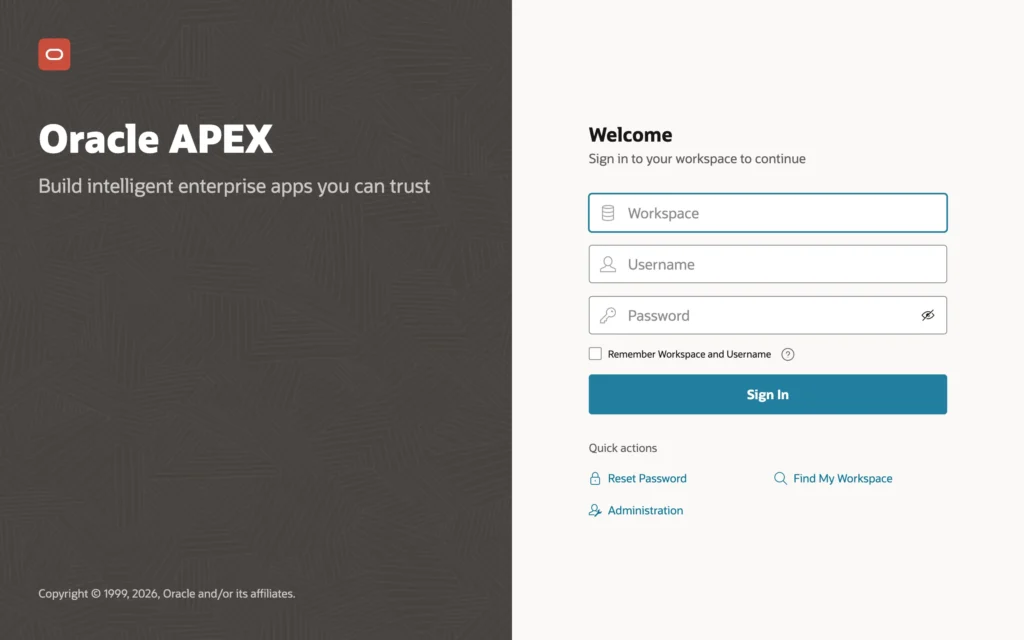
Click Go under Oracle APEX, or open http://localhost:8080/ords/apex, to reach the workspace sign-in page. There are no workspaces yet, so there is nothing to sign in to here.
Open http://localhost:8080/ords/apex_admin and sign in as ADMIN to reach Administration Services, where workspaces are created.
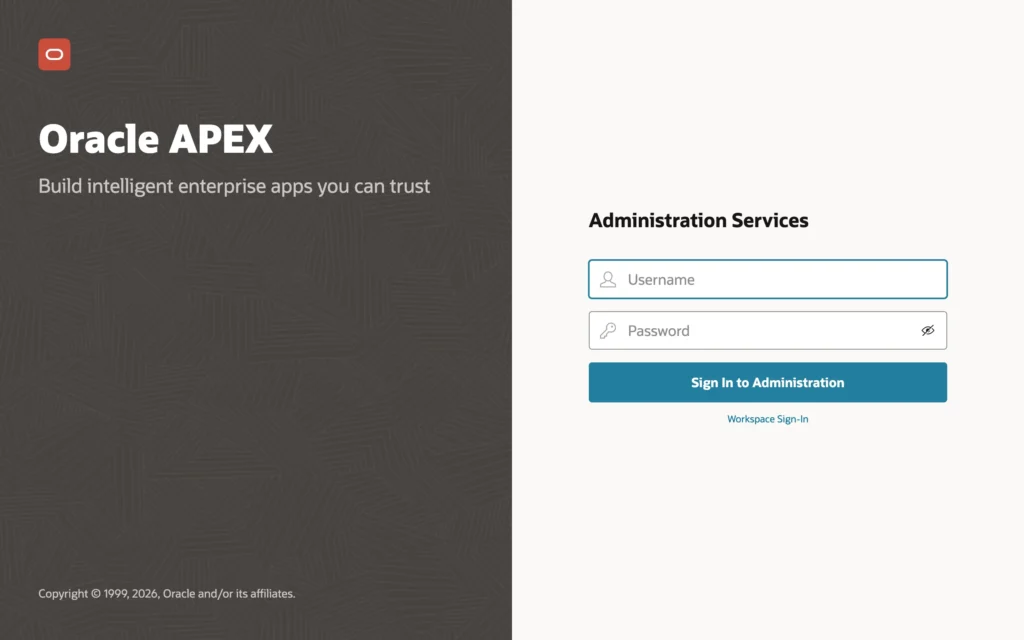
| Address | For |
|---|---|
| /ords/apex | Developers |
| /ords/apex_admin | The instance administrator |
| /ords/ | The ORDS landing page |
Step 8: Allow Outbound Network Calls
The database blocks network connections from PL/SQL unless an access control list (ACL) allows them. APEX needs them to send email, call REST and AI services, and use print servers; without a grant, these fail with ORA-24247: network access denied by access control list (ACL). On a development computer, the simplest grant lets the APEX engine connect to any host. Run it as SYS in the PDB.
Example:
begin
    dbms_network_acl_admin.append_host_ace(
        host => '*',
        ace  => xs$ace_type(
                    privilege_list => xs$name_list('connect'),
                    principal_name => 'APEX_260100',
                    principal_type => xs_acl.ptype_db));
end;
/
The grant goes to APEX_260100, the APEX engine's schema, because the engine makes outbound calls for all applications. On a production server, restrict it to specific hosts and ports.
Day-to-Day Commands
| Task | Command |
|---|---|
| Stop | Ctrl+C in the ORDS window, then docker stop apex-db |
| Start | docker start apex-db, wait a few seconds, then the ords serve command from Step 7 |
| Database log | docker logs apex-db (add --tail 50 for the last lines) |
| Shell or SQL*Plus in the container | docker exec -it apex-db bash, or docker exec -it apex-db sqlplus / as sysdba |
Put the ORDS command in a small start-ords.sh or start-ords.ps1 script to save typing. To delete everything, container and data:
Example:
docker rm -f apex-db
docker volume rm apex-db-data
Removing only the container keeps your data in the apex-db-data volume, and a new docker run with the same -v option picks the database up again, which is also how you move to a newer image.
Oracle AI Database Free allows one running installation per logical environment. Each container counts as its own environment, so several Free containers can run side by side, but a second Free database inside the same container refuses to start with ORA-00442.
Using Podman
Replace docker with podman in every command. On Linux, Podman runs containers without root by default, which works here because the only published port, 1521, is above 1024.
Troubleshooting
| Problem | Fix |
|---|---|
| ORA-12541: Cannot connect. No listener at host localhost port 1521. | The container is not running or not ready, or the port differs. Check docker ps and docker logs apex-db. |
| ORA-12514: Service FREEPDB1 is not registered with the listener. | The database is still starting. Wait for DATABASE IS READY TO USE! and retry. |
| ORA-01017: invalid credential or not authorized; logon denied | Wrong password. Reset SYS, SYSTEM, and PDBADMIN with docker exec apex-db ./setPassword.sh NewPassword_1. |
| 404 Not Found at /ords/apex | The PL/SQL gateway is disabled. Run ords install again (Step 6) and restart ORDS. |
| Pages without styles, or missing-images warnings | --apex-images must point at the images folder of the same APEX version as in the database. |
| Address already in use when ORDS starts | Port 8080 is taken; use --port 8081 and that port in the browser. |
| The container exits soon after starting | Usually too little memory: give Docker Desktop at least 4 GB. docker logs apex-db shows the reason. |
Conclusion
To install Oracle APEX 26.1 with Docker, run Oracle AI Database 26ai Free in a container with a named volume, install ORDS into FREEPDB1, copy the APEX files into the container and run apexins.sql, create ADMIN with apxchpwd.sql, run ords install again to switch the gateway to proxied, start ORDS on port 8080 with --apex-images, and grant APEX_260100 network access. The same commands work on Windows, macOS, and Linux, and with Podman.
See my articles more often when you search Google.
