If you have worked with Oracle APEX for any meaningful amount of time, you already know how powerful the Interactive Grid (IG) is. It gives users the ability to add, edit, delete, duplicate, and refresh rows right inside the browser. That kind of flexibility is great for internal tools and admin panels. But sometimes, all of that flexibility becomes too much.
I run into this situation a lot when building apps for clients. They want a tight, controlled interface where the user can only do exactly what they are supposed to do. Nothing more. The IG Actions menu, by default, shows a long list of options like add row, duplicate, refresh, selection mode, copy down, fill, revert, and more. For power users, that is awesome. For everyday end users, it can feel overwhelming and even risky if they accidentally click something they should not.
That is where customizing the IG Actions menu comes in. And once I learned how to do it, I never looked back.
What Is the Interactive Grid Actions Menu in Oracle APEX
Before I get into the how, let me quickly explain the what. In Oracle APEX, an Interactive Grid is a region that displays data in a spreadsheet-like format. Users can interact with this data through a toolbar and a special contextual menu called the Actions menu.
This Actions menu appears when a user right-clicks inside the grid or when they click the gear or row-level context trigger. It contains a set of predefined actions that APEX registers internally. Each of those actions has a unique string identifier, like "row-add-row", "row-duplicate", or "selection-copy". You can use these identifiers programmatically to remove actions you do not want to show.
The key insight here is that APEX uses a JavaScript-based actions framework for the IG. This means you can intercept the grid initialization process and remove specific actions before the grid fully renders for the user.
Understanding the Initialization JavaScript Function in APEX
Oracle APEX gives you a special hook to customize the Interactive Grid at the JavaScript level. It is called the Initialization JavaScript Function, and you can find it inside the IG region's attributes in the Page Designer.
Here is where to look for it:
- Open your APEX application in the App Builder
- Navigate to the page that has your Interactive Grid
- Click on the IG region to select it
- In the right-hand Property Editor, look under the "Advanced" section
- You will find a field called "Initialization JavaScript Function"
This field expects a JavaScript function that receives a config object and returns it. The config object contains hooks you can use to modify the grid behavior before it is rendered. One of the most useful hooks is config.initActions, which gives you access to the actions registry for that grid instance.
"The real power of Oracle APEX lies in the flexibility it gives developers to extend and override its default behaviors using native JavaScript APIs." This is exactly what we are leveraging here.
The Full List of IG Action Identifiers You Should Know
Here is a table of the most commonly used IG action identifiers and what they do. Knowing these helps you decide which ones to keep and which ones to remove.
| Action Identifier | What It Does |
|---|---|
| row-add-row | Adds a new blank row to the grid |
| row-duplicate | Duplicates the currently focused row |
| row-refresh | Refreshes the current row data from the server |
| row-revert | Reverts changes made to the current row |
| selection-mode | Enables multi-row selection mode |
| selection-duplicate | Duplicates selected rows |
| selection-refresh | Refreshes selected rows |
| selection-revert | Reverts changes on selected rows |
| selection-copy | Copies selected row values |
| selection-copy-down | Fills rows below with the copied value |
| selection-clear | Clears the content of selected cells |
| selection-fill | Fills selected cells with a specified value |
| selection-add-row | Adds a new row using the selection context |
| single-row-view | Switches to a single-row detail view |
Notice that the Delete Row action is not in this list. That is intentional. If you do not remove "row-delete" from the actions, APEX will keep it in the menu by default. So if your goal is to show only the Delete Row option, you simply remove everything else and leave that one alone.
How to Show Only the Delete Row Option in the IG Actions Menu
This is the core of what I want to walk you through. Let me show you the exact code you need to paste into the Initialization JavaScript Function field of your Interactive Grid region.
Here is the complete function:
function(config) {

    config.initActions = function(actions) {
        actions.remove("row-add-row");
        actions.remove("row-duplicate");
        actions.remove("row-refresh");
        actions.remove("row-revert");
        actions.remove("selection-mode");
        actions.remove("selection-duplicate");
        actions.remove("selection-refresh");
        actions.remove("selection-revert");
        actions.remove("selection-copy");
        actions.remove("selection-copy-down");
        actions.remove("selection-clear");
        actions.remove("selection-fill");
        actions.remove("single-row-view");
    };

    return config;
}
What this code does is straightforward. When APEX initializes the Interactive Grid, it calls the function you provide in the Initialization JavaScript Function field. Inside that function, you get access to the config object. You then define a custom initActions hook on the config, which APEX calls with an actions registry object when it is setting up the grid.
Inside initActions, you call actions.remove() for every action you want to hide. The only action you do not call remove() on is the delete row action, which means it stays visible in the menu. After all removals are done, you return the config object so APEX can continue with the rest of the grid initialization.
That is it. You do not need to add anything to the JavaScript section of the page or reference any external scripts. The Initialization JavaScript Function field is the right and only place for this particular customization.
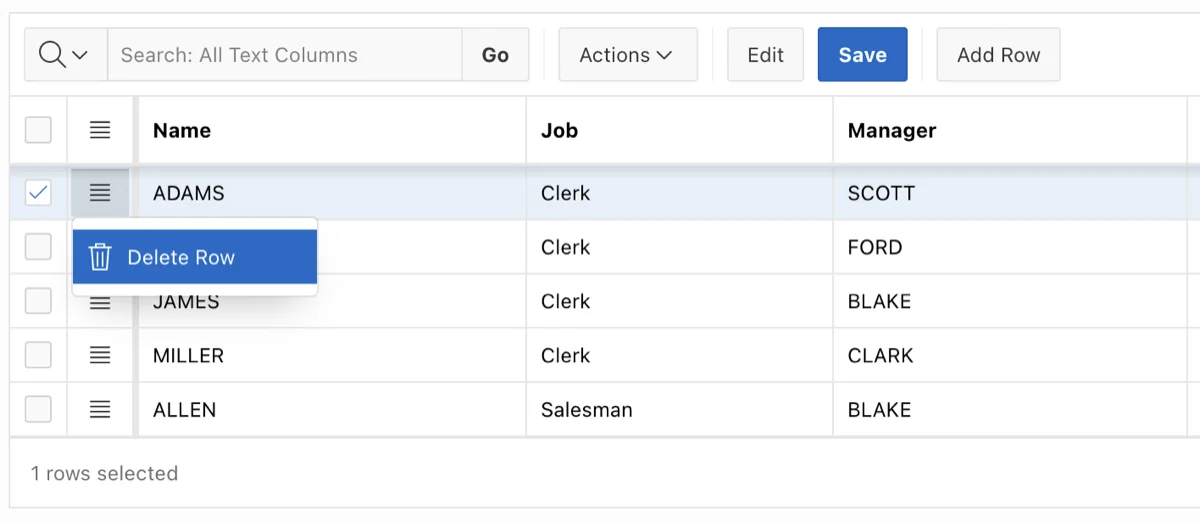
What the Grid Looks Like After the Change
Once you apply the code above and run your page, the IG Actions menu will only show the Delete Row option when a user right-clicks on a row or opens the context menu. All the other options like Add Row, Duplicate, Refresh, Revert, Selection Mode, Copy, Fill, and Single Row View will be gone.
This gives the user a much cleaner interface. They see only what they are supposed to interact with. It also prevents accidental data issues that can happen when a user clicks something they did not intend to.
"A good user interface is like a joke. If you have to explain it, it is not that good." Keeping the Actions menu minimal is one of the best ways to make your APEX app feel intuitive.
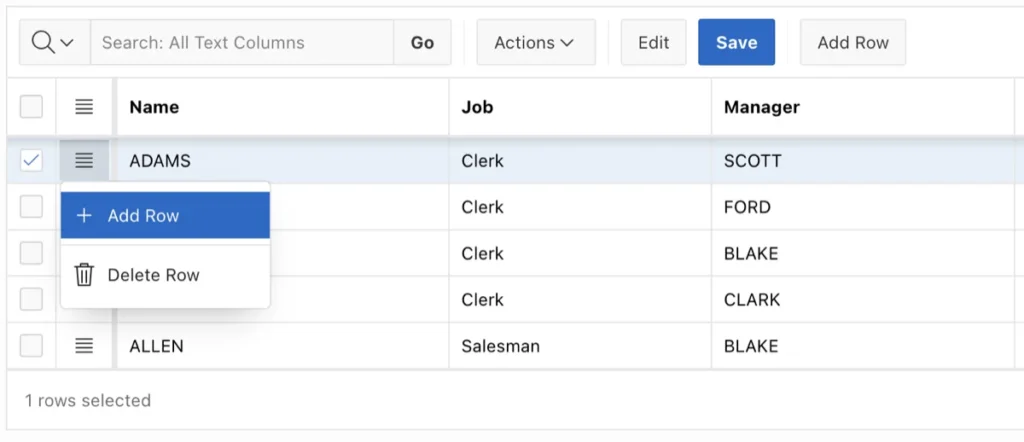
How to Show Both Delete Row and Add Row Options
Maybe you do not want to go all the way down to just one option. Maybe your use case requires showing both the Delete Row and the Add Row options in the menu. That is totally possible with a small tweak.
All you need to do is remove the following line:
actions.remove("row-add-row");Your updated function will look like this:
function(config) {

    config.initActions = function(actions) {
        actions.remove("row-duplicate");
        actions.remove("row-refresh");
        actions.remove("row-revert");
        actions.remove("selection-mode");
        actions.remove("selection-duplicate");
        actions.remove("selection-refresh");
        actions.remove("selection-revert");
        actions.remove("selection-copy");
        actions.remove("selection-copy-down");
        actions.remove("selection-clear");
        actions.remove("selection-fill");
        actions.remove("single-row-view");
    };

    return config;
}
With this version, users will see Add Row and Delete Row in the Actions menu, and everything else will be hidden. This is a great balance if you are building a grid where users need to add new entries and remove existing ones, but should not be allowed to duplicate or bulk-fill data.
Common Mistakes to Avoid When Customizing IG Actions
I have made a few mistakes myself when first working with this approach, so let me help you avoid them.
- Do not forget to return the config object at the end of the function. If you leave that out, the grid will not load properly.
- Make sure you are using the exact action identifier strings. They are case-sensitive and must match exactly what APEX registers internally.
- Do not put this code in the page-level JavaScript section. It must go specifically in the IG region's Initialization JavaScript Function field.
- If the IG region has multiple instances on the same page, you will need to apply the function separately to each one, unless they share the same configuration.
- Always test in both edit mode and view mode. Some action visibility differences might appear depending on the grid's editable state.
When Should You Use This Technique
This kind of customization is especially useful in a few scenarios. Here is when I recommend using it:
- You are building a read-mostly grid where deletion is allowed but additions and edits should come through a separate form
- You want to enforce data governance by preventing users from bulk-editing or filling cells
- You are delivering an app to non-technical users who should have a simplified experience
- You need to match a specific client requirement about what operations are visible in the UI
- You are showing sensitive data and want to limit the ways users can manipulate it
I find this technique particularly valuable when the APEX app is serving as a data review or approval interface, where users need to see records and delete invalid ones, but should not be able to alter or add new data directly from the grid.
Conclusion
Customizing the IG Actions menu in Oracle APEX is one of those small but impactful tweaks that can really improve how your app feels to end users. By using the config.initActions hook inside the Initialization JavaScript Function field of your Interactive Grid region, you can remove any default actions and leave only the ones that make sense for your specific use case.