I take a lot of screenshots on my Mac. Whether I am documenting a bug, saving something from a tutorial, or capturing a quick image for a blog post, screenshots pile up fast. And if you have ever glanced at your Desktop after a long work session, you know exactly what I mean. A sea of PNG files, each one sitting at 500KB to 3MB, doing nothing except eating up storage.
That is when I started asking myself if there was a smarter way to handle this. WebP is a modern image format developed by Google, and it consistently delivers smaller file sizes than PNG without sacrificing much in the way of visual quality. Making the switch felt like an obvious win. The only question was how to make it happen automatically, without touching a single file after every screenshot.
The answer turned out to be macOS Automator, and I have to say it works beautifully once you get it set up.
What Is WebP and Why Should You Care
Before I walk you through the setup, it helps to understand why WebP is worth the effort. A lot of people are still defaulting to PNG because it is what macOS saves screenshots as, but that does not mean it is the best format for everyday use.
Here is a quick comparison of the two formats:
| Feature | PNG | WebP |
|---|---|---|
| Typical file size | 500KB - 3MB | 100KB - 600KB |
| Lossless support | Yes | Yes |
| Lossy compression | No | Yes |
| Browser support | Universal | All modern browsers |
| Best use case | Archive or print quality | Web sharing and upload |
WebP can cut file sizes by 60 to 80 percent in many cases while still looking sharp on screen. For anyone who uploads screenshots to a website, sends images over messaging apps, or simply wants a cleaner Desktop, switching to WebP is one of the smartest low-effort changes you can make.
What You Need Before Getting Started
Getting this workflow running requires just a few things before you touch Automator:
- A Mac running macOS 10.13 High Sierra or later
- Homebrew installed (a free, open-source package manager for Mac)
- The cwebp command-line tool, which handles the actual file conversion
Installing Homebrew is a one-time process. Open Terminal and run this command:
/bin/bash -c "$(curl -fsSL https://raw.githubusercontent.com/Homebrew/install/HEAD/install.sh)"Once Homebrew is ready, adding the WebP tools takes just one more step:
brew install webpTo confirm cwebp installed correctly, run:
cwebp --versionIf you see a version number printed in the Terminal window, you are all set and ready to build the Automator workflow.
Opening Automator and Choosing the Right Document Type
Automator is a built-in macOS app that most people walk right past without realizing how powerful it is. It lets you chain together system actions and shell scripts into repeatable workflows with no coding experience required.
To get started, press Cmd+Space to open Spotlight, type Automator, and press Enter. When the document type picker appears, select "Folder Action." This is the key choice that makes everything work automatically.
As automation author David Sparks has noted, "Automator is one of the most underused power tools on the Mac. Once you get it working for you, you wonder how you ever got by without it." I could not agree more, especially for something like this.
A Folder Action watches a specific folder and runs your workflow automatically whenever new files are added. That is exactly the behavior we need for converting screenshots the moment they land on the Desktop.
Configuring the Workflow for Your Desktop Folder
Once the Folder Action document type is open, you will see a dropdown at the very top of the window that says "Folder Action receives files and folders added to:". Click that dropdown and choose Desktop from the list.
Next, look at the left sidebar, which is the actions library. Type "Run Shell Script" in the search box at the top of that library. When it appears in the results, drag it over and drop it into the main workflow area on the right side of the window.
Before you paste any code, find the dropdown inside the Run Shell Script action that says "Pass input:" and change it to "as arguments." This setting tells Automator to pass each new Desktop file into the script individually, which is exactly what the conversion loop needs.
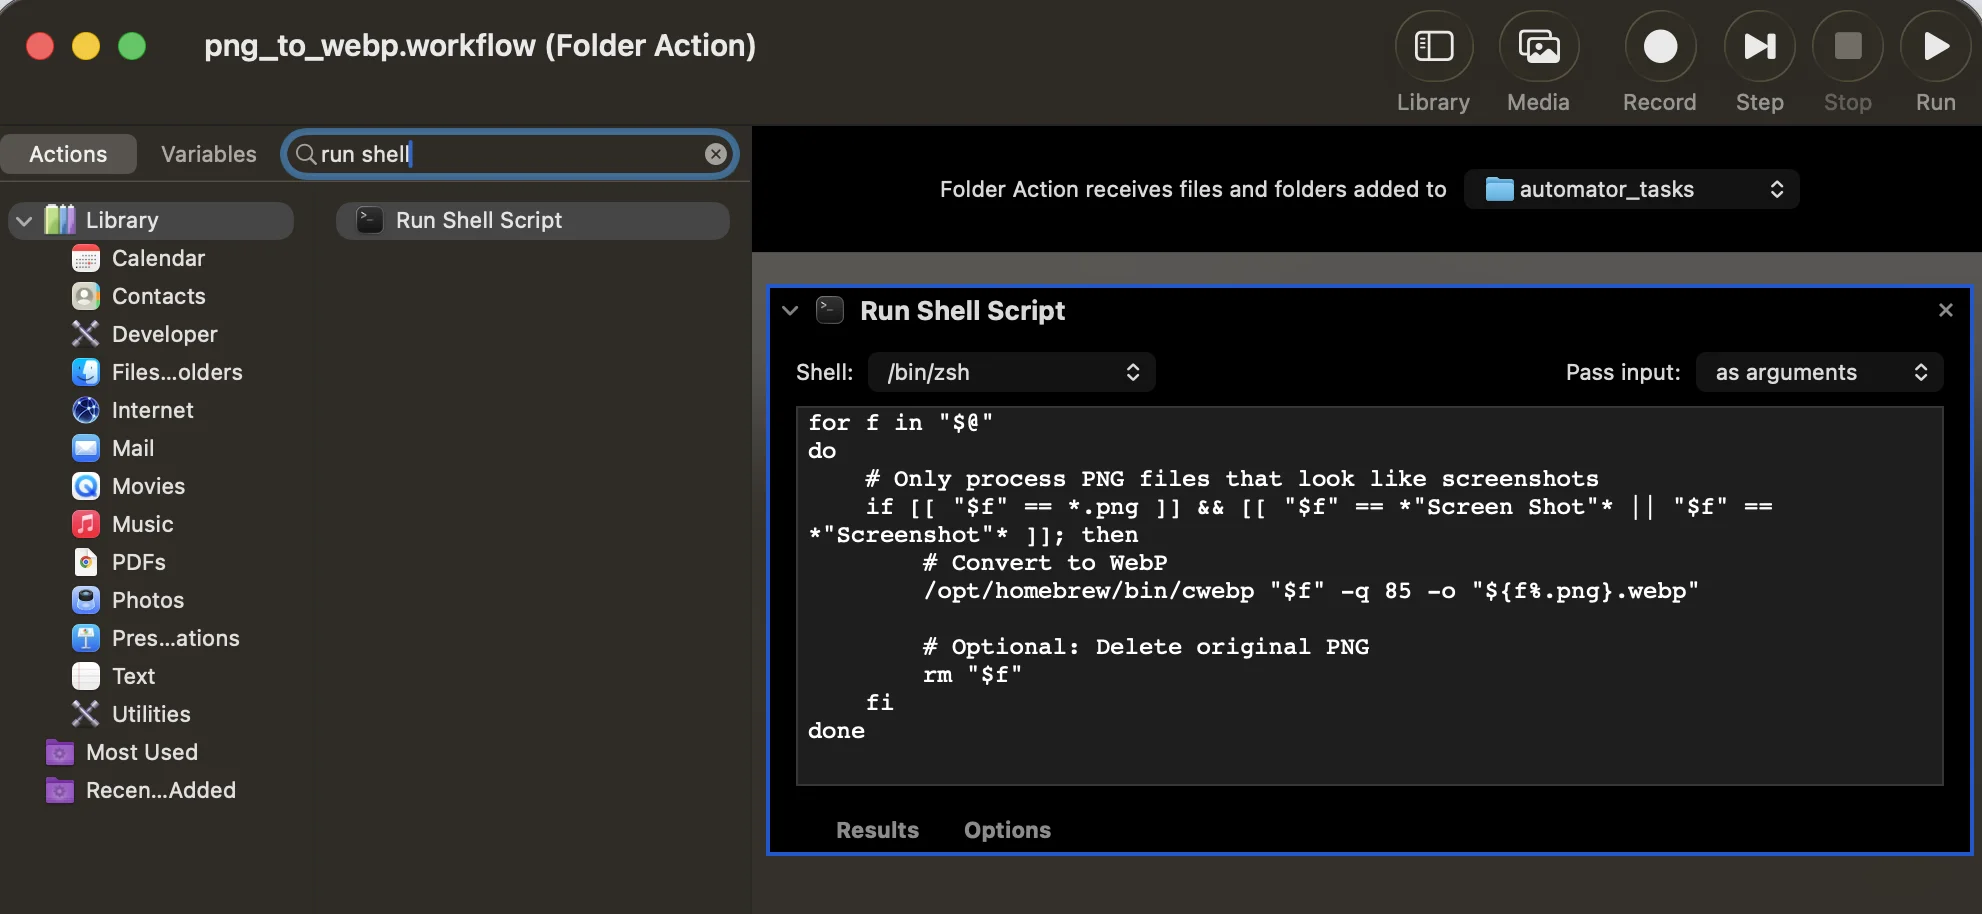
The Shell Script That Powers the Whole Thing
Here is the script to paste into the Run Shell Script text area:
for f in "$@"
do
    if [[ "$f" == *.png ]] && [[ "$f" == *"Screen Shot"* || "$f" == *"Screenshot"* ]]; then
        /opt/homebrew/bin/cwebp "$f" -q 85 -o "${f%.png}.webp"
    fi
done
Here is what each part does:
- for f in "$@" — This loops through every file that Automator hands to the script
- The if condition checks that the file ends in .png and contains "Screen Shot" or "Screenshot" in its name, which is exactly how macOS names every screenshot by default
- /opt/homebrew/bin/cwebp — This is the full path to the converter tool installed via Homebrew
- -q 85 — This sets the output quality to 85 out of 100, a great balance between file size and visual sharpness
- -o "${f%.png}.webp" — This saves the converted file with the same name as the original, just with a .webp extension instead of .png
The quality setting of 85 is my personal go-to. If you want even smaller files, dropping it to 75 works well. If you are preserving screenshots for documentation that needs to look pixel-perfect, nudging it up to 90 or 92 is a reasonable choice.
Saving Your Automator Workflow
Once your script is in place, save the workflow by pressing Cmd+S or going to File and then Save. Give it a name that you will recognize, such as "PNG to WebP Converter." Automator will store it in your Library where macOS can access it whenever the folder action fires.
Enabling Folder Actions on the Desktop
Saving the workflow file is only half the job. You also need to attach it to the Desktop folder so macOS knows to run it when new files appear there. Here are two ways to do that.
Method 1: Right-Click in Finder
- Open Finder and navigate to your Desktop folder in the sidebar
- Right-click on it and hover over Services
- Click "Folder Actions Setup"
- Check the box labeled "Enable Folder Actions" at the top of the dialog
- Make sure Desktop is selected in the folder list on the left
- Check the box next to your "PNG to WebP Converter" workflow
- Click Close
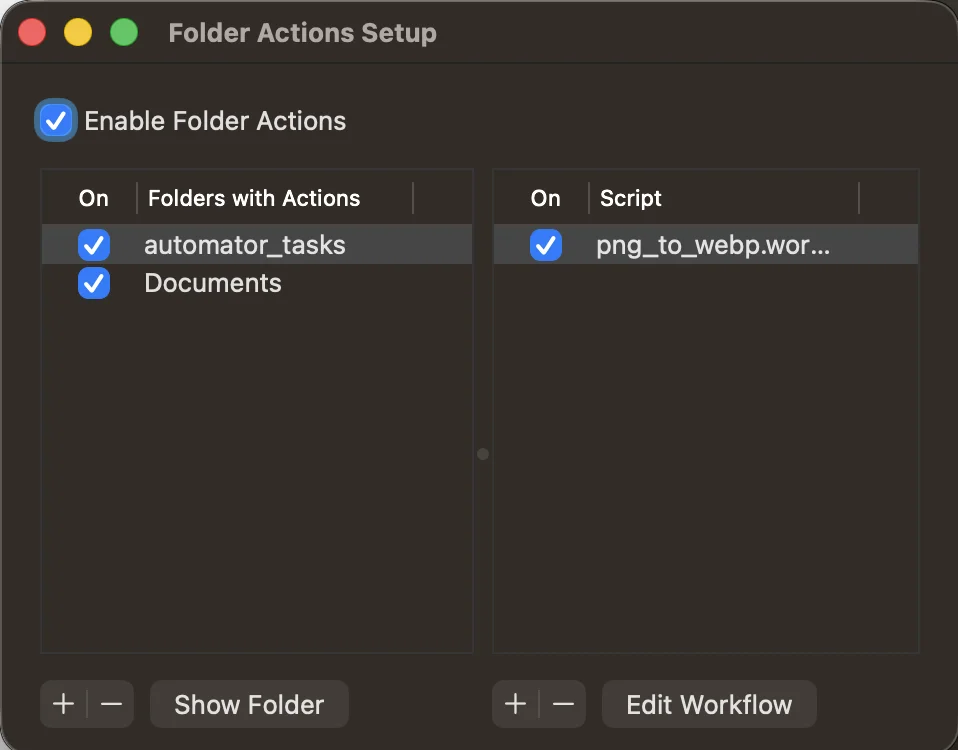
Method 2: Folder Actions Setup App
- Open Spotlight (Cmd+Space) and search for "Folder Actions Setup"
- Check "Enable Folder Actions" at the top of the window
- Click the "+" button under the folder list and select your Desktop folder
- Click the "+" button under Scripts and navigate to your saved workflow (usually at ~/Library/Workflows/Applications/Folder Actions/)
- Select your workflow file and click Attach
Either method gets you to the same result. I find the right-click approach faster since you do not have to hunt for the workflow file manually.
Testing Your Setup
Now for the satisfying part. Take a screenshot using Cmd+Shift+3 for a full-screen capture or Cmd+Shift+4 to drag a selection. Wait a few seconds after the screenshot lands on the Desktop. You should see a new .webp file appear right alongside the original .png.
If the WebP file shows up, your workflow is running perfectly. From this point forward, every screenshot you take will be automatically converted without any extra effort on your part.
Removing the Original PNG Automatically
Once you have confirmed conversion is working correctly, you might want to take things one step further and have the workflow automatically delete the original PNG file after the WebP version is created. This keeps your Desktop clean with zero manual maintenance.
To enable this, open your Automator workflow again and update the script to this version:
for f in "$@"
do
    if [[ "$f" == *.png ]] && [[ "$f" == *"Screen Shot"* || "$f" == *"Screenshot"* ]]; then
        /opt/homebrew/bin/cwebp "$f" -q 85 -o "${f%.png}.webp"
        rm "$f"
    fi
done
The only new line is rm "$f", which removes the original PNG immediately after the WebP file has been saved. Save the workflow, take a test screenshot, and confirm that only the .webp file remains on your Desktop.
One thing worth knowing: the rm command deletes files directly, bypassing the Trash. Make sure your WebP files are saving correctly before you rely on this for important screenshots.
Troubleshooting Common Issues
Sometimes things do not click into place on the first try. Here are the most common problems and how to solve them:
| Problem | Likely Cause | Fix |
|---|---|---|
| Workflow does not trigger | Folder actions not enabled | Check "Enable Folder Actions" in Folder Actions Setup |
| cwebp not found error | Wrong path in script | Run "which cwebp" in Terminal and update the path in your script |
| WebP file does not appear | Automator permission denied | Go to System Settings, Privacy and Security, Automation and grant Automator access |
| Both files stay on Desktop | rm line is commented out | Remove the # character from in front of the rm "$f" line |
To find the correct path to cwebp on your specific Mac, open Terminal and run:
which cwebpUse whatever path that command returns in your Automator script. If folder actions seem completely unresponsive, resetting the System Events process often clears things up right away:
killall System EventsAfter running that, take another test screenshot and the workflow should start responding normally.
Conclusion
Setting up automatic PNG to WebP conversion on the Mac Desktop using Automator is one of those small workflows that quietly pays off every single day. It takes roughly fifteen minutes to configure and then runs completely on its own from that point forward. Every screenshot I take now lands on my Desktop as a compact WebP file, and I never have to think about it.
The combination of Homebrew, the cwebp tool, and Automator folder actions is surprisingly powerful for how simple it is to set up. Whether you manage a website, share a lot of images with colleagues, or just want a tidier Desktop, this is one of the most practical improvements I have made to my daily Mac workflow. Give it a try and I think you will feel the same way.
See also: How to Disable Auto Boot on MacBook Air M4