Your users often struggle to find specific features hidden deep inside standard application menus. When they need to export data from an interactive report, they must navigate through the default actions menu. You can drastically improve their user experience by placing a highly visible custom download button directly on your page.
Oracle APEX provides incredible flexibility when designing your user interface and extending native components. Instead of building a complex export process from scratch, you can simply trigger the native download dialog programmatically. This approach saves you hours of development time while delivering exactly what your users requested.
The interactive report engine uses a specialized jQuery UI menu widget under the hood to manage its actions. By targeting this specific widget with a tiny snippet of JavaScript, you can simulate a user clicking the default download option. Let us walk through the exact steps required to implement this elegant solution.
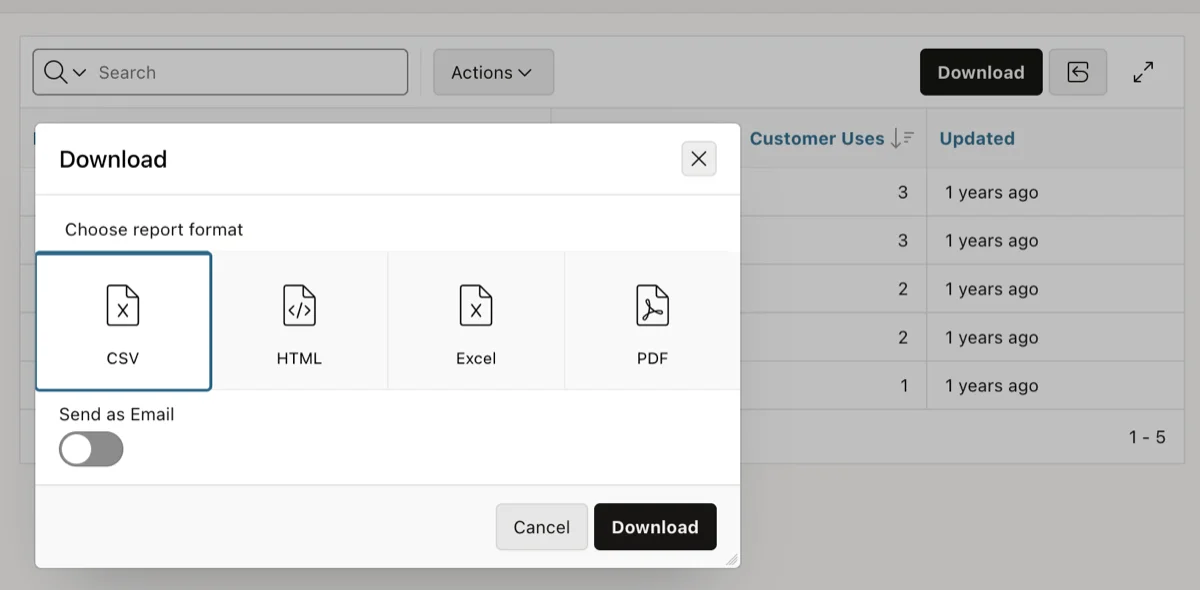
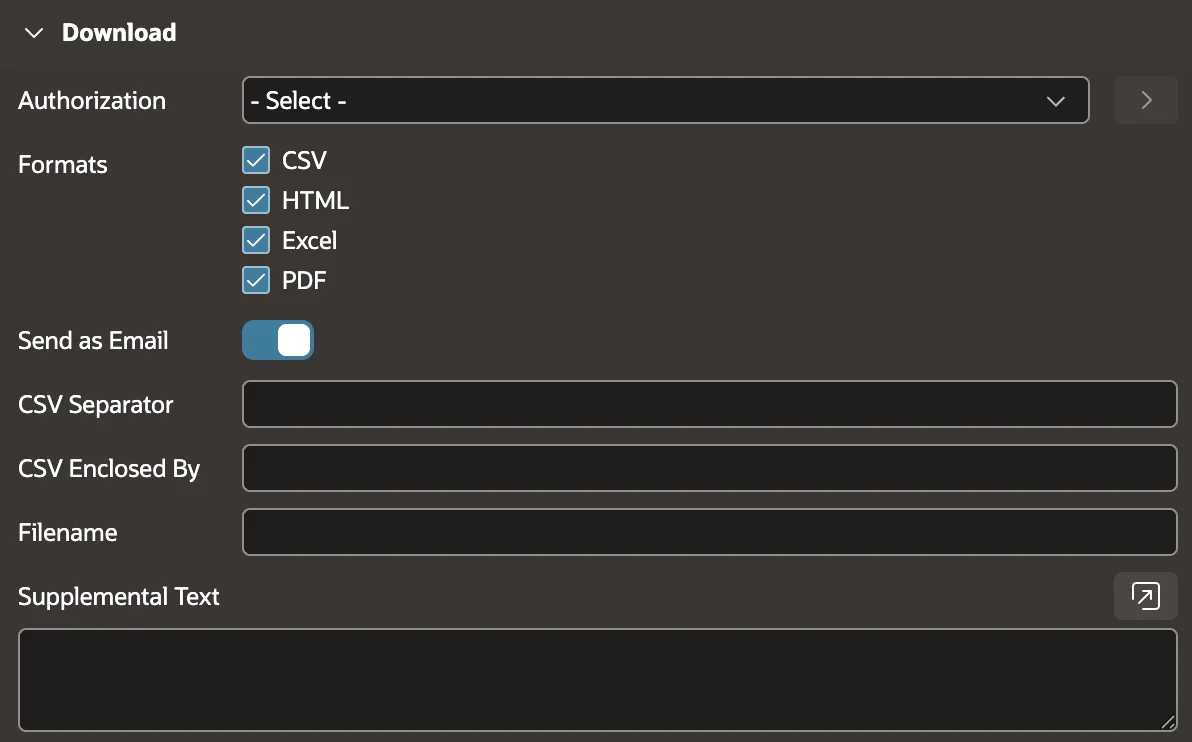
Enabling Download Formats in Your Report Attributes
Before you write any custom logic, you must ensure your interactive report actually supports downloading data. If the native download feature is disabled, your custom button will trigger an empty action and fail silently. You need to configure the report attributes first.
Navigate to your page designer and select the interactive report region from your rendering tree. Click on the attributes node located right below your main region definition. Scroll down until you find the dedicated download section in your property editor.
You must explicitly check the boxes for the formats you want to offer your users. Make sure you enable options like CSV, HTML, Excel, and PDF based on your business requirements. Once these formats are enabled, the native download dialog will populate correctly when triggered.
Setting the HTML DOM ID in Oracle APEX 26.1
Historically, developers relied heavily on the static ID property to target regions with JavaScript or CSS. However, Oracle APEX 26.1 introduced the HTML DOM ID attribute to provide more precise control over your markup. You will use this new attribute to uniquely identify your interactive report region.
Properly identifying your regions is the foundation of reliable client-side interactions in modern web applications.
Select your interactive report region again and locate the advanced section in the property editor. Find the HTML DOM ID field and enter a clean, descriptive value like my_custom_ir without any spaces. Your JavaScript code will reference this exact identifier to locate the correct menu widget.

If you have multiple interactive reports on the same page, assigning unique HTML DOM IDs prevents conflicting behaviors. Your custom button needs to know exactly which report it should target when a user clicks it. Taking the time to name your regions correctly prevents frustrating debugging sessions later.
Building Your Custom Button and Dynamic Action
Now that your report is properly configured, you need a physical button for your users to click. Create a new button in the region position of your choice and name it something obvious like Export Data. Give it a prominent visual style so it stands out from the rest of your page elements.
Right-click on your newly created button and select the option to create a dynamic action. Name your dynamic action something descriptive so other developers understand its purpose immediately. Ensure the event is set to click and the selection type targets your specific button.
Navigate to the true action that was generated automatically and change its action type to execute JavaScript code. This action type allows you to run client-side logic directly in the browser when the button is pressed. You are now ready to paste the magic snippet that connects your button to the report.
The JavaScript Command You Need
You only need a single line of JavaScript to force the interactive report download dialog to open. The code specifically targets the hidden actions menu associated with your HTML DOM ID. It then searches for the internal download command and executes it immediately.
Here is the exact code snippet you must paste into your dynamic action editor:
$("#PRODUCTS_actions_menu").menu("find", "irDownload").action();
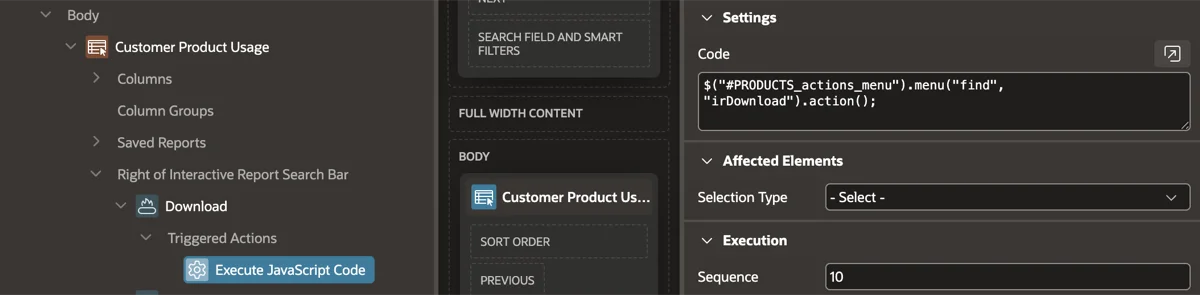
Remember to replace the my_custom_ir portion with the actual HTML DOM ID you defined earlier. The _actions_menu suffix is automatically generated by the APEX engine, so you must leave that part intact. When your user clicks the button, this script instantly renders the native download modal on their screen.

Conclusion
You have successfully enhanced your application by surfacing a critical feature directly to your end users. A custom download button removes friction from their daily workflow and makes your application feel much more intuitive. Small user experience improvements like this dramatically increase overall software adoption rates.
You learned how to properly configure your interactive report attributes to support multiple export formats. You also learned how to utilize the new HTML DOM ID attribute introduced in Oracle APEX 26.1 for precise element targeting. Finally, you successfully connected a dynamic action to the native jQuery UI menu widget.
Always look for opportunities to leverage native functionality before building complex custom solutions. Oracle APEX provides a massive toolkit under the hood if you know where to look. Keep exploring the client-side APIs, and you will continue to build faster, smarter applications.