Oracle Application Express (APEX) is a low-code platform that lets you build scalable web applications directly inside your Oracle Database. In this guide, you will learn how to install Oracle APEX 24.2 on a Container Database (CDB) in Windows, configure Oracle REST Data Services (ORDS), and finally make APEX available across all Pluggable Databases (PDBs).
Every step will be explained with detailed reasoning so you understand why it is required, and you will see examples of commands and their expected results. By the end, you will be able to access APEX from your browser and start building applications.
Why Install APEX in the CDB?
When Oracle introduced multitenant architecture, the idea of having one container database (CDB) and multiple pluggable databases (PDBs) became the standard. Installing APEX at the CDB level means it becomes a common component available to every PDB. This approach saves time, simplifies upgrades, and ensures all PDBs use the same APEX version. Without this, you would need to install and maintain separate APEX copies inside each PDB, which is inefficient and error-prone.
When you patch or upgrade APEX later, you only need to do it once in the CDB root, and all PDBs immediately benefit from the update. This is the recommended practice for enterprises running multiple applications inside one Oracle Database environment.
Preparing Your Environment
Before starting the installation, ensure that you have the following in place:
- Oracle Database 19c or later with multitenant enabled (CDB with at least one open PDB).
- Oracle APEX 24.2 downloaded and extracted at
C:\apex_24.2\apex. - Oracle REST Data Services (ORDS) 24.2 downloaded from Oracle Technology Network.
- Java 11 or later installed and available in your system PATH. Download JDK 24.
- Windows Command Prompt with administrator rights.
- SQL*Plus or SQLcl to connect as SYSDBA.
Step 1: Install APEX in the CDB Root
Start by installing APEX in the container database so that it becomes available to every PDB.
Open Command Prompt and move into the APEX directory:
cd C:\apex_24.2\apex
Now connect to the CDB root as SYS:
sqlplus / as sysdba
Inside SQL*Plus, run one of the installation scripts:
- For full development environment (includes SQL Workshop, Application Builder, etc.):
@apexins.sql SYSAUX SYSAUX TEMP /i/
It will start the installation of Oracle APEX:
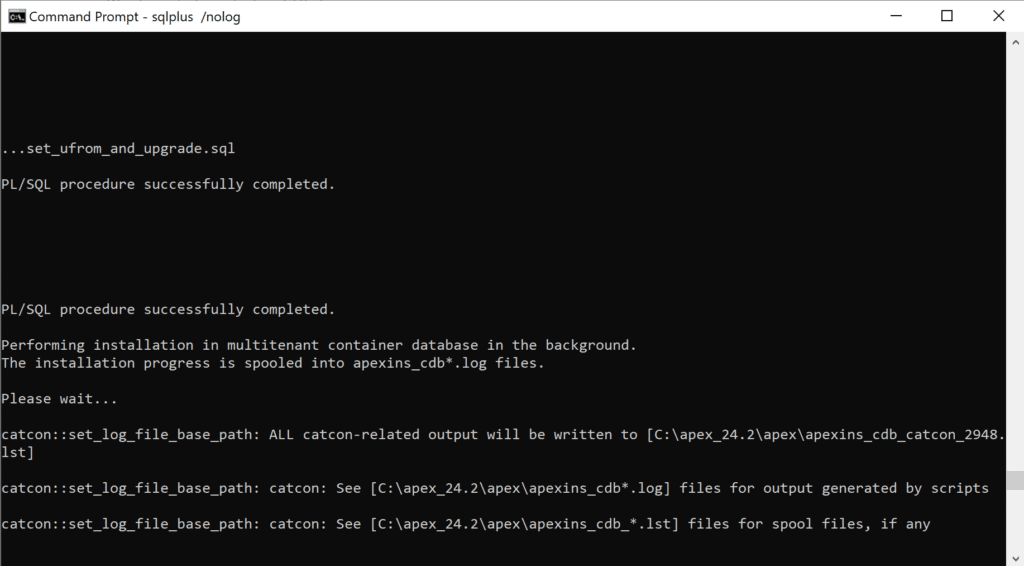
After a few minutes wait, you will get the message that the installation is completed successfully.
- For runtime environment only (no development tools, for production use):
@apxrtins.sql SYSAUX SYSAUX TEMP /i/
Here:
SYSAUXis the tablespace for APEX metadata.TEMPis the temporary tablespace./i/is the virtual path that must later map to the APEX images folder.
Now run the change password script:
@apxchpwd.sql
You will be prompted to enter your username, email address, and a new password for the APEX ADMIN account. For example:
Enter a value for password: MyStrongPassword123!
Result:
APEX will create the ADMIN user for that CDB and set the password.
Also, unlock the APEX_PUBLIC_USER if you need it:
ALTER USER APEX_PUBLIC_USER ACCOUNT UNLOCK;
Once the script completes, validate the installation:
set serveroutput on
begin
    sys.validate_apex;
end;
/
If successful, SQL*Plus will output confirmation messages indicating that APEX schemas are installed and validated.
Step 2: Create ORDS Directory Structure
APEX requires ORDS to serve its web interface. Prepare the directories where ORDS will be installed and configured.
Run these commands in Command Prompt:
mkdir C:\ords_24.2
mkdir C:\ords_config
At this point, you have two clean folders: one for ORDS binaries and one for configuration files.
Step 3: Extract ORDS
Download the ORDS 24.2 zip file from Oracle’s official site. Extract the contents into C:\ords_24.2. After extraction, you should see a structure like this:
C:\ords_24.2\
├── bin\
├── lib\
└── ords.war
This ensures that you have the ORDS executable and supporting libraries ready for installation.
Step 4: Set Environment Variable for ORDS Config
ORDS requires a persistent location to store its configuration. Define an environment variable named ORDS_CONFIG and point it to the configuration directory.
From Command Prompt:
set ORDS_CONFIG=C:\ords_config
You can also set this permanently via System Properties → Environment Variables in Windows.
Step 5: Copy APEX Images
The /i/ alias used during APEX installation must point to the images directory. Copy the APEX images into the ORDS configuration:
From Command Prompt:
xcopy C:\apex_24.2\apex\images C:\ords_config\global\doc_root\i /E /I
After running this, the i directory will exist under C:\ords_config\global\doc_root\, and it will contain all image files needed by APEX.
Step 6: Install and Configure ORDS
Navigate to the ORDS bin directory and start the installation:
cd C:\ords_24.2\bin
ords --config C:\ords_config install
ORDS will ask you a series of questions interactively. Provide the following:
- Database connection type: service name.
- Service name of your PDB (for example, free).
- SYSDBA credentials.
- User credentials for ORDS metadata (ORDS_PUBLIC_USER, ORDS_METADATA, ORDS_PLUGGED).
When complete, ORDS will create necessary schemas inside the PDB and prepare itself for serving APEX applications.
You can now close the ORDS installation window. We will start the server again when we complete the Oracle APEX installation.
Step 7: Run apxchpwd.sql in the Target PDB
Although APEX is installed in the CDB, you must enable access in each PDB you want to use. Connect to your PDB:
sqlplus / as sysdba
ALTER SESSION SET CONTAINER = freepdb1;
Now run the password script:
@apxchpwd.sql
You will be prompted to enter your username, email address, and a new password for the APEX ADMIN account. For example:
Enter a value for password: MyStrongPassword123!
Result:
APEX will create the ADMIN user for that PDB and set the password. You will use these credentials to log in for the first time.
Also, unlock the APEX_PUBLIC_USER if you need it:
ALTER USER APEX_PUBLIC_USER ACCOUNT UNLOCK;
This ensures that ORDS can communicate properly with APEX in the PDB.
Step 8: Start ORDS in Standalone Mode
Once ORDS is installed and configured, serve APEX using standalone mode:
From the Command Prompt:
cd C:\ords_24.2\bin
ords --config C:\ords_config serve
By default, ORDS listens on port 8080. Open a browser and navigate to:
http://localhost:8080/ords/
You will see an Oracle APEX landing page that will show you the options, such as SQL Developer Web, Oracle APEX, OAuth2. Enter your pluggable database name, for example, FREEPDB1 into PDF field of Oralce APEX section and click the Go button, as shown in the below image:

Then you should see the Oracle APEX login screen. Enter the ADMIN username and the password you set in apxchpwd.sql for the PDB. If everything is configured correctly, you will log in and can start creating workspaces and building applications.

Example: Logging In to APEX
After completing all steps, go to your browser and type:
http://localhost:8080/ords/
- Workspace: INTERNAL
- Username:
ADMIN - Password:
MyStrongPassword123!
If successful, you will see the APEX Administration Services page. From here, you can create a new workspace and a user. For example, creating a workspace named TEST_WS linked to schema HR will let you build applications on the HR schema data immediately.
Common Issues and Fixes
Sometimes errors occur if any step is skipped:
- Broken images or CSS: This happens if the
/i/directory is not correctly mapped. Make sure you copied APEX images toC:\ords_config\global\doc_root\i. - Login not possible in a PDB: Usually caused by skipping
@apxchpwd.sql. Always run it inside the PDB. - ORDS installed against the CDB root: Reinstall ORDS and point it specifically to your PDB service. APEX logins only work inside a PDB, not in CDB root.
Conclusion
Installing Oracle APEX 24.2 on Windows in a CDB ensures a single, central installation that can serve all PDBs. By installing in the CDB, you simplify maintenance and upgrades; by running apxchpwd.sql in each PDB, you enable access and assign the initial administrator credentials.
See also:
- How to Install Oracle Database 23ai on Windows Step by Step
- Installing Oracle SQL Developer 24 on Windows
- Oracle Database 23ai Tutorials