If you work with Oracle databases, you need a reliable tool that makes querying, building, and managing your data feel effortless. Oracle SQL Developer is exactly that tool, and it has been the go-to IDE for Oracle database professionals for well over a decade.
It is a free, Java-based graphical environment that lets you browse database objects, run SQL and PL/SQL, debug stored procedures, and even migrate third-party databases to Oracle. Whether you are a beginner or a seasoned DBA, this guide walks you through everything you need to know.
In this complete walkthrough, you will learn how to download, install, and configure Oracle SQL Developer from scratch. You will also explore its major features, from creating database connections to writing complex queries and managing database administration tasks.
What is Oracle SQL Developer?
Oracle SQL Developer is a free integrated development environment built by Oracle Corporation. It simplifies the development and management of Oracle Database in both traditional and cloud deployments. Think of it as a graphical version of SQL*Plus, but far more powerful and user-friendly.
You can use it to browse, create, edit, and drop database objects. You can run SQL statements and scripts, edit and debug PL/SQL code, and manipulate or export data. It also supports creating and viewing reports.
As one Oracle documentation page puts it: "Oracle SQL Developer gives database developers a convenient way to perform basic tasks." But do not let the word "basic" fool you. The tool packs advanced features like Data Modeler, third-party database migration, REST Data Services support, and a built-in DBA console.
Supported Platforms and System Requirements
Oracle SQL Developer runs on Windows, macOS, and Linux. Since it is a Java-based application, you need a supported Java Development Kit (JDK) installed on your machine. The latest version (24.3) bundles a JDK in the download for most platforms.
Here are the platform-specific details you should know before downloading.
| Platform | JDK Requirement | Download Type |
|---|---|---|
| Windows 64-bit | Bundled with JDK 17 | ZIP file with JDK included |
| Windows 64-bit (no JDK) | Requires JDK 11 or 17 | ZIP file without JDK |
| macOS (Apple Silicon / Intel) | Bundled with JDK 17 | DMG file |
| Linux RPM | Bundled with JDK 17 | RPM package |
| Other platforms | Requires JDK 11 or 17 | Platform-independent ZIP |
You also need network access to connect to your target Oracle Database. The tool supports connecting to Oracle Database versions 11.2 and later, including Oracle Database 26ai.
How to Download Oracle SQL Developer
Downloading Oracle SQL Developer is straightforward. You get it directly from the official Oracle website at no cost. No license key is required.
Follow these steps to download the correct version for your system.
- Open your web browser and go to the Oracle SQL Developer Downloads page on oracle.com.
- Scroll down to find the list of available platforms (Windows, macOS, Linux, and Other Platforms).
- Click the download link that matches your operating system. If you already have a compatible JDK installed, you can choose the smaller "without JDK" option on Windows.
- You may be prompted to accept the Oracle License Agreement. Check the box and proceed.
- If you do not already have an Oracle account, you will need to create a free one. Then sign in, and the download will begin.
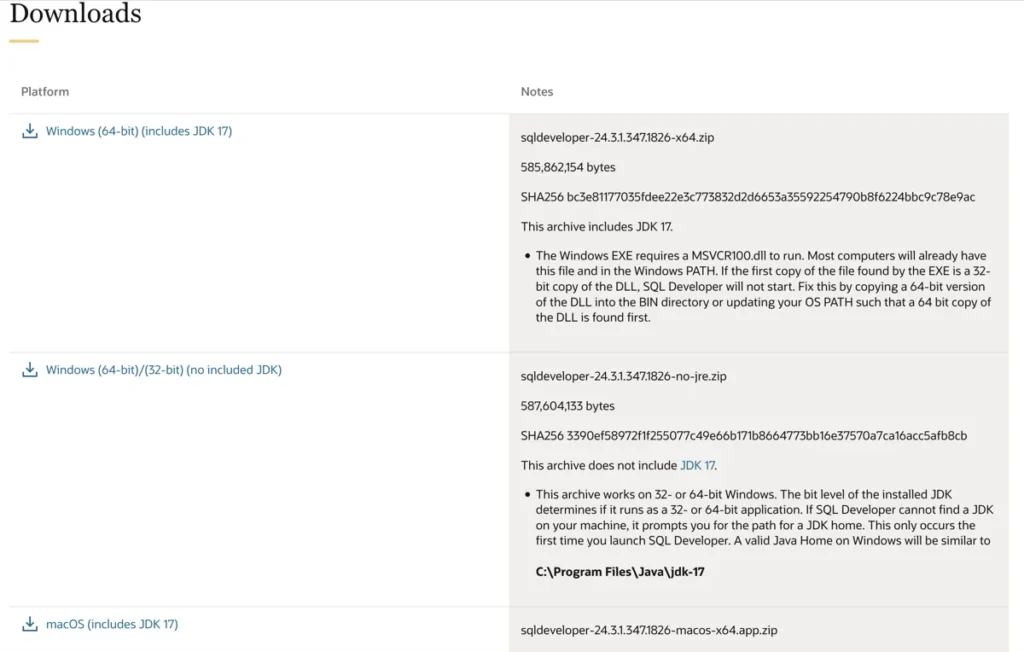
The download file size varies. The Windows version with the JDK bundled is typically around 600 to 700 MB. The macOS DMG file is a similar size.
How to Install Oracle SQL Developer
The installation process is refreshingly simple. There is no traditional installer to run. You simply extract the downloaded archive and launch the application.
Installing on Windows
Here is how you install Oracle SQL Developer on a Windows machine.
- Locate the downloaded ZIP file (for example, sqldeveloper-24.3.0-xxx-x64.zip).
- Right-click the ZIP file and select "Extract All" to unzip it into a directory of your choice. A common location is C:\sqldeveloper. Do not extract it into a path that contains spaces, such as C:\Program Files, to avoid potential issues.
- Open the extracted SQLDeveloper folder.
- Double-click the sqldeveloper.exe file to launch the application.
- If this is your first time launching and you chose the "without JDK" version, the tool will prompt you to specify the path to your JDK installation. Click Browse and navigate to your JDK home folder (for example, C:\Program Files\Java\jdk-17).
On first launch, you may see a dialog asking whether to import preferences from a previous SQL Developer installation. If you are installing it fresh, choose No.
Installing on macOS
For macOS users, the process is even simpler.
- Open the downloaded DMG file.
- Drag the SQLDeveloper application icon into your Applications folder.
- Open the Applications folder and double-click SQLDeveloper to launch it.
- If macOS shows a security warning saying the app is from an unidentified developer, go to System Settings, then Privacy and Security, and click "Open Anyway."
Installing on Linux
On Linux, you can use either the RPM package or the platform-independent ZIP file.
- For the RPM package, open a terminal and run: rpm -Uhv sqldeveloper-24.3.0-xxx.noarch.rpm
- For the ZIP file, extract it to a directory of your choice using: unzip sqldeveloper-24.3.0-xxx.zip
- Navigate to the sqldeveloper directory and run: sh sqldeveloper.sh
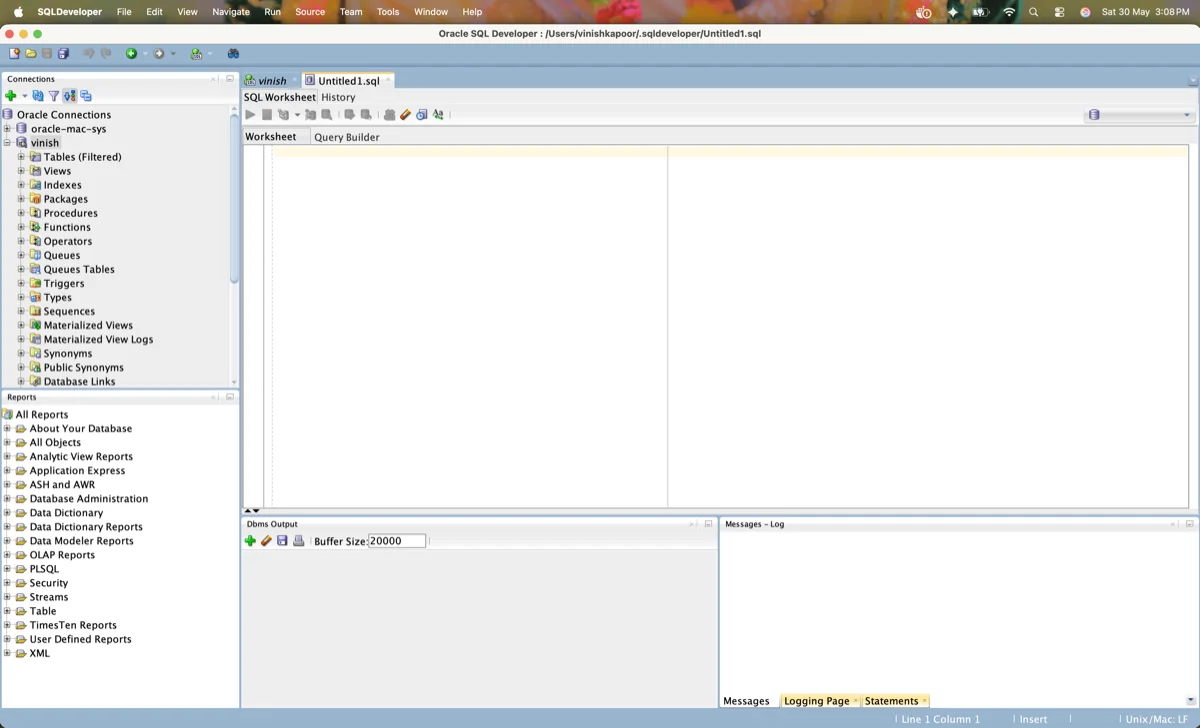
After launching on any platform, the SQL Developer main window will appear. You will see the Connections navigator on the left and a blank workspace on the right.
Understanding the SQL Developer User Interface
The SQL Developer interface follows a standard IDE layout. The left side is for navigation and the right side displays information about your selected objects. Getting familiar with this layout will make you much more productive.
The Main Window Layout
The main window consists of several key areas.
- Menu Bar: Located at the top with menus for File, Edit, View, Navigate, Run, Versioning, Tools, Window, and Help.
- Main Toolbar: Below the menu bar, it has icons for New, Open, Save, Save All, Back, Forward, and Open SQL Worksheet.
- Connections Navigator: The left panel where you see all your database connections organized in a tree structure.
- Editor and Details Pane: The large right panel that displays object details, SQL Worksheet tabs, or code editors.
- Messages / Log Area: Located at the bottom, it shows feedback messages, errors, and compiler output.
You can customize the toolbar by clicking View, then Show Toolbars, then Customize Main Toolbar. To undo any customization, select Reset Toolbars from the same menu.
The Connections Navigator
This is the most important panel in Oracle SQL Developer. It lists all your database connections and lets you expand each one to browse database objects like tables, views, indexes, packages, procedures, functions, triggers, sequences, and synonyms.
You can also find a Files navigator (marked by a folder icon) that displays your local file system. This is useful for opening SQL scripts saved on your computer. The Reports navigator lists pre-built informative reports provided by SQL Developer.
Navigating with Keyboard Shortcuts
You can use keyboard shortcuts to speed up your workflow significantly. Here are some essential ones.
| Shortcut | Action |
|---|---|
| Ctrl+Shift+N | Open a new SQL Worksheet |
| F5 | Run the entire script in the SQL Worksheet |
| Ctrl+Enter | Execute the current SQL statement |
| F10 | Display the Explain Plan |
| F6 | Show the Autotrace output |
| Ctrl+Shift+F | Format the SQL code in the editor |
| Ctrl+Space | Trigger code completion (Completion Insight) |
| Alt+F4 | Close the current window |
| Ctrl+F | Find and Replace |
Creating a Database Connection in SQL Developer
Before you can do anything useful in Oracle SQL Developer, you need to create a database connection. A connection stores the details needed to log into a specific Oracle Database schema. You can create multiple connections to different databases and schemas.
Step-by-Step Connection Setup
Follow these steps to create your first database connection.
- In the Connections navigator on the left, right-click the Connections node (or the Oracle Connections sub-node).
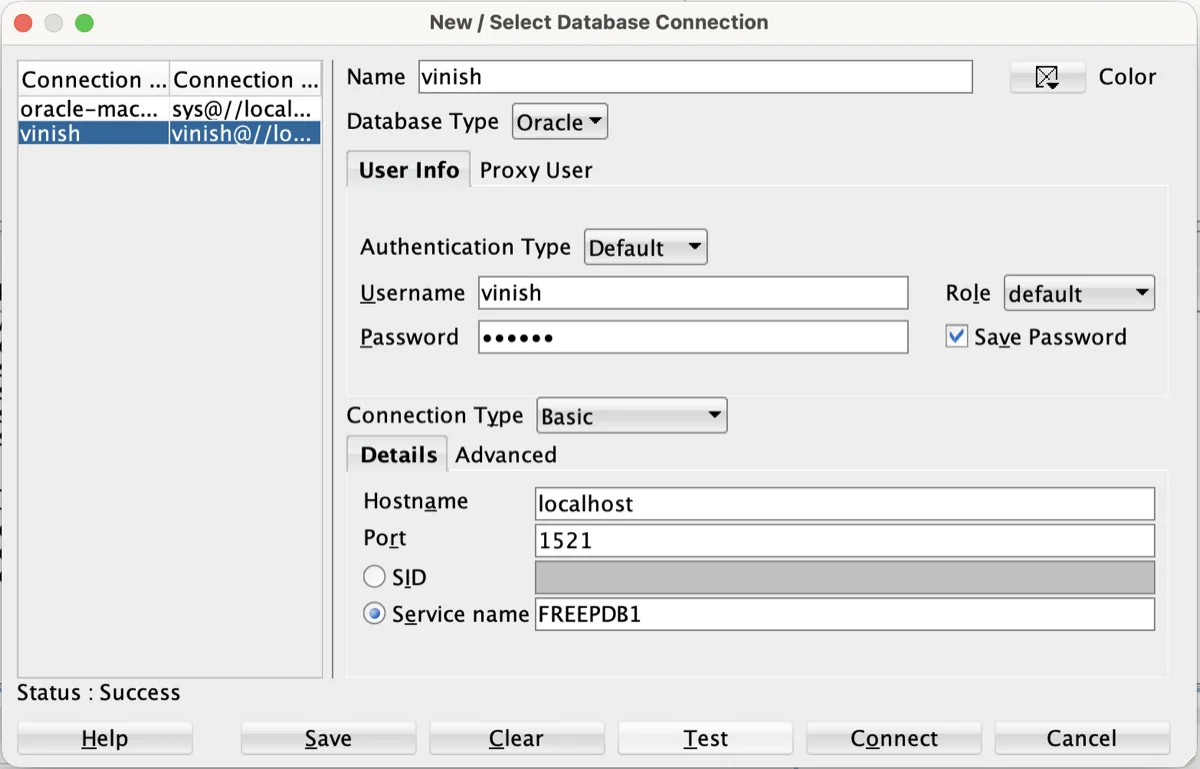
- Select New Connection from the context menu. The New / Select Database Connection dialog box opens.
- Fill in the following fields:
- Name: Give your connection a descriptive name (for example, HR_Dev or ProdDB_Admin).
- Database Type: Select Oracle from the dropdown.
- Username: Enter the database username you want to connect with (for example, hr or system).
- Password: Enter the password for that user. Check "Save Password" if you want it remembered.
- Connection Type: Choose Basic (the simplest option). Other options include TNS, LDAP, Advanced, and Cloud Wallet.
- Hostname: Enter the server address (for example, localhost or your server IP like 192.168.1.50).
- Port: The default Oracle listener port is 1521.
- SID or Service Name: Select the radio button for Service Name (recommended) or SID, and enter the value. For pluggable databases, use the service name of the PDB (for example, XEPDB1 or ORCLPDB1).
- Click the Test button at the bottom left. If your details are correct, you will see "Status: Success" in the lower left corner.
- Click Save to save the connection without connecting, or click Connect to save and connect immediately.
Other Connection Types
Besides the Basic connection type, Oracle SQL Developer supports several other methods.
- TNS: Uses entries from your tnsnames.ora file. Select the TNS tab and pick a network alias from the dropdown.
- LDAP: Connects through a Lightweight Directory Access Protocol server.
- Advanced: Lets you enter a custom JDBC URL directly.
- Cloud Wallet: Used for connecting to Oracle Autonomous Databases in the cloud. You provide the wallet ZIP file downloaded from the OCI console.
- SSH: Allows connections through a Secure Shell tunnel for added security.
- Proxy Connection: Lets you connect as a proxy user on behalf of another database user.
You can also automatically detect local databases by right-clicking the Connections node and selecting Create Local Connections. SQL Developer will scan for locally running Oracle databases and create connections for their default schemas.
Organizing Connections with Folders
If you work with many databases, your connection list can get long quickly. SQL Developer lets you organize connections into folders. Right-click the Connections node, select New Folder, give it a name like "Development" or "Production," and then drag your connections into the appropriate folders.
Browsing and Managing Database Objects
Once you are connected, the Connections navigator becomes your primary tool for exploring the database. Expand your connection node and you will see categorized folders for every type of database object.
Object Categories in the Navigator
Here is what you will find under each connection node.
- Tables: All tables owned by the connected schema.
- Views: Standard views and materialized views.
- Indexes: All indexes on the schema's tables.
- Packages: PL/SQL package specifications and bodies.
- Procedures: Standalone stored procedures.
- Functions: Standalone stored functions.
- Triggers: Database triggers attached to tables or schema-level events.
- Sequences: Number sequence generators.
- Synonyms: Public and private synonyms.
- Types: User-defined object types and collection types.
- Database Links: Links to other remote databases.
- Directories: Oracle directory objects that point to OS file system paths.
- Materialized View Logs: Logs used by materialized views for fast refresh.
- Queues: Advanced Queuing objects.
- Recycle Bin: Dropped objects that can be restored using FLASHBACK.
You can filter these lists by right-clicking any object type node and selecting Apply Filter. For example, type EMP% to see only objects starting with EMP. To remove the filter, right-click and choose Clear Filter.
Viewing Table Details
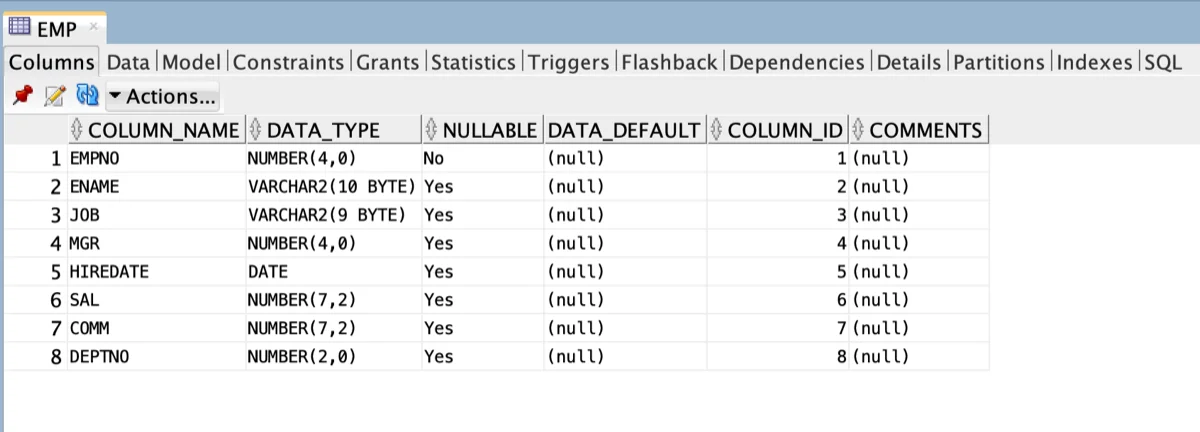
Click on any table name in the navigator and the right pane opens a detailed view with multiple tabs.
- Columns: Shows column names, data types, nullability, and default values.
- Data: Displays the actual rows in the table. You can edit data directly here by clicking a cell, making your change, and clicking the Commit button.
- Indexes: Lists all indexes defined on the table.
- Constraints: Shows primary keys, foreign keys, unique constraints, and check constraints.
- Grants: Displays privileges granted on the table.
- Statistics: Shows table and column statistics used by the optimizer.
- Triggers: Lists any triggers associated with the table.
- Dependencies: Shows objects that depend on this table and objects this table depends on.
- Details: Provides general information like tablespace, row count, and storage parameters.
- Partitions: Shows partition information if the table is partitioned.
- SQL: Displays the DDL statement (CREATE TABLE) needed to recreate the table.
Creating a New Table
To create a table using the graphical interface, follow these steps.
- Right-click the Tables node under your connection in the navigator.
- Select New Table from the context menu.
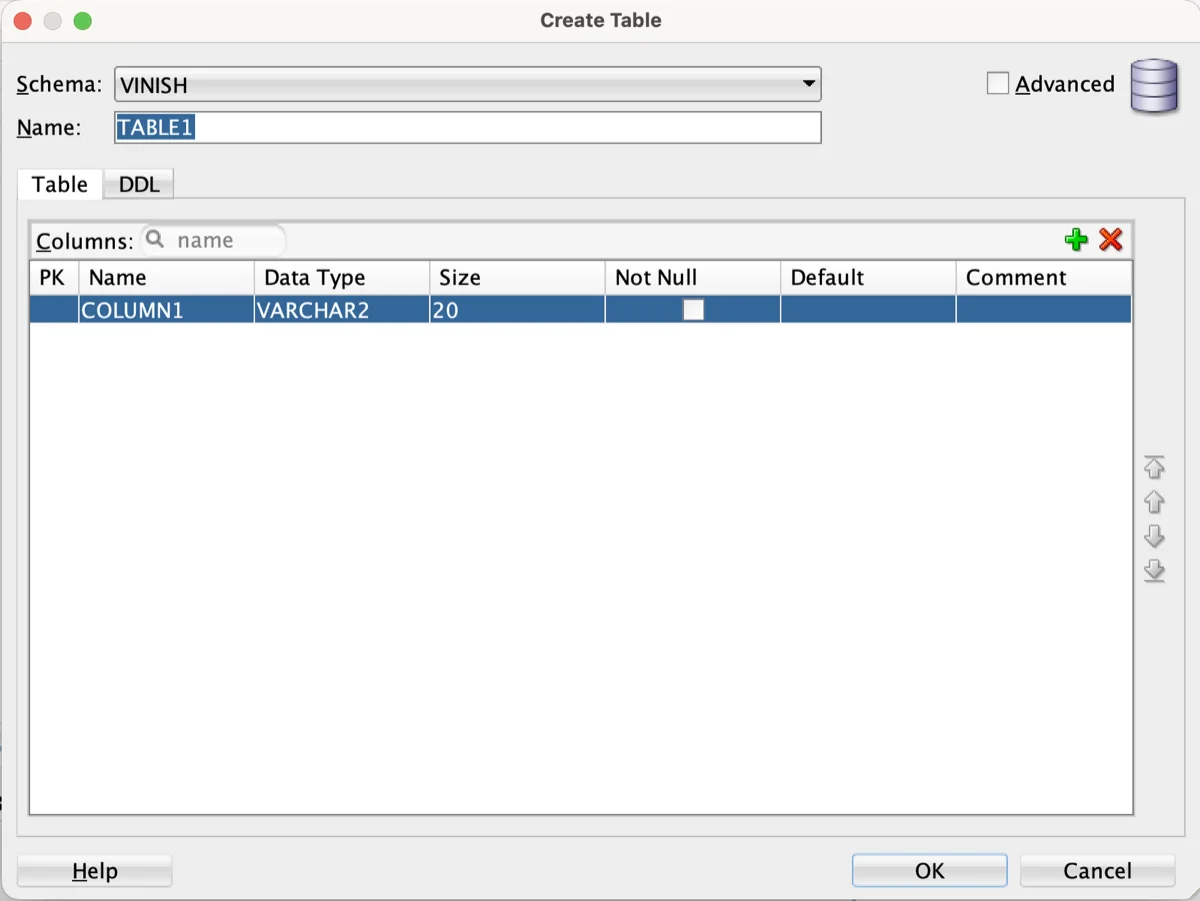
- In the Create Table dialog, enter the Table Name.
- Click the green plus (+) icon to add columns. For each column, specify the Name, Type (such as VARCHAR2, NUMBER, DATE), Size, and whether it can be NULL.
- Switch to the Primary Key tab to define your primary key. You can select an existing column or let Oracle auto-generate one.
- Use the Foreign Keys tab to add relationships to other tables.
- Use the Constraints tab to add CHECK constraints or UNIQUE constraints.
- Click the DDL tab to review the generated SQL before applying.
- Click OK to create the table.
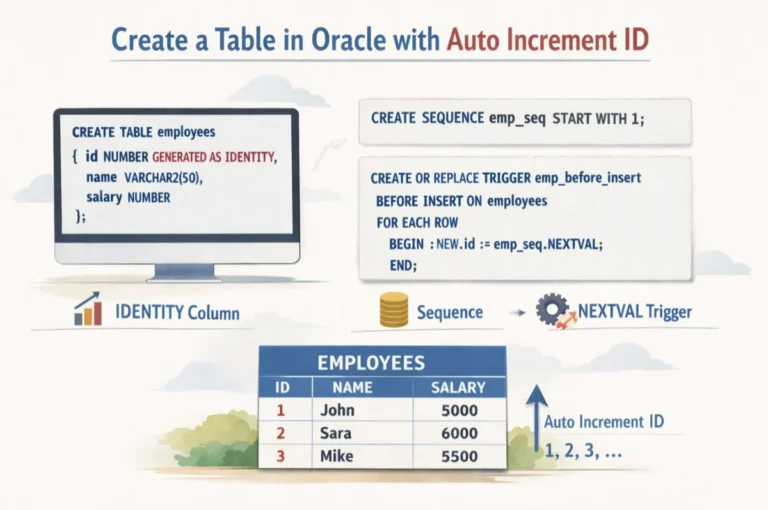
You can also create tables by writing DDL directly in the SQL Worksheet. Here is an example.
CREATE TABLE employees (
    employee_id   NUMBER GENERATED ALWAYS AS IDENTITY PRIMARY KEY,
    first_name    VARCHAR2(50) NOT NULL,
    last_name     VARCHAR2(50) NOT NULL,
    email         VARCHAR2(100),
    hire_date     DATE DEFAULT SYSDATE,
    salary        NUMBER(10,2)
);
Editing and Dropping Objects
To edit an existing object, right-click it in the navigator and select Edit. This opens the same dialog you used for creation, but pre-populated with the current definition. Make your changes and click OK.
To drop (delete) an object, right-click it and select Drop. SQL Developer will ask for confirmation. If the object has dependent objects, you may need to check "Cascade Constraints" to remove related foreign keys automatically.
Using the SQL Worksheet
The SQL Worksheet is where you spend most of your time in Oracle SQL Developer. It is a powerful editor for writing and executing SQL statements, PL/SQL blocks, and SQL scripts.
Opening the SQL Worksheet
There are multiple ways to open a SQL Worksheet.
- Click the Open SQL Worksheet icon in the main toolbar.
- Use the keyboard shortcut Ctrl+Shift+N (or Alt+F10).
- Go to File, then New, then SQL Worksheet.
- Double-click any existing connection in the Connections navigator.
Each worksheet is tied to a specific database connection. You can see which connection is active in the dropdown at the top right of the worksheet.
Writing and Running SQL Statements
Type your SQL statement in the editor area and execute it using one of these methods.
- Run Statement (Ctrl+Enter): Executes only the statement where your cursor is placed. Results appear in the Query Result tab below.
- Run Script (F5): Executes the entire contents of the worksheet as a script. Output appears in the Script Output tab below.
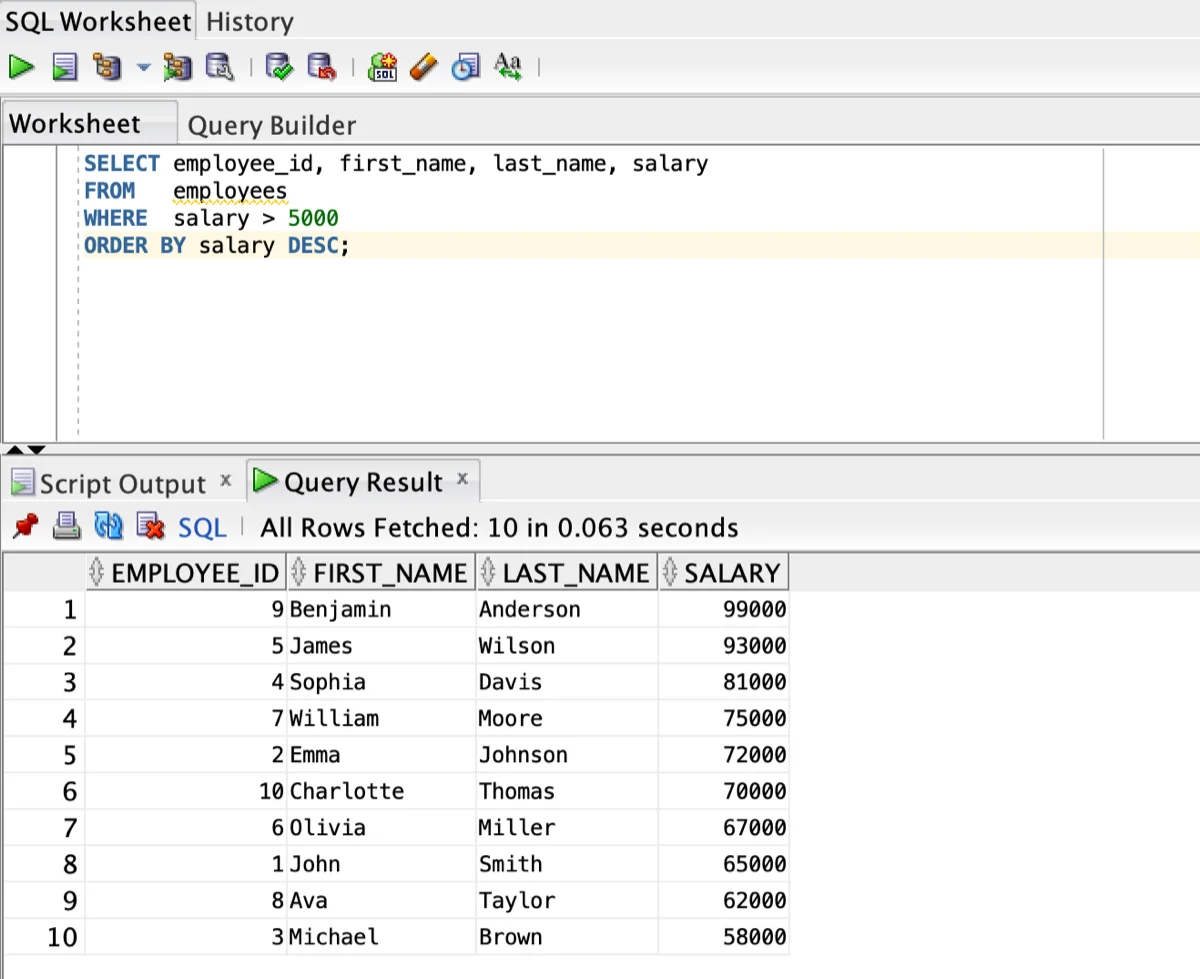
Here is a sample SELECT statement you can try.
SELECT employee_id, first_name, last_name, salary
FROM   employees
WHERE  salary > 5000
ORDER BY salary DESC;
The results grid below the editor displays your query output. You can sort columns by clicking the column headers. You can also filter results, export data, and adjust the number of rows fetched.
Running PL/SQL Blocks
You can execute anonymous PL/SQL blocks directly in the worksheet. Use the Run Script button (F5) for PL/SQL blocks. Here is an example that uses DBMS_OUTPUT to print a message.
SET SERVEROUTPUT ON;

BEGIN
    DBMS_OUTPUT.PUT_LINE('Hello from PL/SQL!');
    FOR rec IN (SELECT first_name FROM employees WHERE ROWNUM <= 5) LOOP
        DBMS_OUTPUT.PUT_LINE('Employee: ' || rec.first_name);
    END LOOP;
END;
/
Make sure the DBMS Output pane is enabled. Go to View, then DBMS Output, then click the green plus icon and select your connection. Your printed messages will appear in this pane.
Execution Plan and Autotrace
Understanding how Oracle executes your query is essential for performance tuning. SQL Developer offers two built-in tools for this.
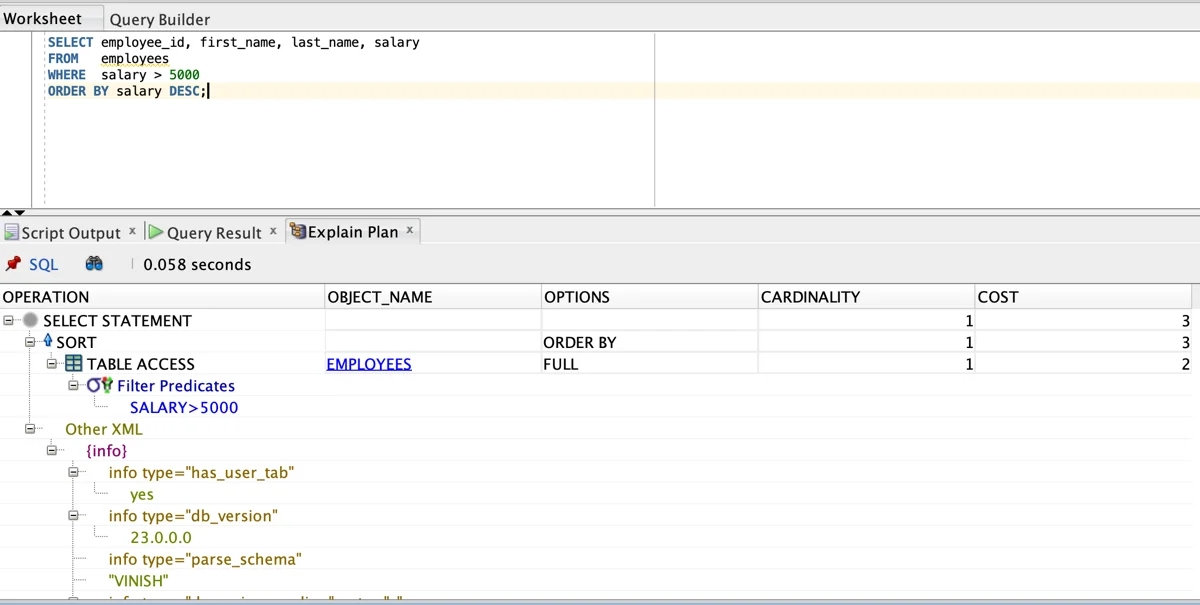
- Explain Plan (F10): Shows the execution plan the optimizer would use for your query without actually running it. Results appear in the Explain Plan tab.
- Autotrace (F6): Runs the query and shows both the execution plan and runtime statistics (such as consistent gets, physical reads, and sorts).
These features are invaluable when you need to optimize slow-running queries. You can compare plans before and after adding indexes or rewriting your SQL.
SQL Formatting
SQL Developer includes a built-in SQL formatter. Select your SQL code (or leave nothing selected to format the entire worksheet) and press Ctrl+Shift+F. The code is automatically reformatted with proper indentation and alignment.
You can customize the formatting rules under Tools, then Preferences, then Code Editor, then Format. Options include uppercase for keywords, indentation width, line breaks, and alignment preferences.
Code Completion (Completion Insight)
As you type in the SQL Worksheet, you can press Ctrl+Space to trigger Completion Insight. This feature suggests table names, column names, SQL keywords, and PL/SQL constructs based on your current context. It dramatically speeds up your coding.
Working with PL/SQL in SQL Developer
Oracle SQL Developer is one of the most capable IDEs for PL/SQL development. You can create, edit, compile, run, and debug stored procedures, functions, packages, and triggers with ease.
Creating a Stored Procedure
You can create a procedure through the navigator or the worksheet.
- Right-click the Procedures node under your connection.
- Select New Procedure.
- Enter the procedure name and define any parameters in the dialog.
- Click OK. SQL Developer opens a code editor tab pre-populated with a procedure skeleton.
- Write your logic inside the BEGIN...END block.
- Click the Compile button (or press Ctrl+Shift+F9) to compile the procedure.
If there are compilation errors, they appear in the Compiler - Log pane at the bottom. Click on any error to jump directly to the offending line in your code.
Running a Procedure or Function
To run a compiled procedure or function, right-click it in the navigator and select Run. SQL Developer opens a Run PL/SQL dialog that shows the parameters. Enter values for any IN parameters and click OK. The results appear in the Running - Log pane.
Debugging PL/SQL Code
SQL Developer includes a full PL/SQL debugger. To use it, follow these steps.
- Open the procedure or function you want to debug.
- Click Compile for Debug (the bug icon) instead of the regular Compile. This compiles the code with debug information included.
- Set breakpoints by clicking in the gutter (the gray margin to the left of the line numbers). A red dot appears at each breakpoint.
- Right-click the procedure and select Debug. Enter parameter values in the dialog and click OK.
- Execution pauses at your first breakpoint. Use the toolbar buttons to Step Over (F8), Step Into (F7), Step Out (Shift+F7), or Resume (F9).
- While paused, use the Data tab to inspect variable values. You can also add watch expressions.
To enable remote debugging for applications calling PL/SQL from external programs, go to Tools, then Preferences, then Debugger, and configure the remote debugging port.
Managing Data in Tables
SQL Developer makes it easy to view, edit, insert, and delete data directly without writing SQL.
Viewing and Editing Data
Click any table in the navigator and go to the Data tab. You will see the rows displayed in a grid format. To edit a cell, click on it, change the value, and then click the Commit Changes button (the green checkmark icon in the Data tab toolbar) to save. Click the Rollback button to undo pending changes.
To insert a new row, click the green plus icon in the Data tab toolbar. A blank row appears at the bottom. Fill in the values and Commit.
To delete a row, select it and click the red X icon. Then Commit the change.
Exporting Data
You can export data from any table or query result in multiple formats. Right-click on the data grid (or on a table in the navigator) and select Export. SQL Developer supports these export formats.
- CSV (Comma Separated Values)
- Excel (.xlsx)
- XML
- JSON
- SQL INSERT statements
- HTML
- Text (delimited or fixed-width)
This is extremely useful when you need to share data with non-technical stakeholders or export data into Excel for reporting purposes.
Importing Data
To import data into a table, right-click the table name in the navigator and select Import Data. SQL Developer supports importing from CSV, Excel, and other delimited file types. A wizard guides you through mapping file columns to table columns.
SQL Developer Preferences and Settings
You can fine-tune nearly every aspect of Oracle SQL Developer through its Preferences panel. Go to Tools, then Preferences to open it. Here are the most important categories.
Code Editor Settings
Under Code Editor, you will find settings that control your editing experience.
- Font: Change the editor font family and size. A popular choice is Consolas or JetBrains Mono at 14px.
- Display: Toggle line numbers, code folding margin, visible whitespace, and text antialiasing.
- Line Gutter: Show or hide line numbers (highly recommended to keep them on).
- Completion Insight: Enable or disable auto-completion, set the delay, and configure case matching behavior.
- Format: Customize how the SQL formatter handles keywords, indentation, and alignment.
Database Settings
Under Database, you can configure important connection behaviors.
- Worksheet: Set the default number of rows to fetch (the default is 50 and you can increase it). You can also choose whether to automatically commit after every DML statement (keep this off for safety).
- NLS (National Language Support): Set date format, timestamp format, number format, and language settings. A common US preference is to set the Date Format to YYYY-MM-DD HH24:MI:SS.
- ObjectViewer: Configure which tabs appear when you click on a table or other object in the navigator.
Environment Settings
Under Environment, you control the general look and feel.
- Look and Feel: Choose between the default Oracle look and several alternatives.
- Encoding: Set the default file encoding (UTF-8 is recommended).
- Log: Configure how many lines to keep in the log panes.
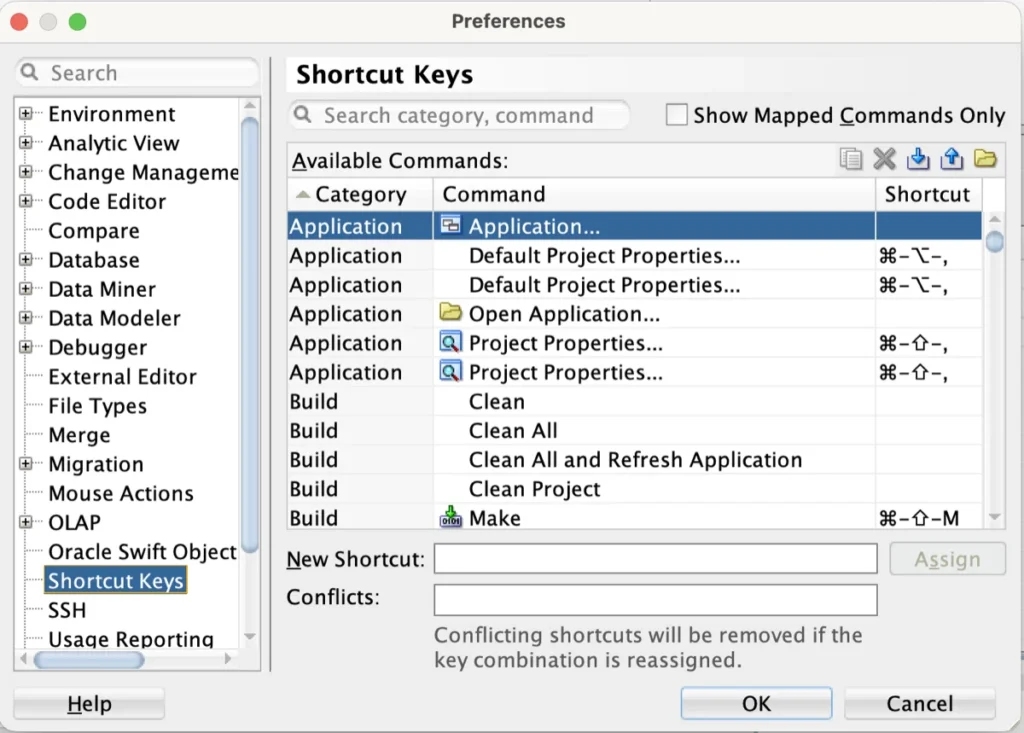
Shortcut Keys
Under Shortcut Keys (found under Tools, then Preferences), you can view and customize every keyboard shortcut. You can search for any action by name and assign your preferred key combination. This is perfect if you are coming from another IDE and want to keep familiar shortcuts.
Using DBA Features in SQL Developer
Oracle SQL Developer includes a built-in DBA panel that gives database administrators a graphical interface for common administrative tasks. This is available for Oracle Database 12c and later connections.
Accessing the DBA Panel
Go to View, then DBA to open the DBA navigator. Then click the green plus icon and select a connection to add. Once added, you can expand the connection to see administrative categories.
- Data Pump: Run Export and Import operations using Oracle Data Pump.
- RMAN (Recovery Manager): Configure and run database backup and recovery operations.
- Security: Manage users, roles, and profiles. You can create new users, grant privileges, and manage password policies here.
- Storage: View and manage tablespaces, datafiles, temp files, undo management, and redo log groups.
- Oracle Scheduler: Create and manage scheduled jobs, programs, schedules, and job chains.
- Resource Manager: Configure database resource plans.
Managing Users
Under Security, then Users, you can see all database users. Right-click to create a new user. In the Create User dialog, you can set the username, password, default and temporary tablespaces, and quota. Switch to the Granted Roles tab to assign roles like CONNECT and RESOURCE. Switch to System Privileges to grant specific privileges like CREATE TABLE or CREATE SESSION.
Working with the Data Modeler
Oracle SQL Developer includes a built-in Data Modeler that lets you design database schemas visually. Go to View, then Data Modeler, then Browser to access it.
You can create entity-relationship diagrams, generate DDL from your designs, and reverse-engineer existing databases into visual models. This is particularly useful during the planning phase of new projects or when documenting existing database architectures.
Database Migration from Third-Party Databases
One of the standout features of Oracle SQL Developer is its ability to migrate databases from third-party systems to Oracle. Supported source databases include Microsoft SQL Server, MySQL, Sybase Adaptive Server, and IBM DB2.
The migration wizard walks you through the entire process.
- Create a connection to the source (third-party) database.
- Go to Tools, then Migration, then Migrate.
- Follow the wizard steps to capture the source schema, convert data types, and generate Oracle DDL.
- Review the converted objects and resolve any issues flagged by the tool.
- Deploy the migrated objects to your Oracle target database.
- Move the data using the built-in data move utilities.
Version Control Integration
SQL Developer supports integration with popular version control systems directly within the IDE.
- Git: Go to Versioning, then Git to initialize repositories, stage files, commit, push, pull, and manage branches.
- Subversion (SVN): Go to Versioning, then Subversion for SVN operations.
This is essential for teams that version-control their database scripts, packages, and migration files. You can pair this with good code review practices to maintain high-quality database code.
Using the Cart for Deployment
The Cart is a unique feature that lets you collect database objects from different connections and generate deployment scripts. Go to View, then Cart to open it.
Drag and drop objects (tables, views, packages, etc.) from the Connections navigator into the Cart. Once your Cart contains all the objects you need, click Export Cart to generate a SQL script that recreates those objects. This is perfect for deploying schema changes across environments like development, staging, and production.
SQL Developer Reports
SQL Developer comes with a rich set of pre-built reports that provide valuable insights about your database.
Accessing Built-in Reports
Go to View, then Reports to open the Reports navigator. The built-in reports are organized into categories.
- About Your Database: Reports on database version, parameters, NLS settings, and sessions.
- Data Dictionary Reports: Information about tables, indexes, constraints, triggers, and more.
- PL/SQL Reports: Details about packages, procedures, functions, and compilation errors.
- Security Reports: User privileges, roles, and auditing information.
- ASH and AWR Reports: Active Session History and Automated Workload Repository reports for performance analysis (requires Diagnostic Pack license).
Creating User-Defined Reports
You can also create your own custom reports. Right-click the User Defined Reports node in the Reports navigator and select New Report. Give it a name, write the SQL query, and save. Your custom report becomes available under the User Defined Reports folder for any connection.
Oracle REST Data Services (ORDS) Support
SQL Developer provides a convenient platform for installing, configuring, and managing Oracle REST Data Services. You can RESTful-enable your database tables and views directly from within the tool. This is particularly useful if you are building web applications that consume Oracle data through REST APIs.
Tips and Best Practices for Oracle SQL Developer
After years of use by database professionals worldwide, certain practices have proven to make the tool even more effective.
- Save your connections: Use File, then Export Connections to save a connection XML file as a backup. You can import it later on a new machine.
- Use Snippets: Go to View, then Snippets for a library of reusable code fragments. You can also create your own custom snippets.
- Set NLS preferences early: Configure your date and number formats under Preferences, then Database, then NLS to avoid confusion with date formats.
- Use the SQL History: SQL Developer keeps a history of every statement you execute. Press F8 or go to View, then SQL History to search through past queries.
- Enable line numbers: Always turn on line numbers in the editor under Preferences, then Code Editor, then Line Gutter.
- Learn the shortcuts: Memorize Ctrl+Enter (run statement), F5 (run script), and Ctrl+Shift+F (format SQL). These three alone will save you significant time.
Troubleshooting Common Issues
Here are solutions to some frequently encountered problems.
| Issue | Solution |
|---|---|
| SQL Developer won't start | Check that you have a compatible JDK installed. Verify the JDK path in the product.conf file located in the SQL Developer user directory. |
| Cannot connect to database | Verify the hostname, port, and service name. Ensure the Oracle Listener is running on the database server. Test the connection by running: tnsping your_service_name from the command line. |
| ORA-12505: TNS listener does not currently know of SID | Switch from SID to Service Name in your connection settings. This is the most common cause of this error. |
| Slow performance with large result sets | Reduce the number of rows fetched per page in Preferences, then Database, then Worksheet. Use WHERE clauses or ROWNUM to limit results. |
| Fonts look blurry on high-DPI displays | Update the sqldeveloper.conf file to add JVM scaling flags for HiDPI support. |
Comparing Oracle SQL Developer with Other Tools
You might be wondering how Oracle SQL Developer stacks up against other popular database IDEs. Here is a quick comparison to help you decide.
| Feature | Oracle SQL Developer | DBeaver | Toad for Oracle |
|---|---|---|---|
| Price | Free | Free (Community) | Paid (commercial license) |
| Oracle-specific features | Excellent (built by Oracle) | Good | Excellent |
| PL/SQL debugger | Built-in | Limited | Built-in |
| Data Modeler | Built-in | Available (Pro) | Separate product |
| Multi-database support | Limited (migration focus) | Extensive (80+ databases) | Oracle-focused |
| DBA features | Comprehensive | Basic | Comprehensive |
Oracle SQL Developer is the natural choice if you work exclusively with Oracle databases. It is free, officially supported by Oracle, and deeply integrated with the Oracle ecosystem.
Conclusion
Oracle SQL Developer is a feature-rich, free IDE that covers virtually every need of an Oracle database developer or administrator. From downloading and installing it in minutes, to creating connections, browsing schemas, writing optimized SQL, debugging PL/SQL, managing users, and even migrating third-party databases, it delivers a complete toolkit under one roof. Take the time to explore its preferences, learn its keyboard shortcuts, and experiment with features like the Data Modeler and the DBA panel. Once you do, you will find it hard to imagine working with Oracle databases without it.