In this tutorial, you will learn which version of Python to choose for download and how to install it on Windows 10. Also, I am giving an example to download, install and configure PyCharm IDE on Windows 10. By setting up all this, you would be able to develop and run Python applications efficiently. Follow these steps to perform the tasks.
1. Download Python on Windows 10
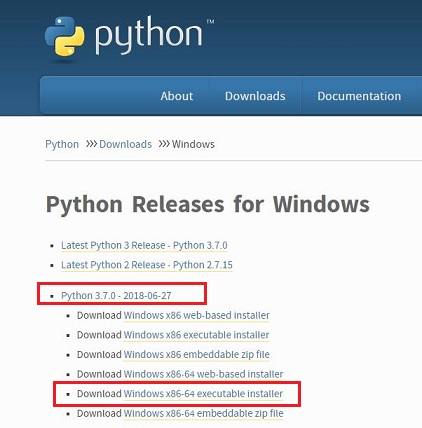
- Click on the following link to download the Python for Windows Download Python for Windows 10, and you can select any one of the following, as shown in the below image. The latest version of Python is 3.7 as of August 2018. I chose the Windows x86-64 executable installer for the installation.

2. Install Python 3.7 on Windows 10
- After completing the download, run the executable to start the installation for Python 3.7 on Windows 10. The first installation screen will display as shown in the below image. Select the check-boxes for install launcher for all users and Add Python 3.7 to PATH and click on the Customize installation option.

- The installation customization screen will appear, as shown in below image. You can select all options and then Click on the Next button.

- Specify the location of installation for Python, and select the check-boxes as per your need. Then click on the Install button.

- The installation will be complete, and it will show the successful installation screen, as shown in the below image.

3. Run Python 3.7 IDE
- You can now run the Python 3.7 IDE on your computer by clicking on the Start menu > Python 3.7 > IDLE (Python 3.7 64 bit) option. The screen will open as shown in the below image.

4. Download PyCharm IDE on Windows 10
- You can now start building your Python applications from the above IDE, but there is also a good IDE called PyCharm to build applications more efficiently in Python. To download PyCharm click on the following link Download PyCharm. You can select the any one of the following options, showing in the image. I chose the community version because it is free.

5. Install PyCharm on Windows 10
- After completing the download, run the executable to start the installation of PyCharm on Windows 10 PC. The screen will display as shown below. Click on the Next button to continue.

- Specify the installation location for PyCharm IDE and click on the Next button.

- Then select the PyCharm installation options as shown below and click on the Next button to continue.

- Then choose the installation folder for Start Menu shortcuts and click on the Install button.

- Now the installation will complete for the PyCharm IDE.
6. Run PyCharm IDE
- To run PyCharm, click on the Start Menu > JetBrains > JetBrains PyCharm Community Edition. The following screen will appear. Scroll down the agreement page and then click on the Accept button to continue.

- The Customize PyCharm screen will appear, select the theme and click on the Next button.

- Then download and install plugin screen will appear you can install the plugins as per your need and then click on the Start Using PyCharm button to continue.

- Then click on the Create New Project button to create your first project in PyCharm, as shown in the below image.

- Specify the location for your Python Project and the environment, as shown in the below image. As you can see in the below picture, the Base Interpreter is auto selected for your Python 3.7 installation location. But if not, then choose the location of your Python 3.7 installation. Then click on the Create button to continue.

- Then your first PyCharm project window will open, and you can start building your Python programs. The below is an example of Python Hello World program.

See also:
- How to Install MongoDB Compass on Windows 10

